
How to set up SMS or voice with your own telecom provider in Microsoft Entra
On this page
Bring your own SMS and voice provider to Microsoft Entra ID: setting up Soprano#
Microsoft is retiring Microsoft-provided SMS and voice authentication. If you still have users who genuinely need telephony, whether for regulatory reasons, shared devices, or field staff without smartphones, there is now one supported path: Choose Your Own Telephony Provider (CYOT), generally available since October 30, 2026.
You buy a provider offer in the Microsoft Security Store, deploy an Azure Function in your own subscription, and Entra routes the one-time passcodes through it. Entra still generates and validates the OTP. You only take over delivery.
I ran this end to end with Soprano on the pay-per-transaction offer. This post walks through the setup, the wizard prompt by prompt, and what actually lands in your tenant and Azure subscription. If you pick another provider, the steps will be similar, so this guide will help you configure it. During private preview, I randomly picked Soprano, so I am sticking with it for now. I might explore the other providers in the future. For my lab, a per-transaction subscription works best. I won’t go too deep into costs at this moment.
What do you need?#
- A Microsoft Entra workforce tenant.
- An Azure subscription with a valid payment method to host the integration and subscribe to your telecom provider.
- Azure Cloud Shell in PowerShell mode (recommended), or PowerShell 7.0+ with Azure CLI 2.61+ for integration deployment.
- A test user with a phone number registered for SMS or voice authentication.
Permissions#
| Task | Needed |
|---|---|
| Create the app registration | Rights to register applications |
| Deploy the Azure resources | Subscription Owner, or Contributor plus RBAC Administrator |
| Grant the directory permissions | Privileged Role Administrator |
| Create the authentication profile | Authentication Policy Administrator |
Note: Before you continue, think ahead and make a choice. Authentication runs through an Entra ID app registration. That’s the key part in linking your telecom subscription to your tenant, and your provider will ask for it after you buy your new subscription.
You have two options, and the choice changes a couple of the wizard prompts later. Decide now rather than at the prompt.
Option 1: create it yourself first#
If you want tight control over your app registration, create it yourself first.
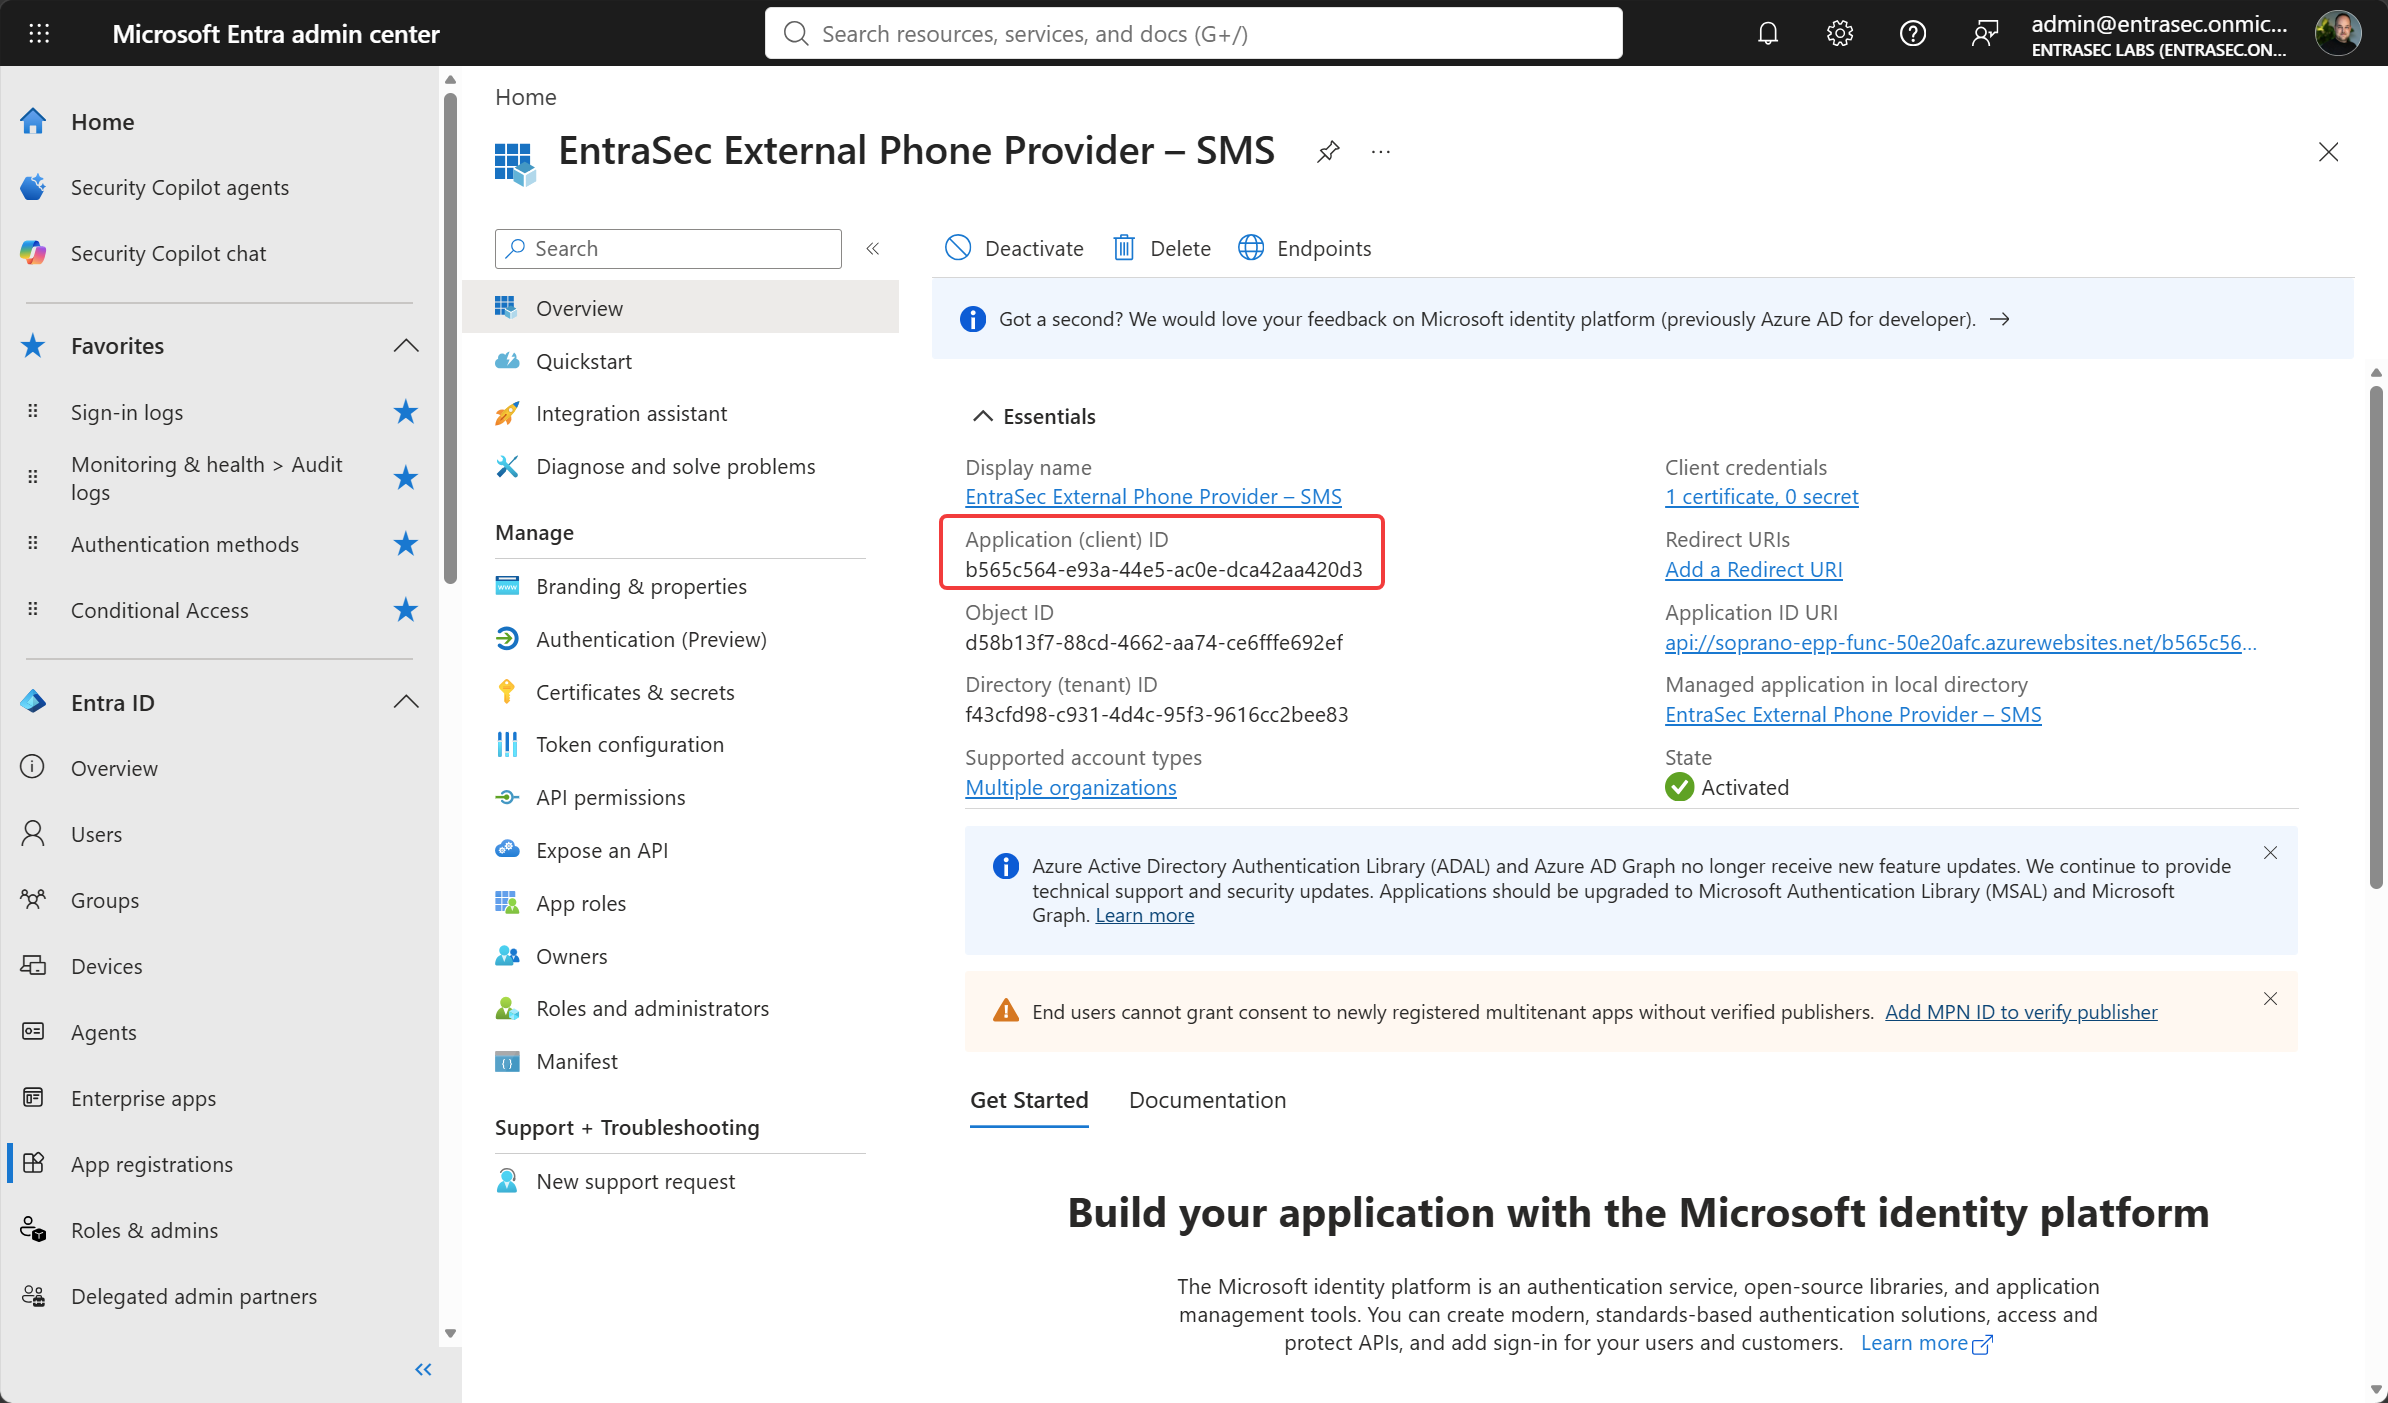
Go to App registrations > New registration, give it a name, set Supported account types to Accounts in this organizational directory only (Single tenant), and leave the redirect URI empty. That is the whole job: no secret, no API permissions, nothing else. The script adds what it needs, including switching the app to multi-tenant with a tenant allowlist, and the deployment plan shows that change before you approve it.
If you go this route, note down the App ID. You will need it in step 2 when running the script.
Option 2: let the wizard create it#
This option has fewer moving parts and is the default. Choose Create a new application at the Application prompt, give it a display name, and it is registered only after you approve the plan at the end.
This is perfectly fine for a lab or a first run. Avoid it if you run app management policies, and remember that the client ID it generates is the one your provider has to authorise. If you later rebuild with a different app, you are back in your provider’s portal.
Note: Whether you create it yourself or let the wizard do it, check your Entra application policies first:
The script registers a 12-month certificate on the app registration, and that lifetime is hard-coded with no parameter to change it. If you run
app management policies, check them before you start, because a restriction on certificate lifetime or identifier URIs will make the script fail partway through. Exemptions attach to an app that already exists, so you may need to register the app yourself first and pass -ApplicationId.
Let’s start, shall we?#
Time to get started. Everything runs from one page. Go to Entra ID > Authentication methods > Policies and select Add telecom profile in the toolbar next to Add external multifactor authentication.
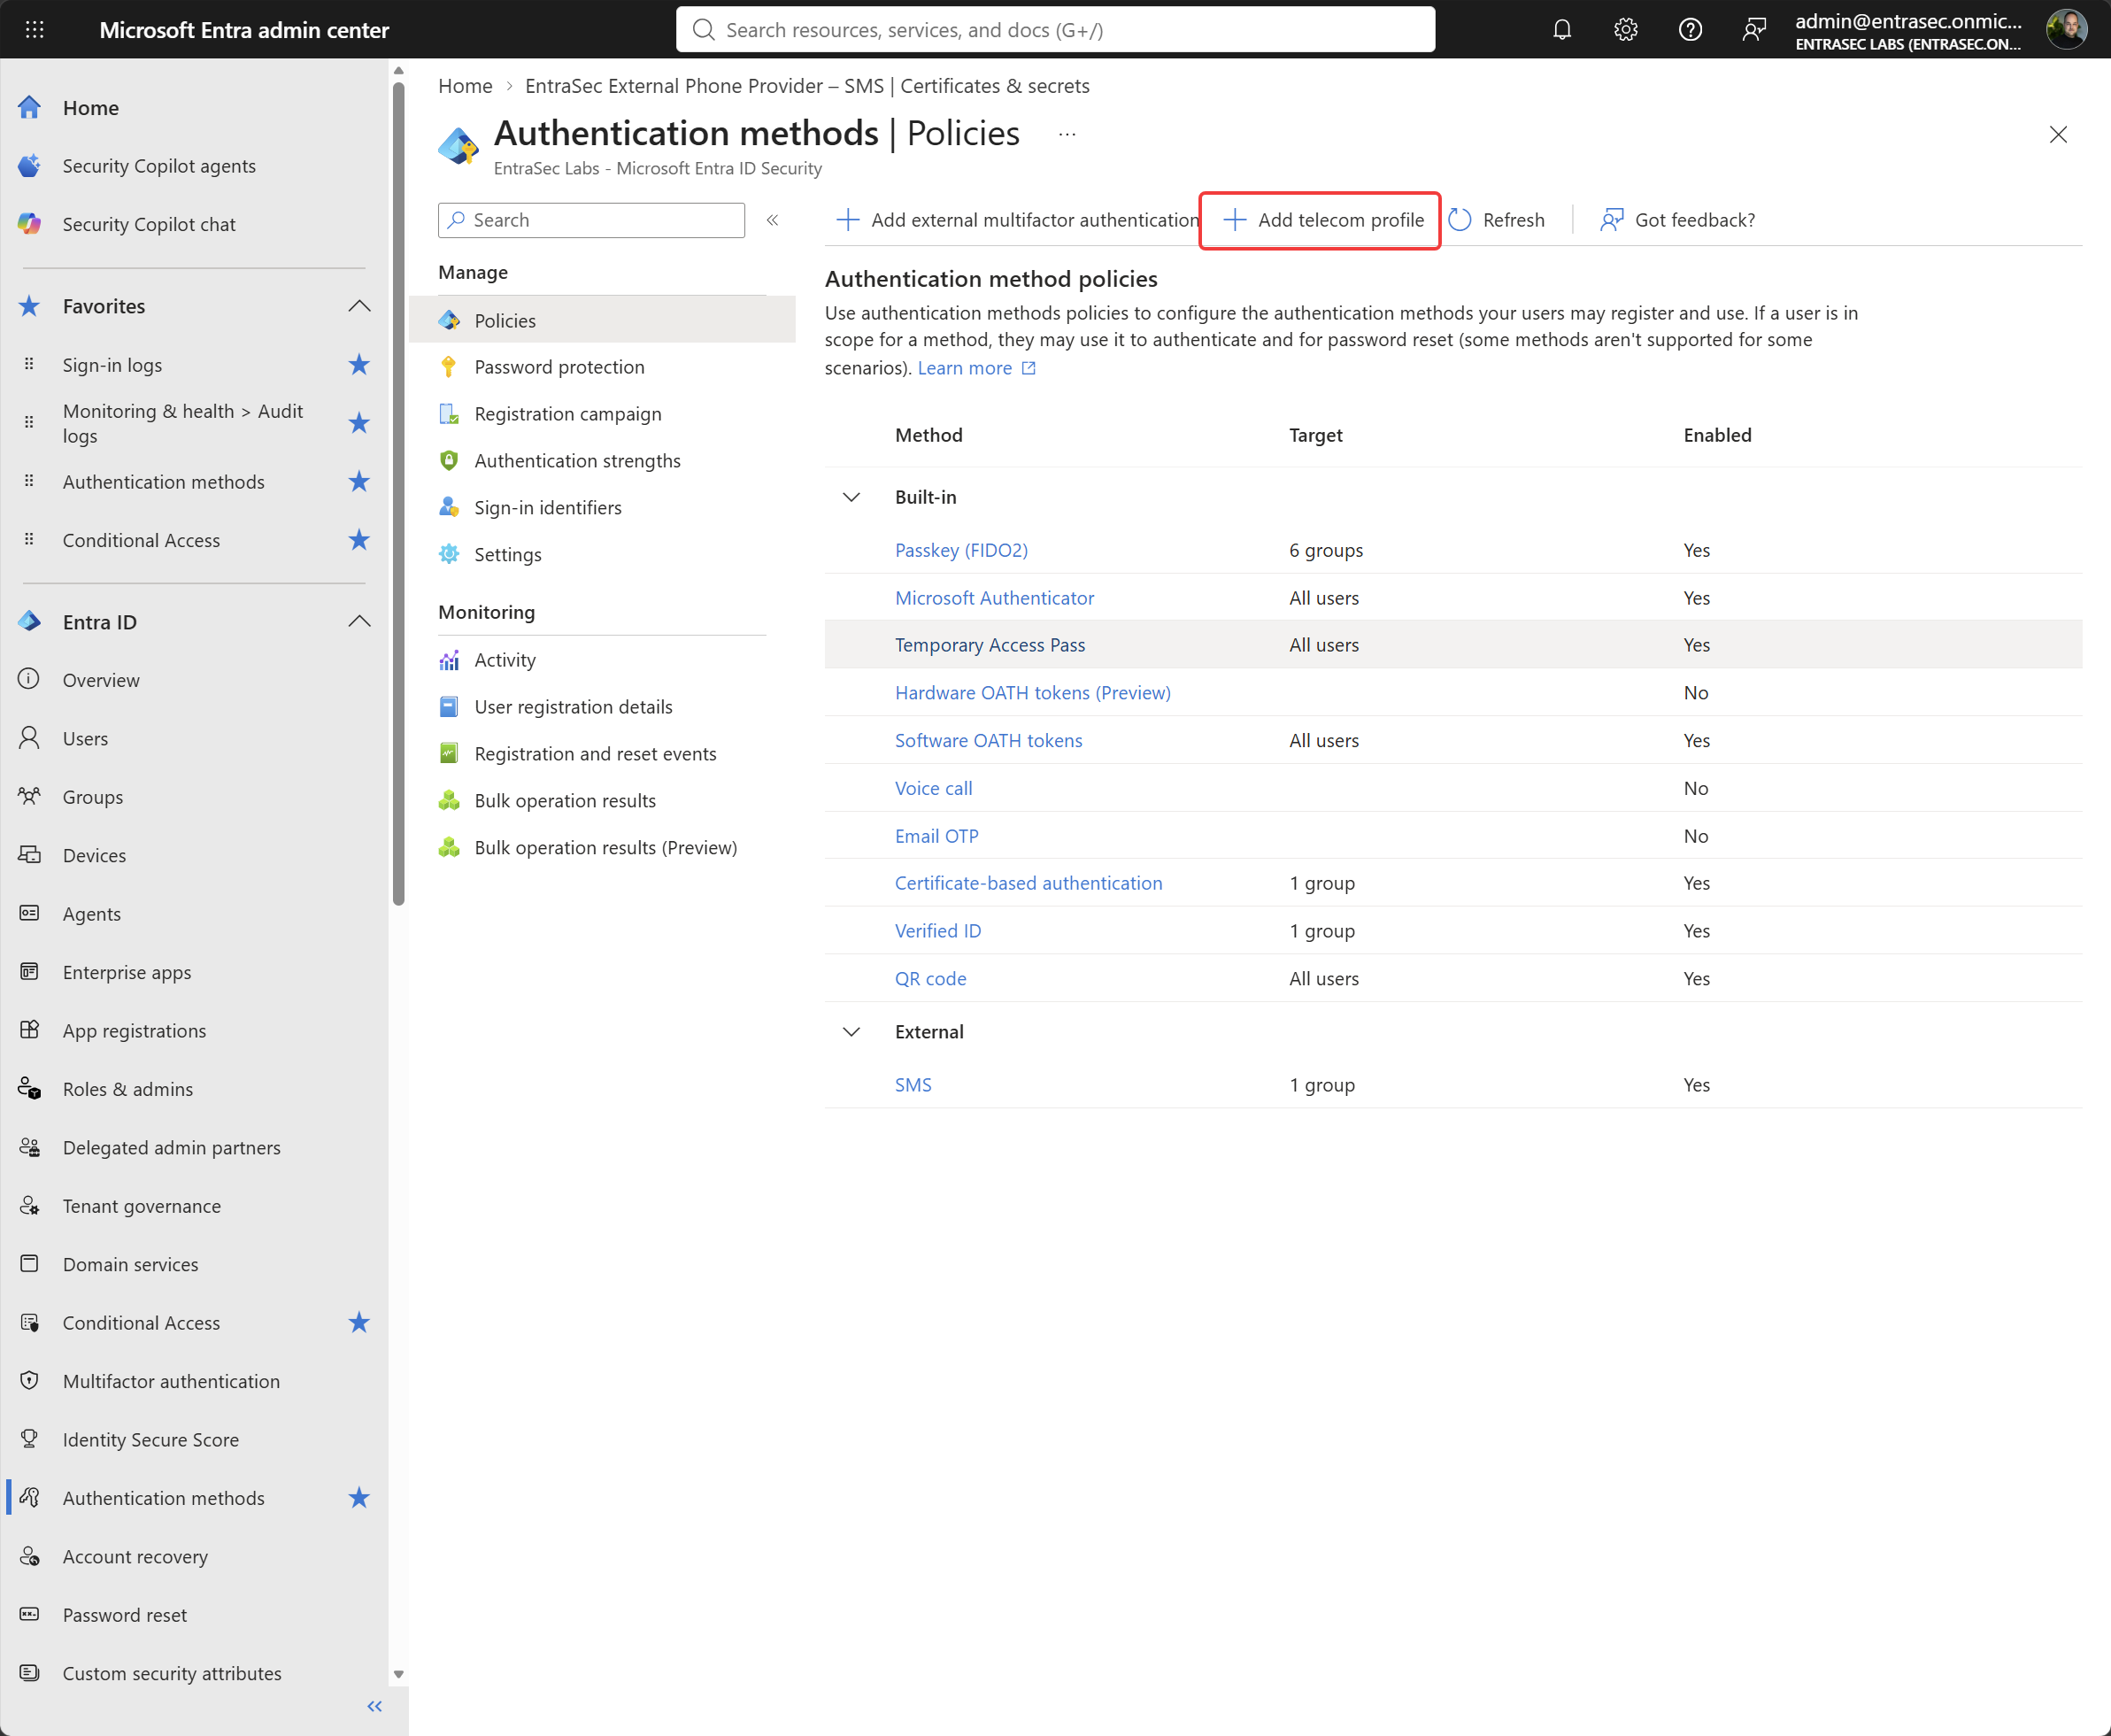
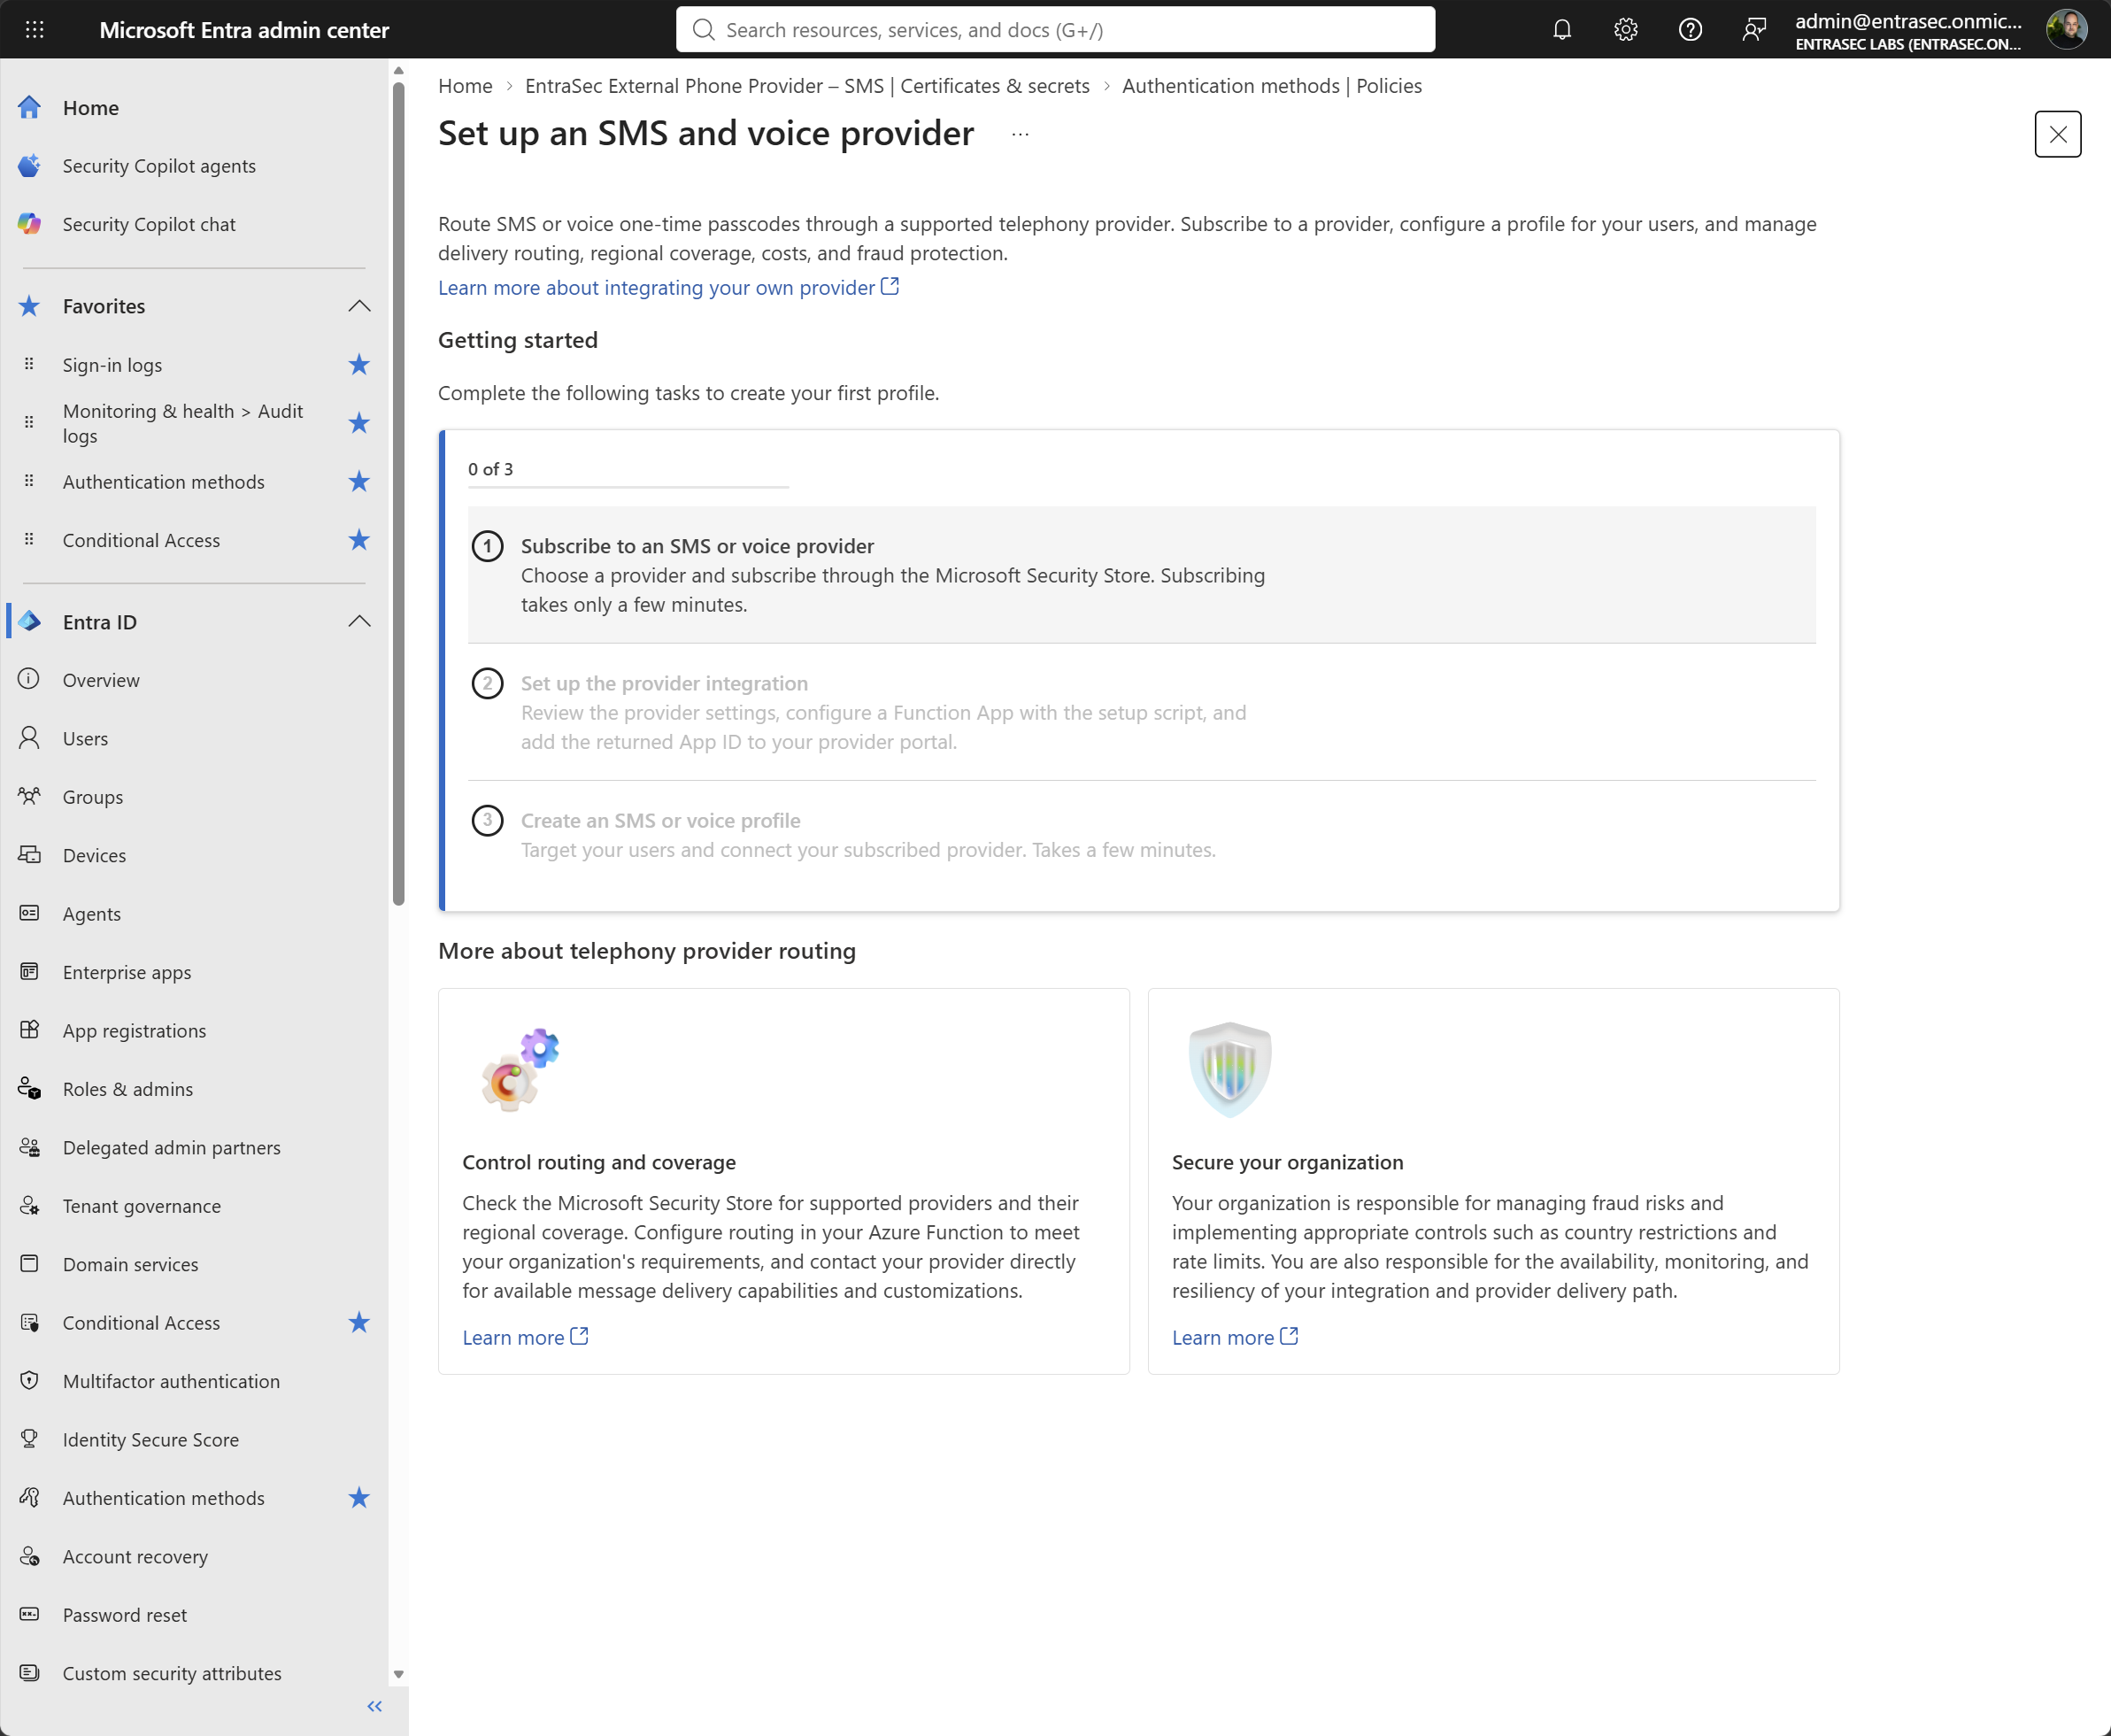
That opens Set up an SMS and voice provider, which tracks three tasks and shows your progress as “0 of 3”:
- Subscribe to an SMS or voice provider. Choose a provider and subscribe through Microsoft Security Store.
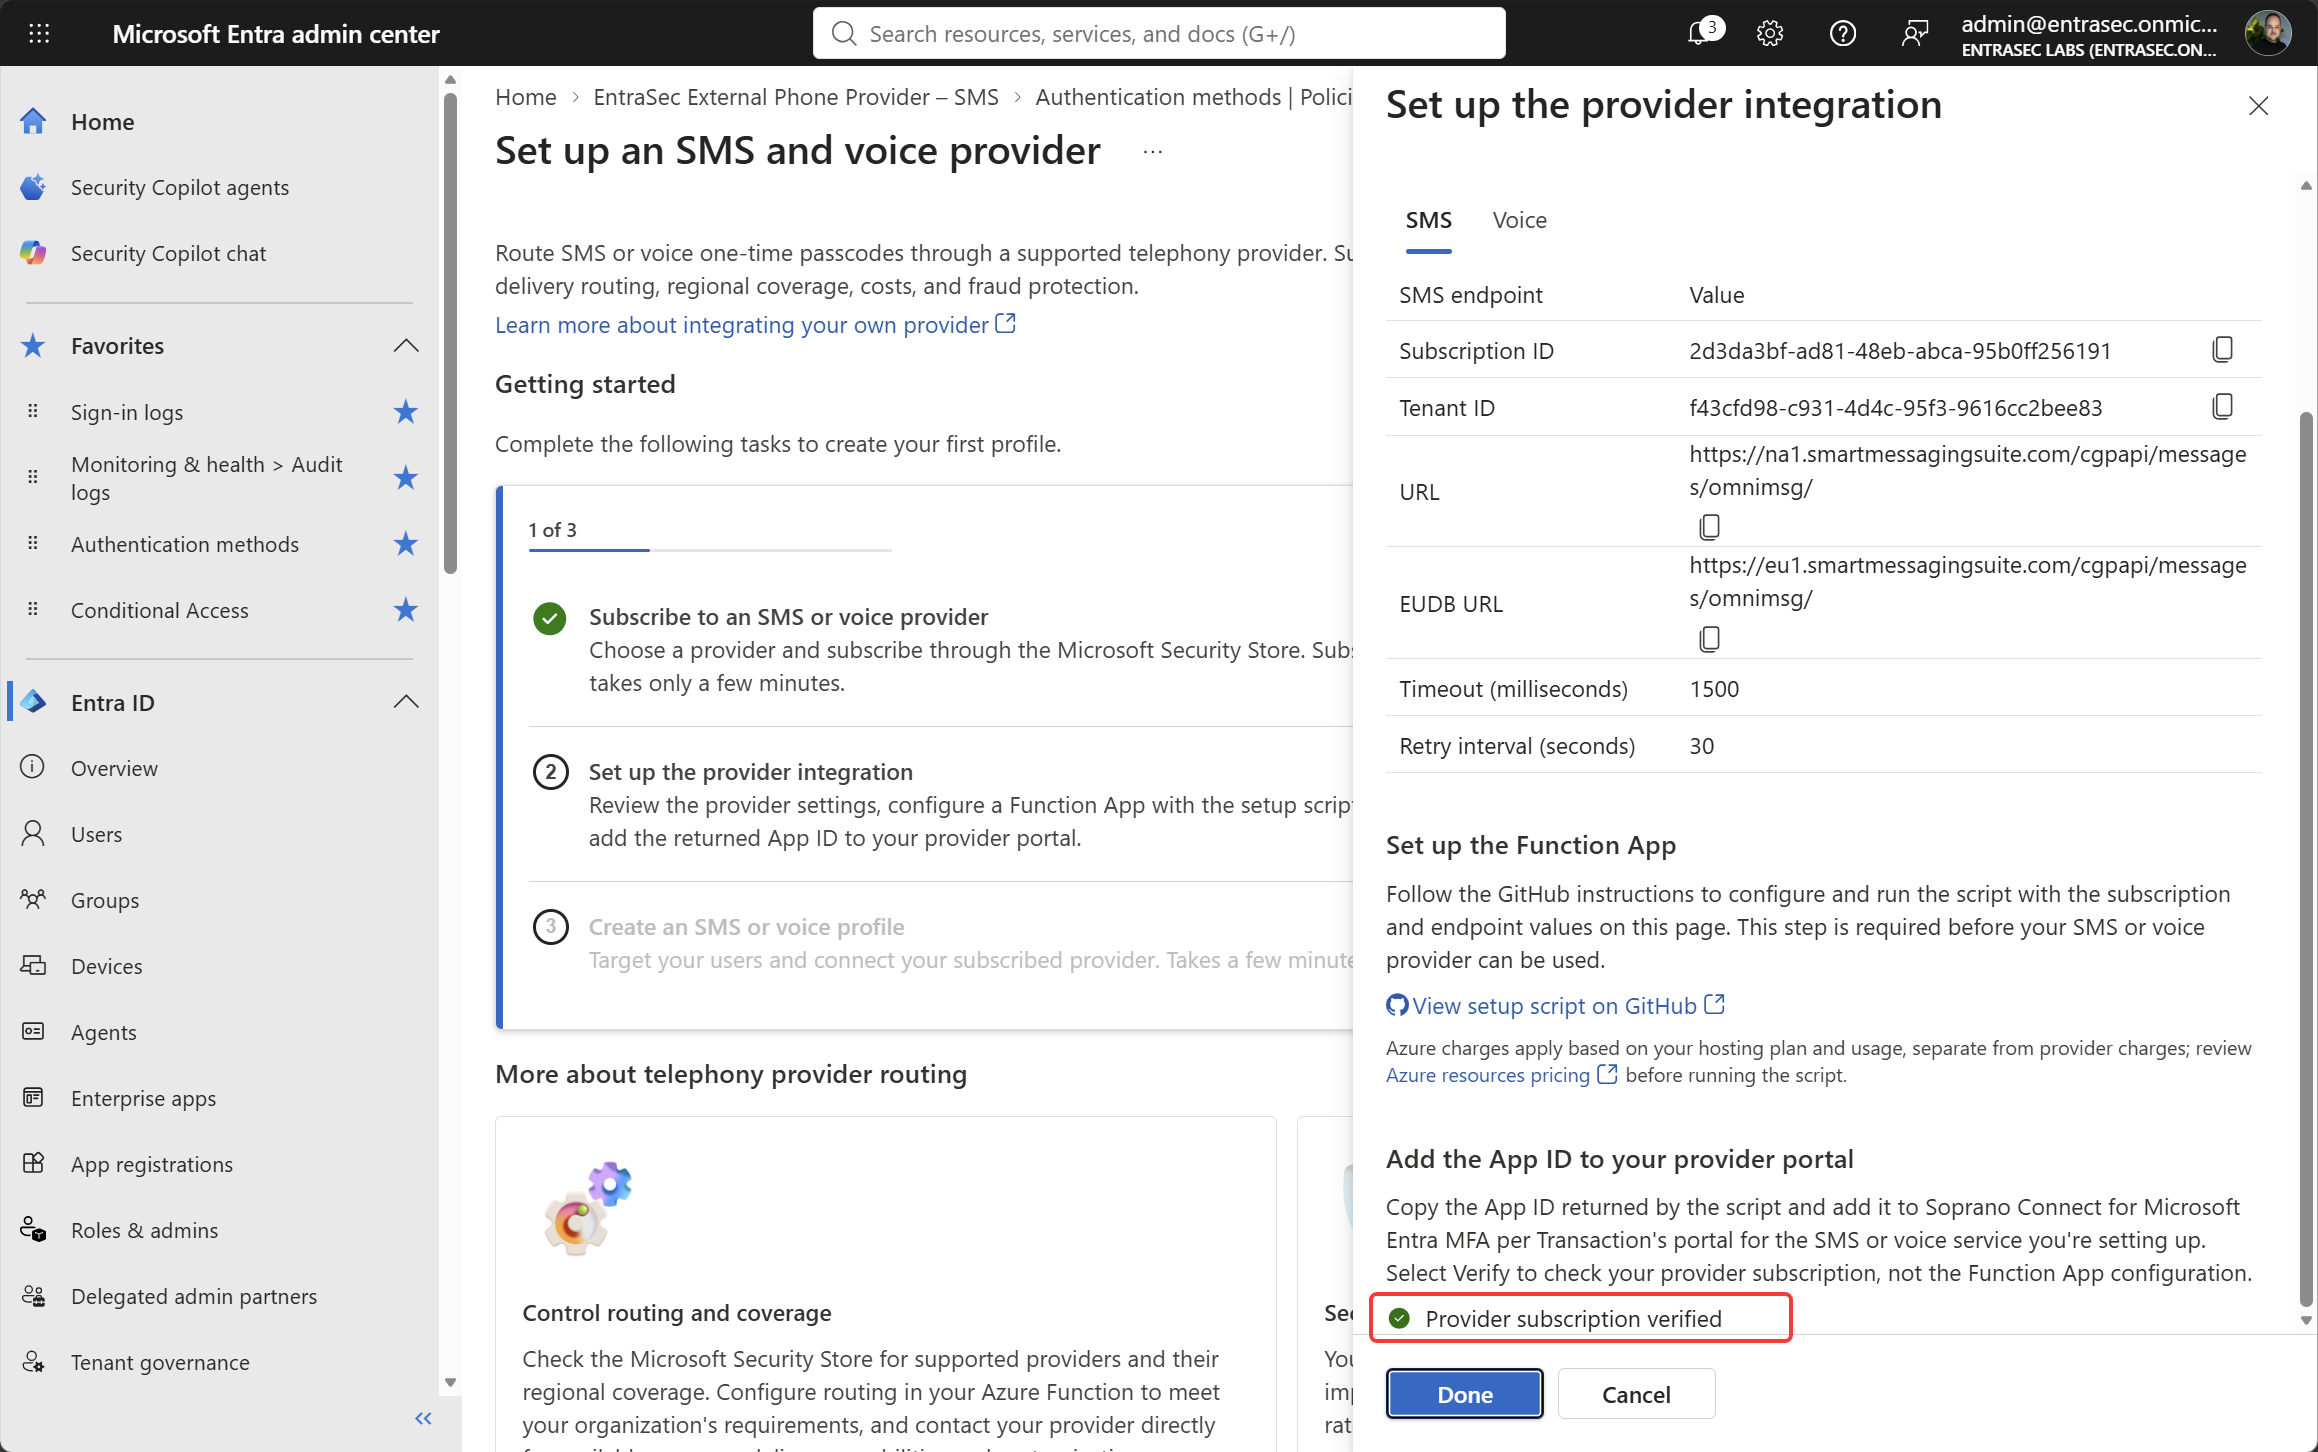
- Set up the provider integration. Review the provider settings, configure a Function App with the setup script, and add the returned App ID to your provider portal.
- Create an SMS or voice profile. Target your users and connect your subscribed provider.
Start by buying a subscription from the Microsoft Security Store. The wizard will take you there, but you can also go directly to https://securitystore.microsoft.com/ and buy it from there.
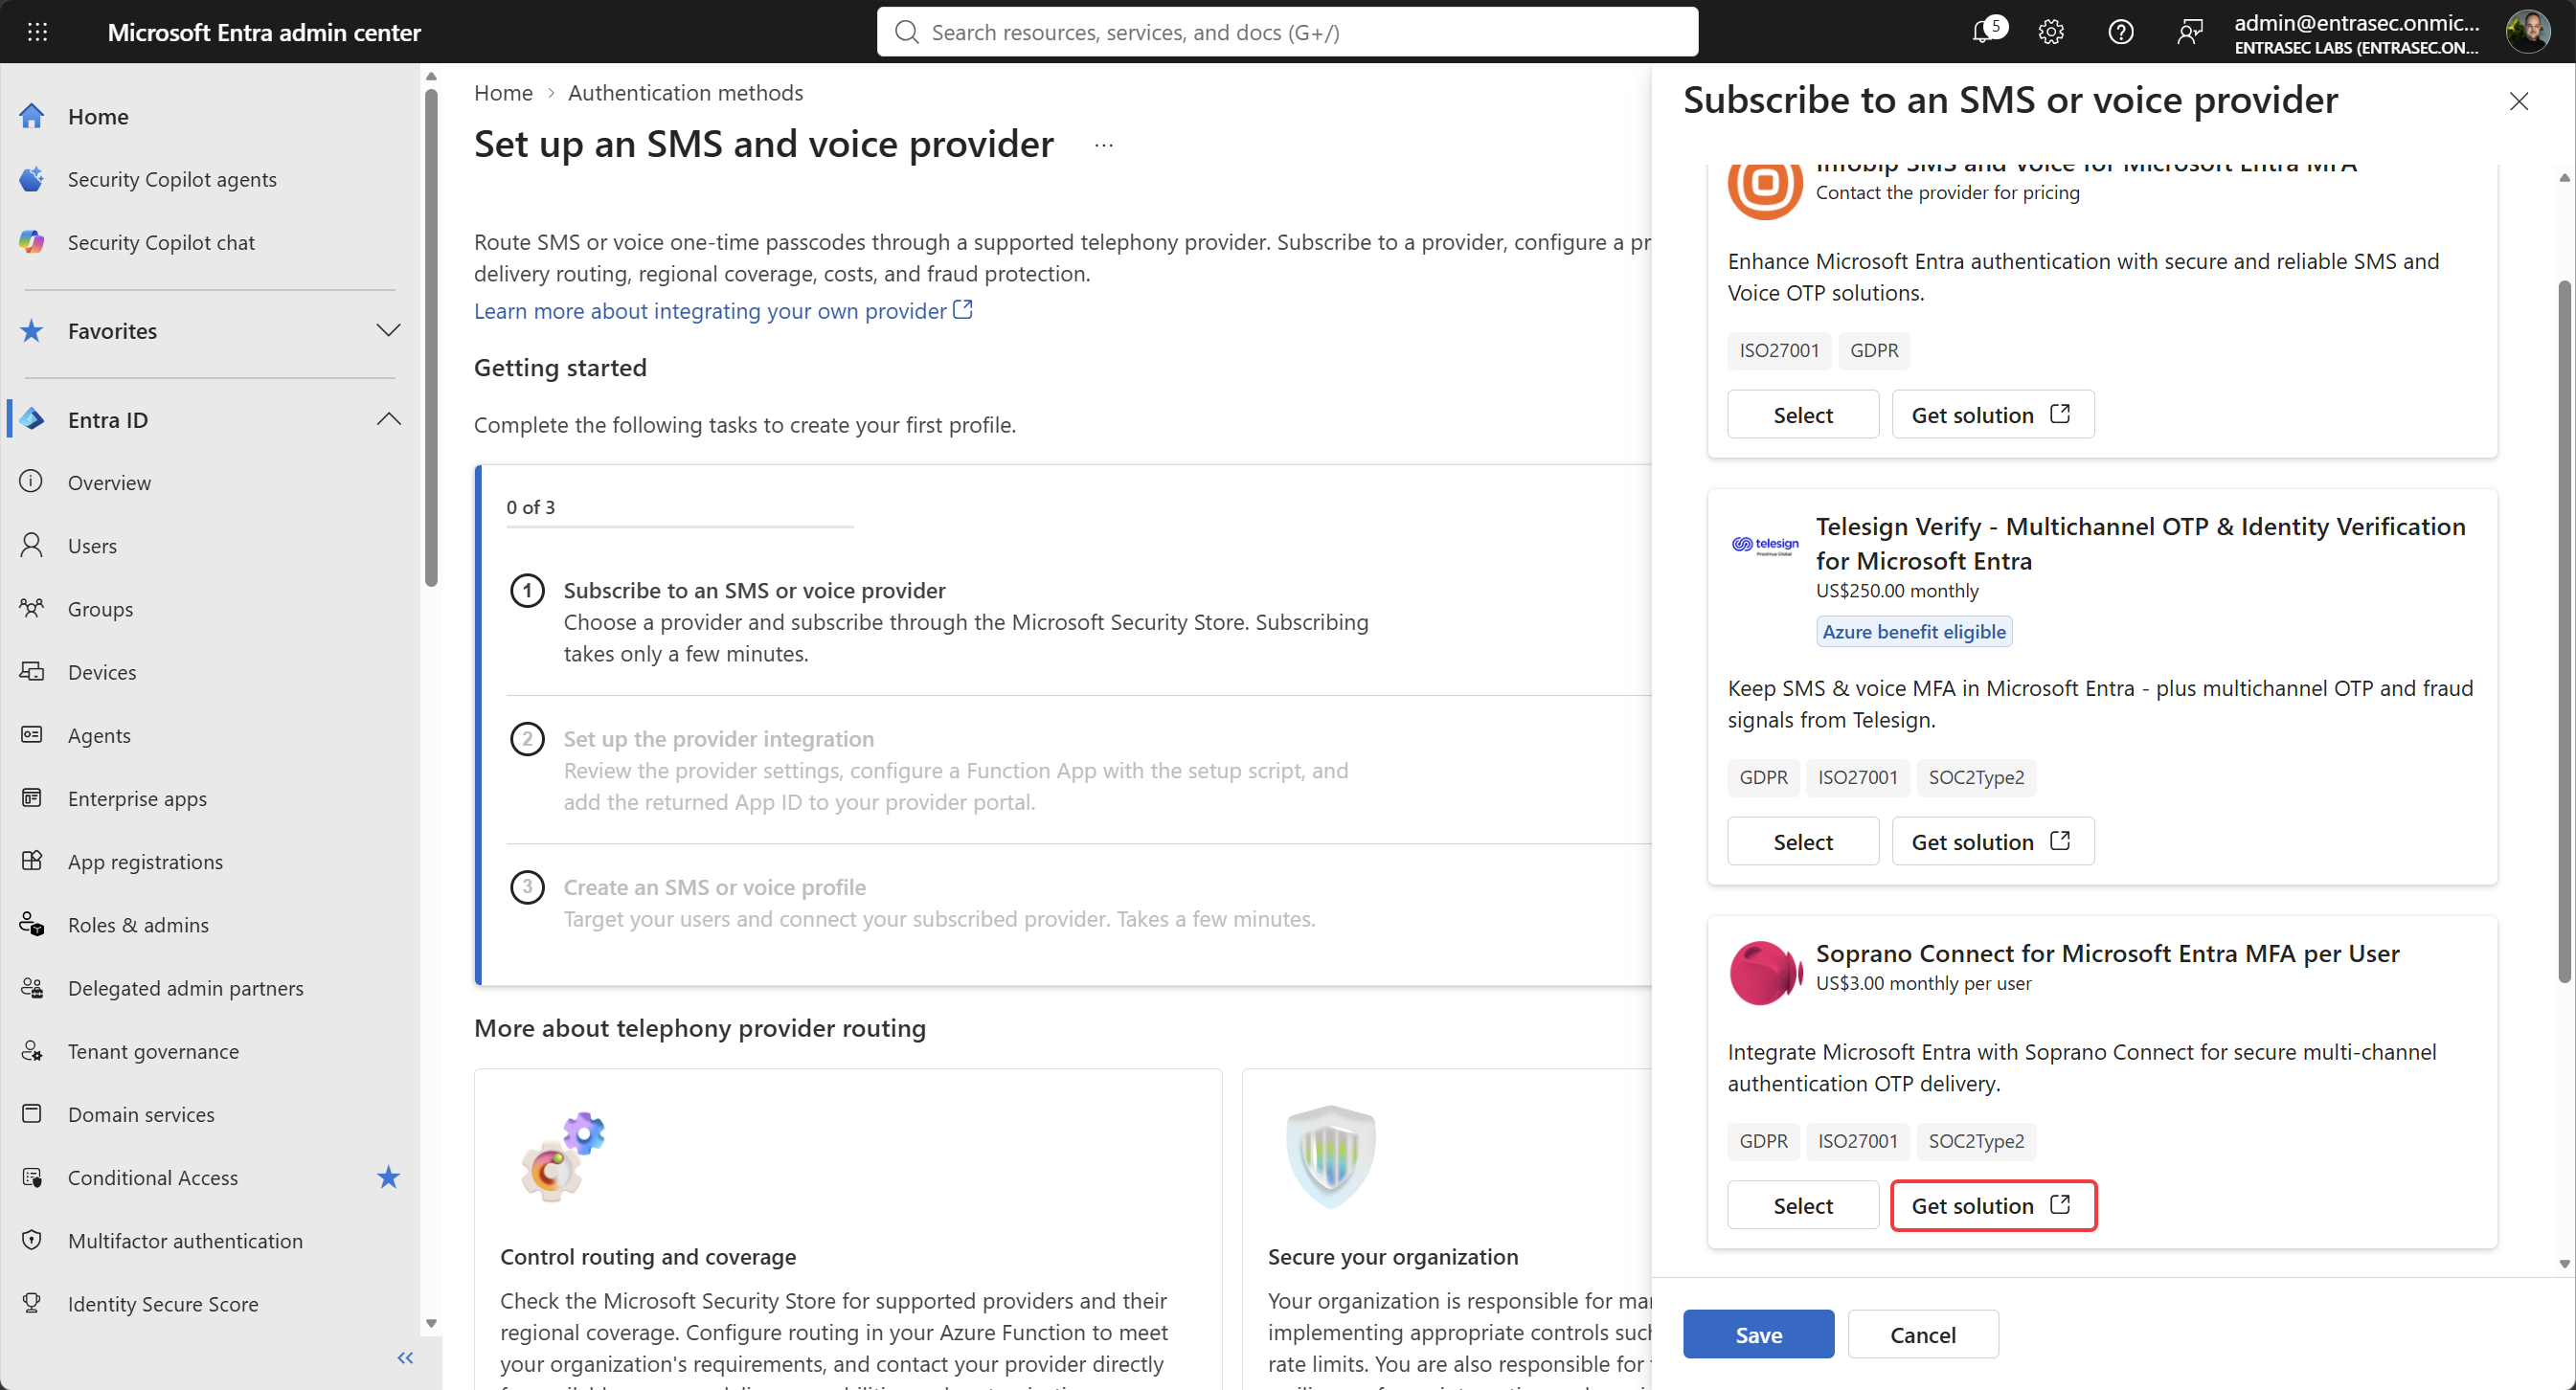
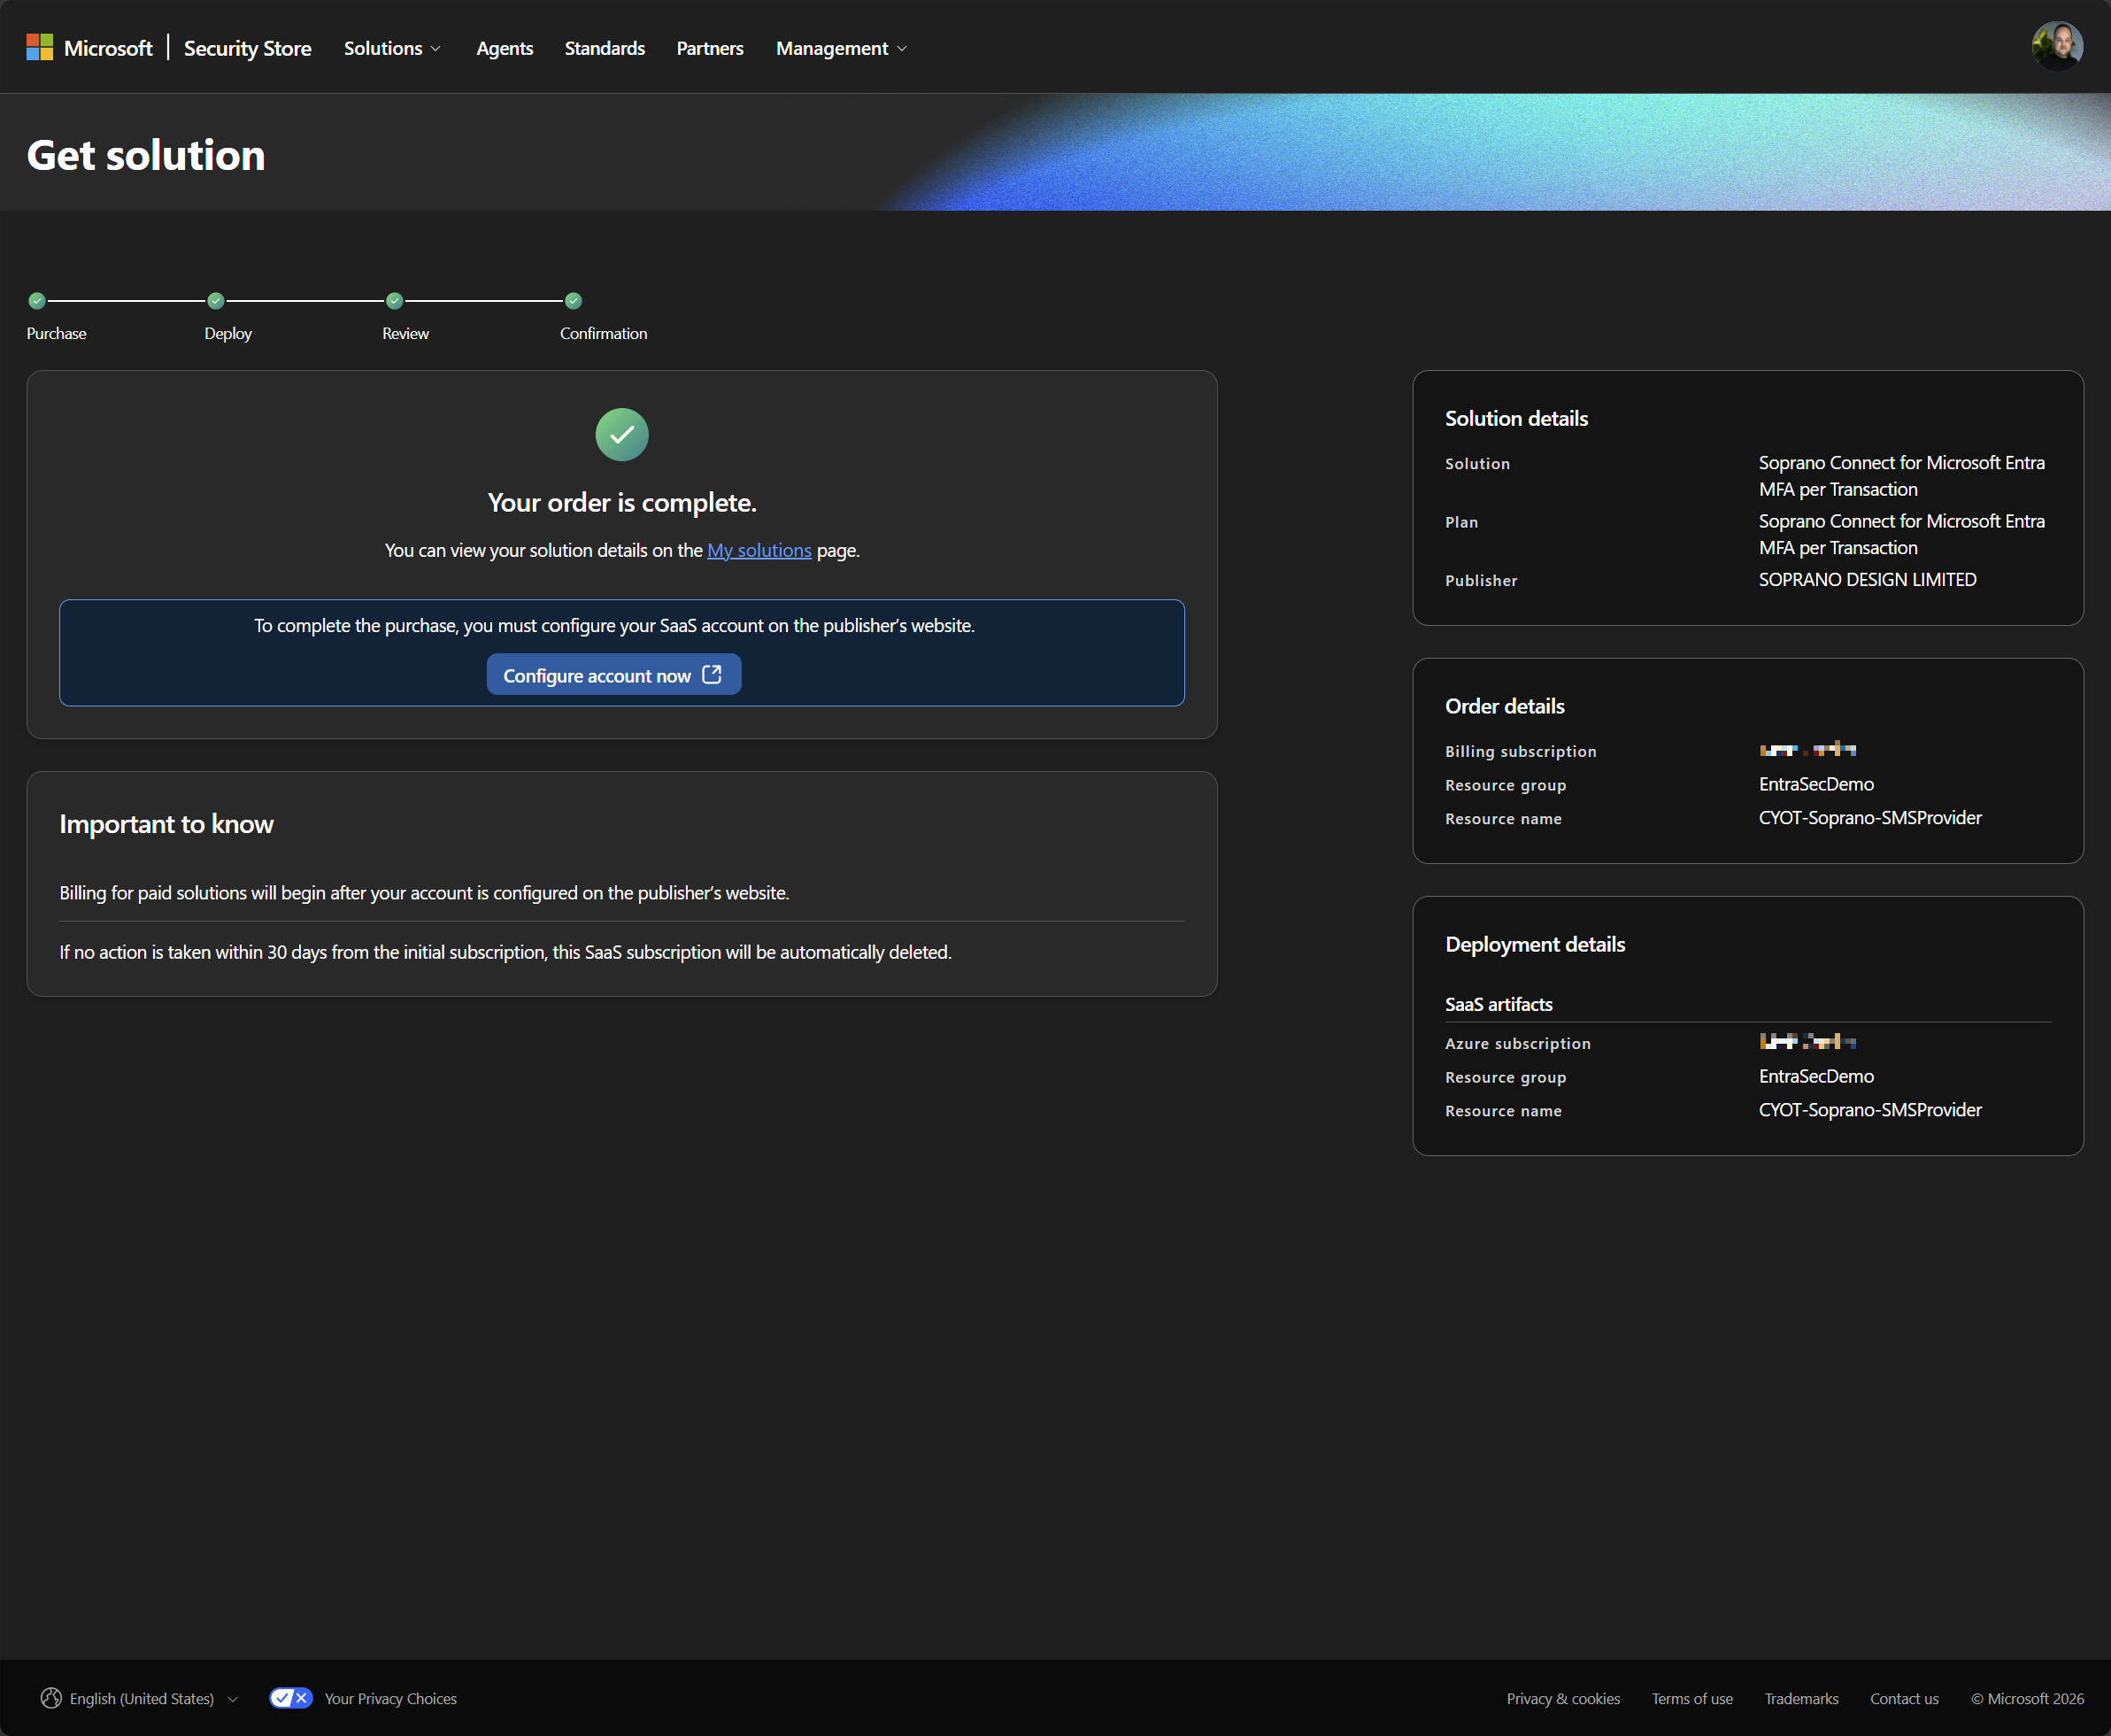
Follow the wizard to purchase a new subscription. It takes a few steps, and you’ll need to provide your Azure subscription.
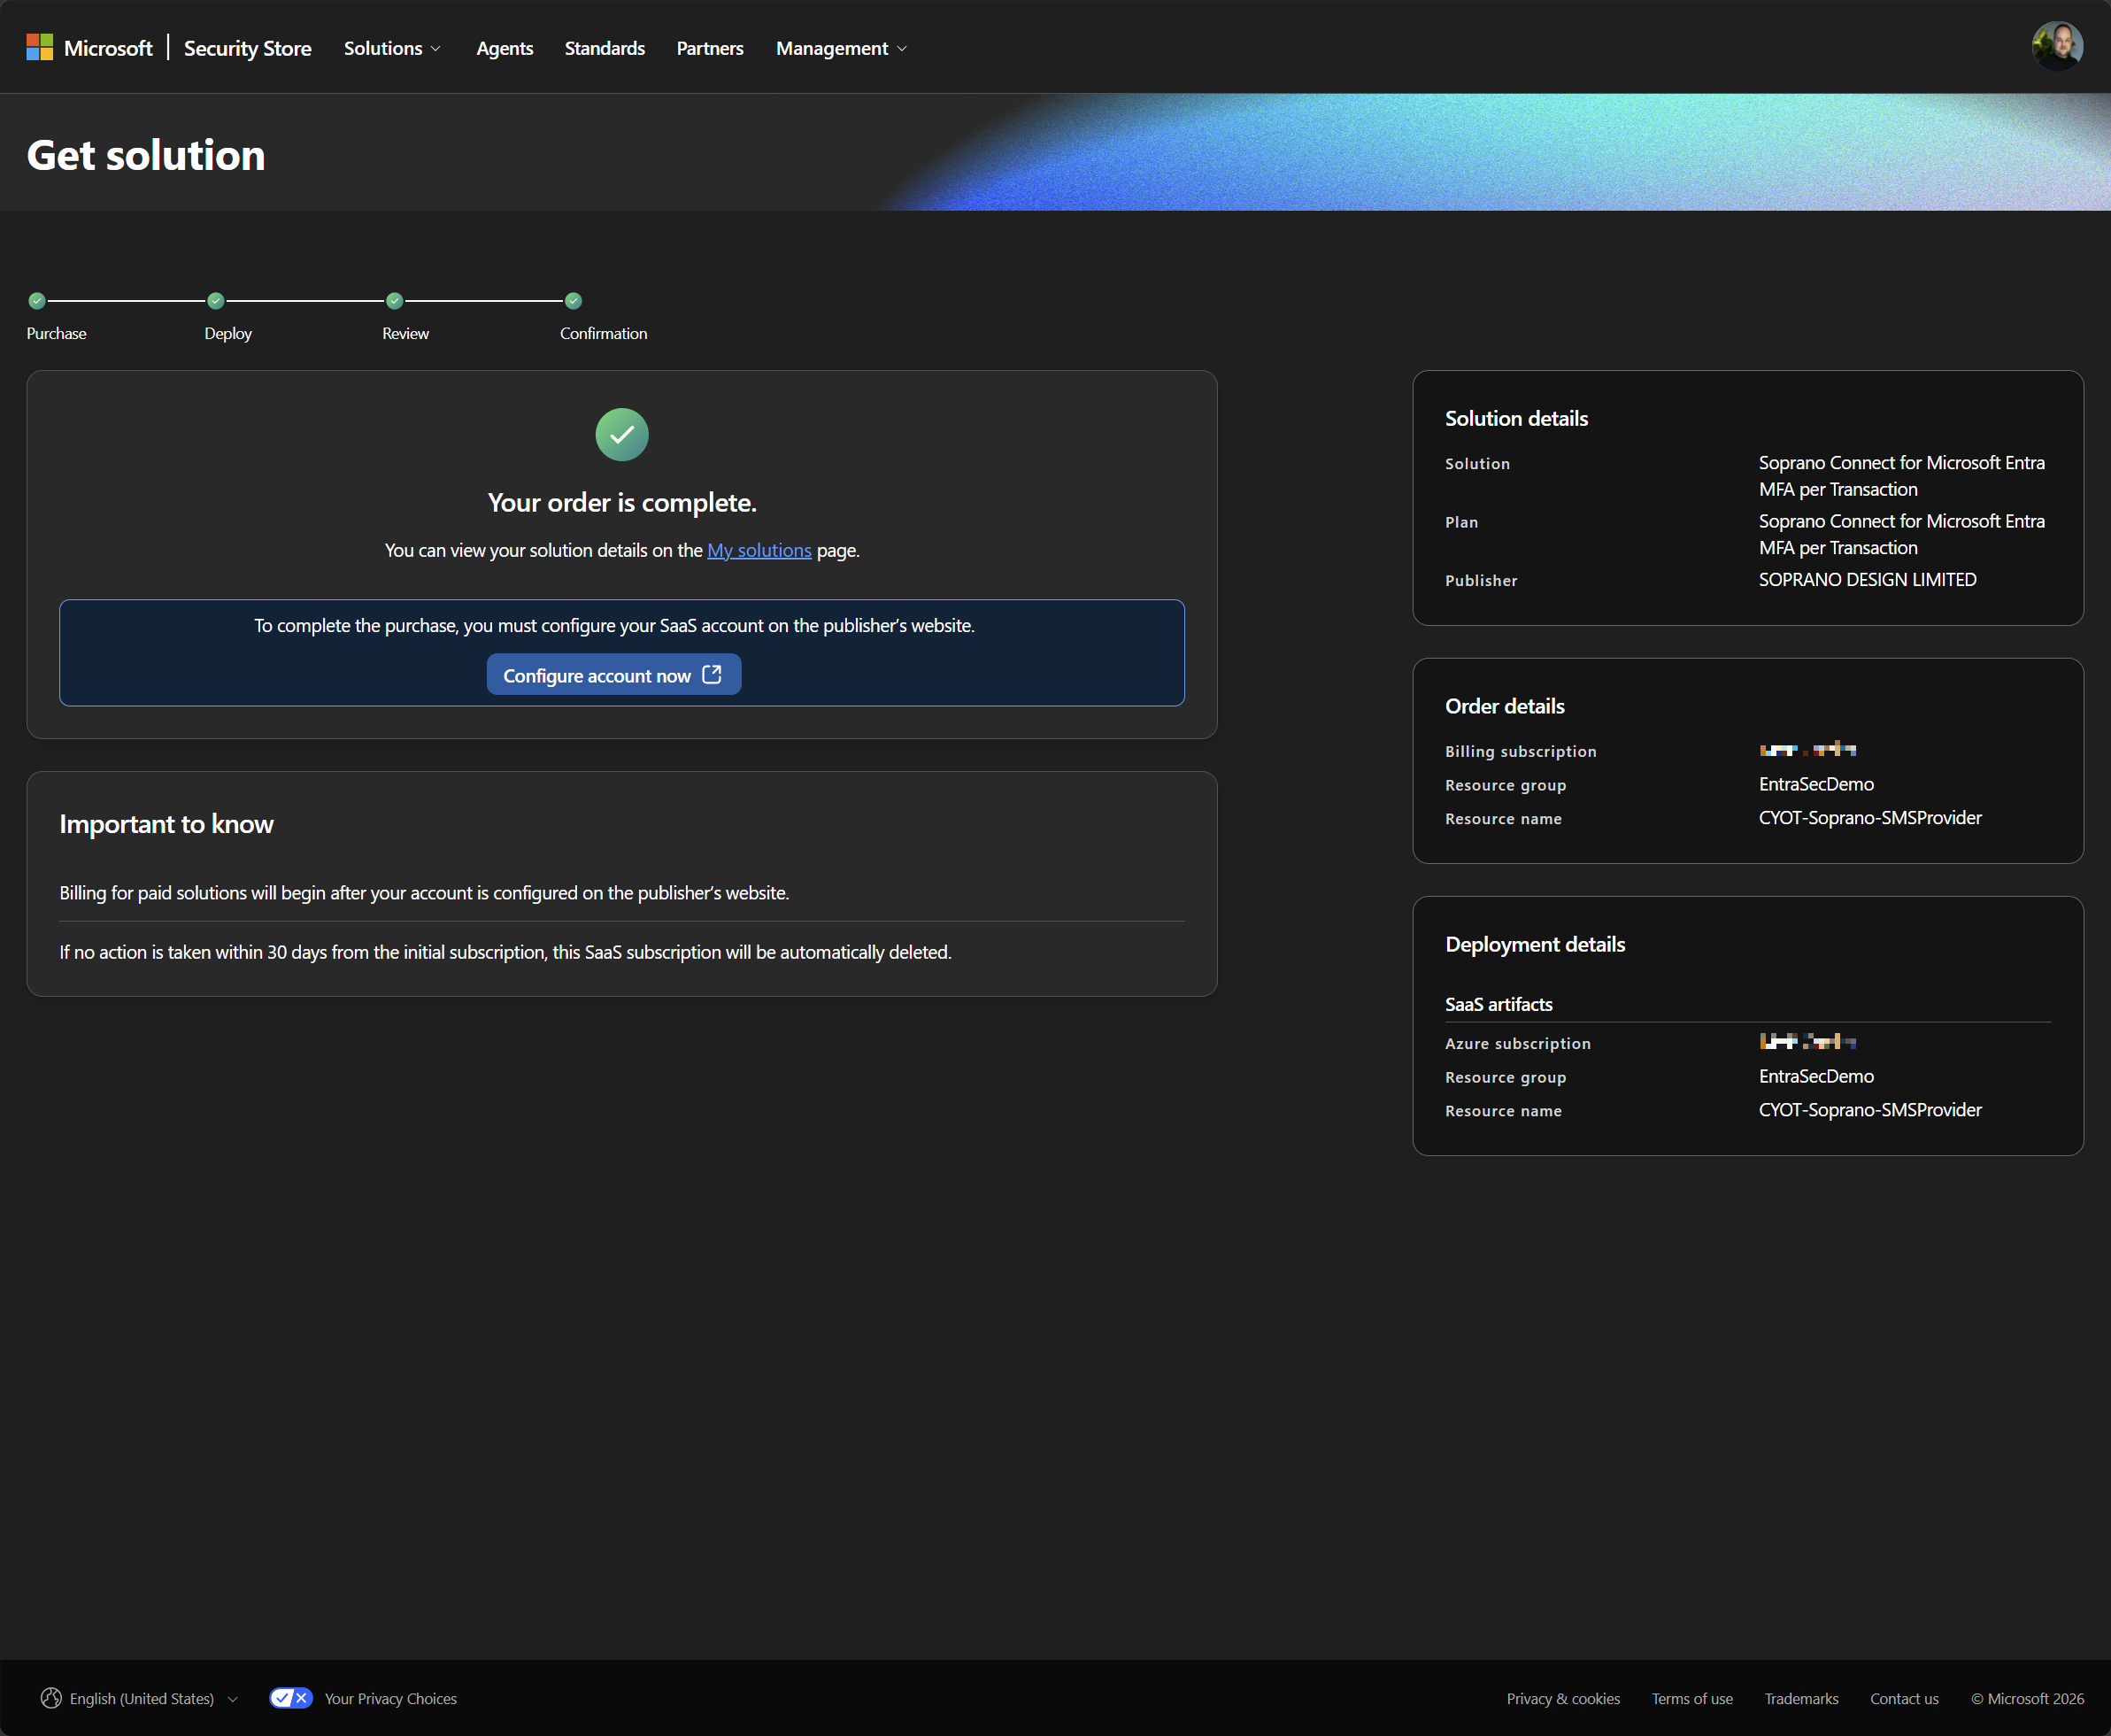
Once that’s done, the wizard will take you to the Soprano configuration page.
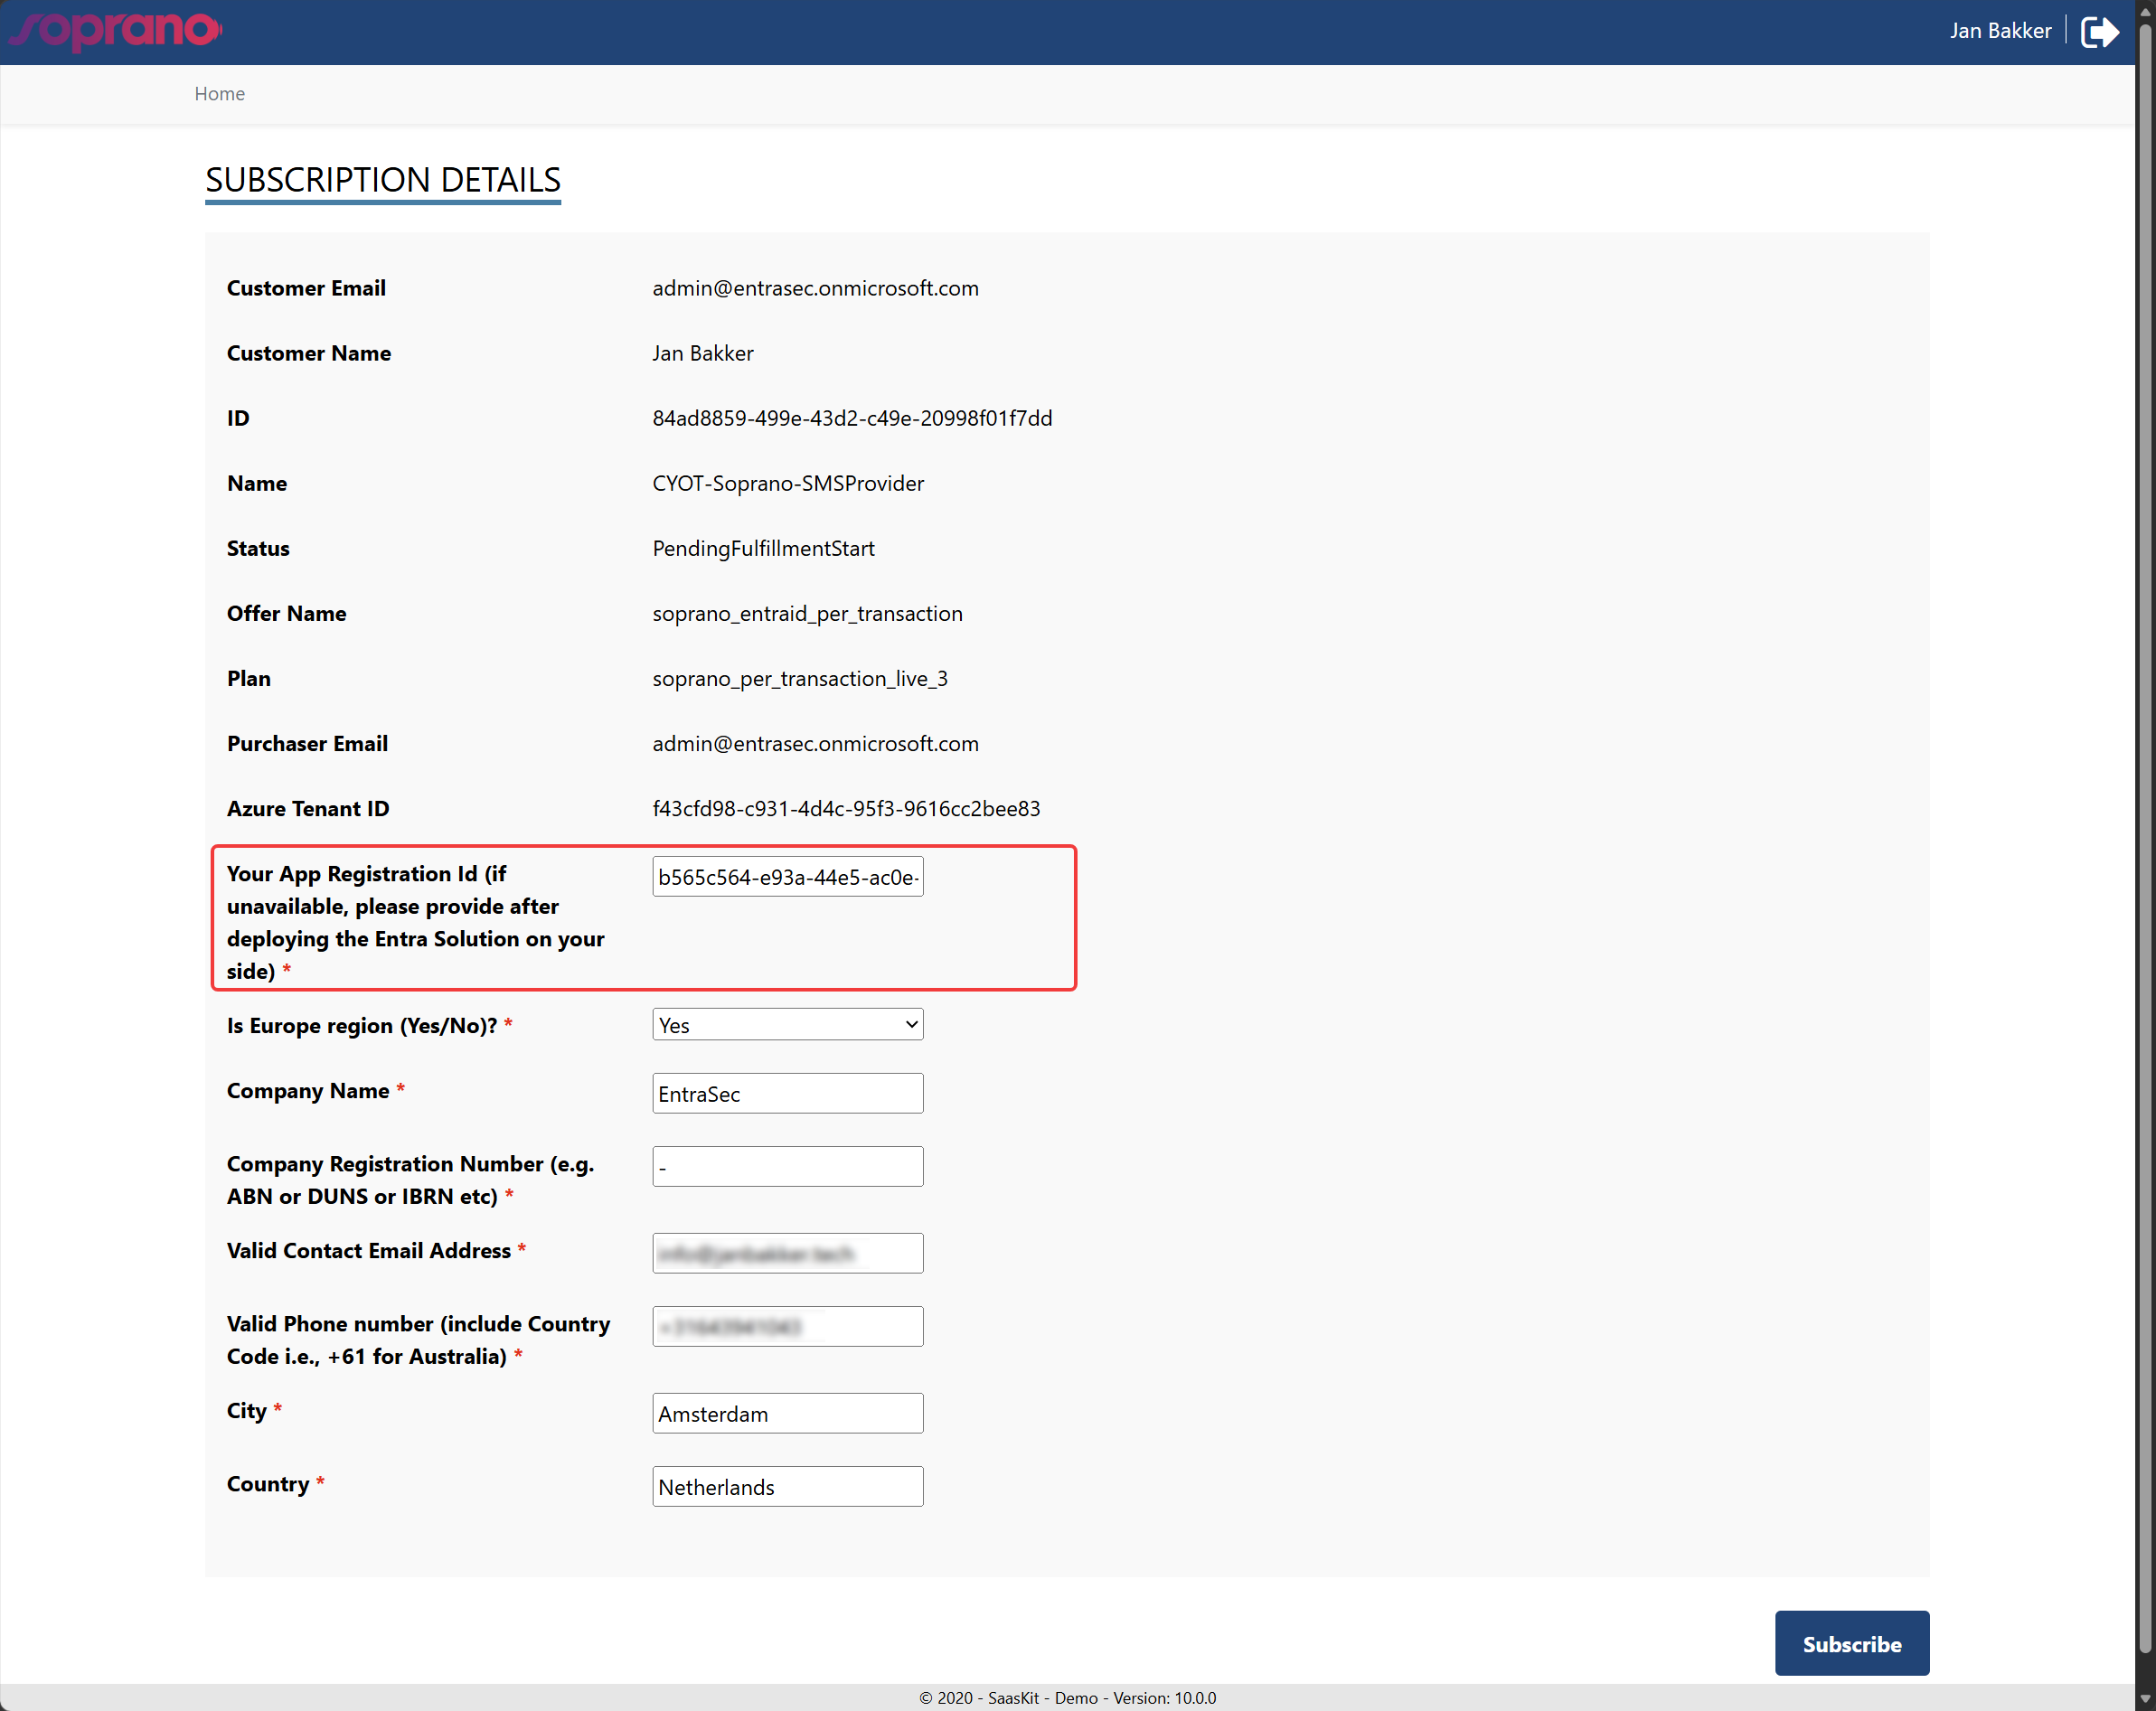
It will ask you for the App ID and a few other details. Leave this page open, as we need to complete task 2 first.
Task 2: running the setup script#
Sign in to the Azure portal and select the Cloud Shell icon (>_) in the top toolbar. You can also go directly to https://shell.azure.com.
Download the script:
Invoke-WebRequest -Uri 'https://raw.githubusercontent.com/Azure-Samples/ExternalPhoneProvider-AzureFunction-Sample/main/setup/Setup-Epp.ps1' -OutFile '.\Setup-Epp.ps1'Then run the script:
.\Setup-Epp.ps1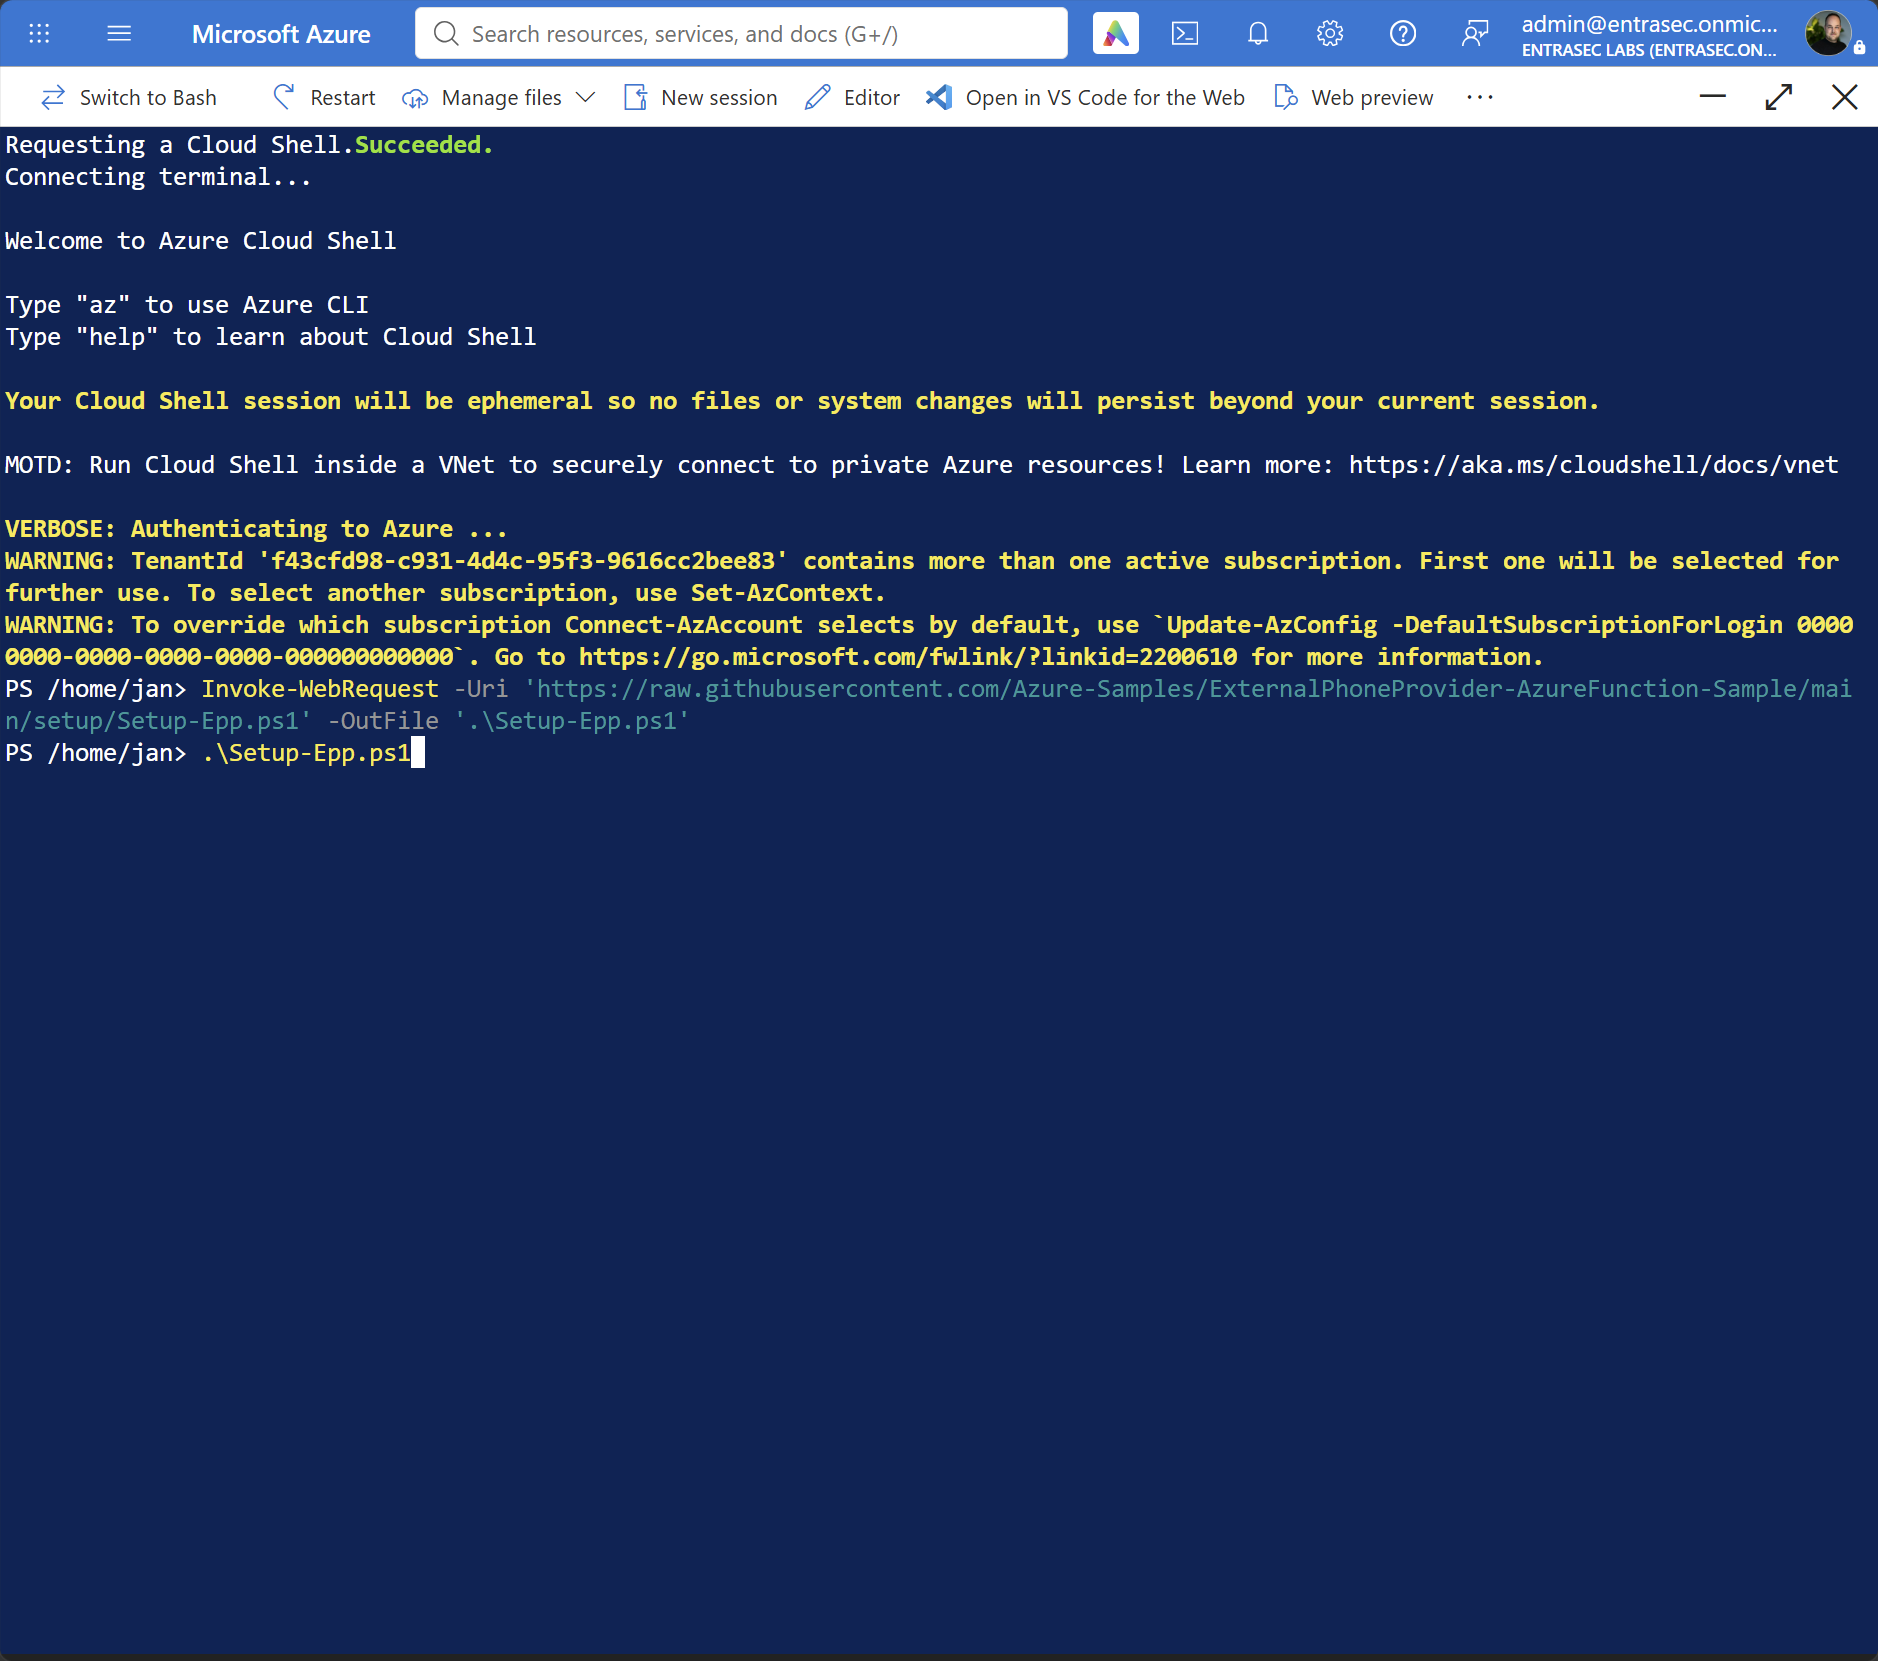
Nothing is created until you approve the plan at the end, so you can go through the entire wizard and back out.
The wizard, step by step#
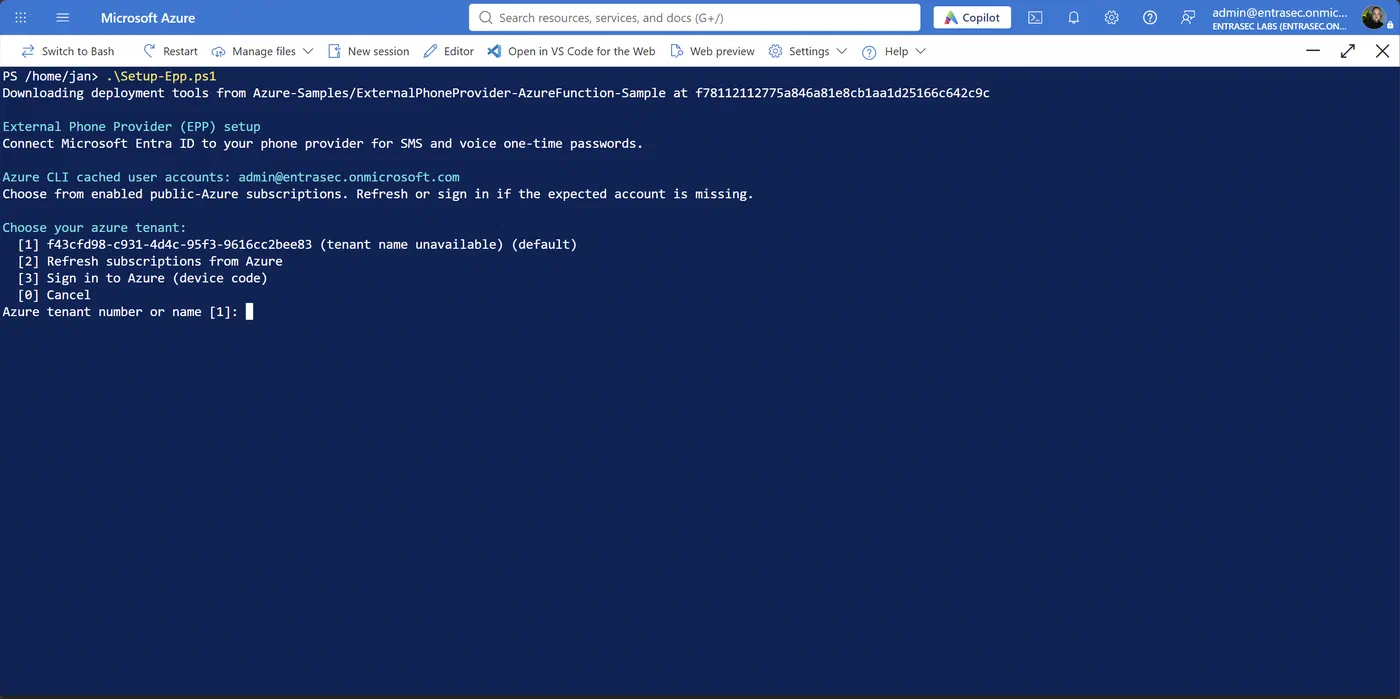
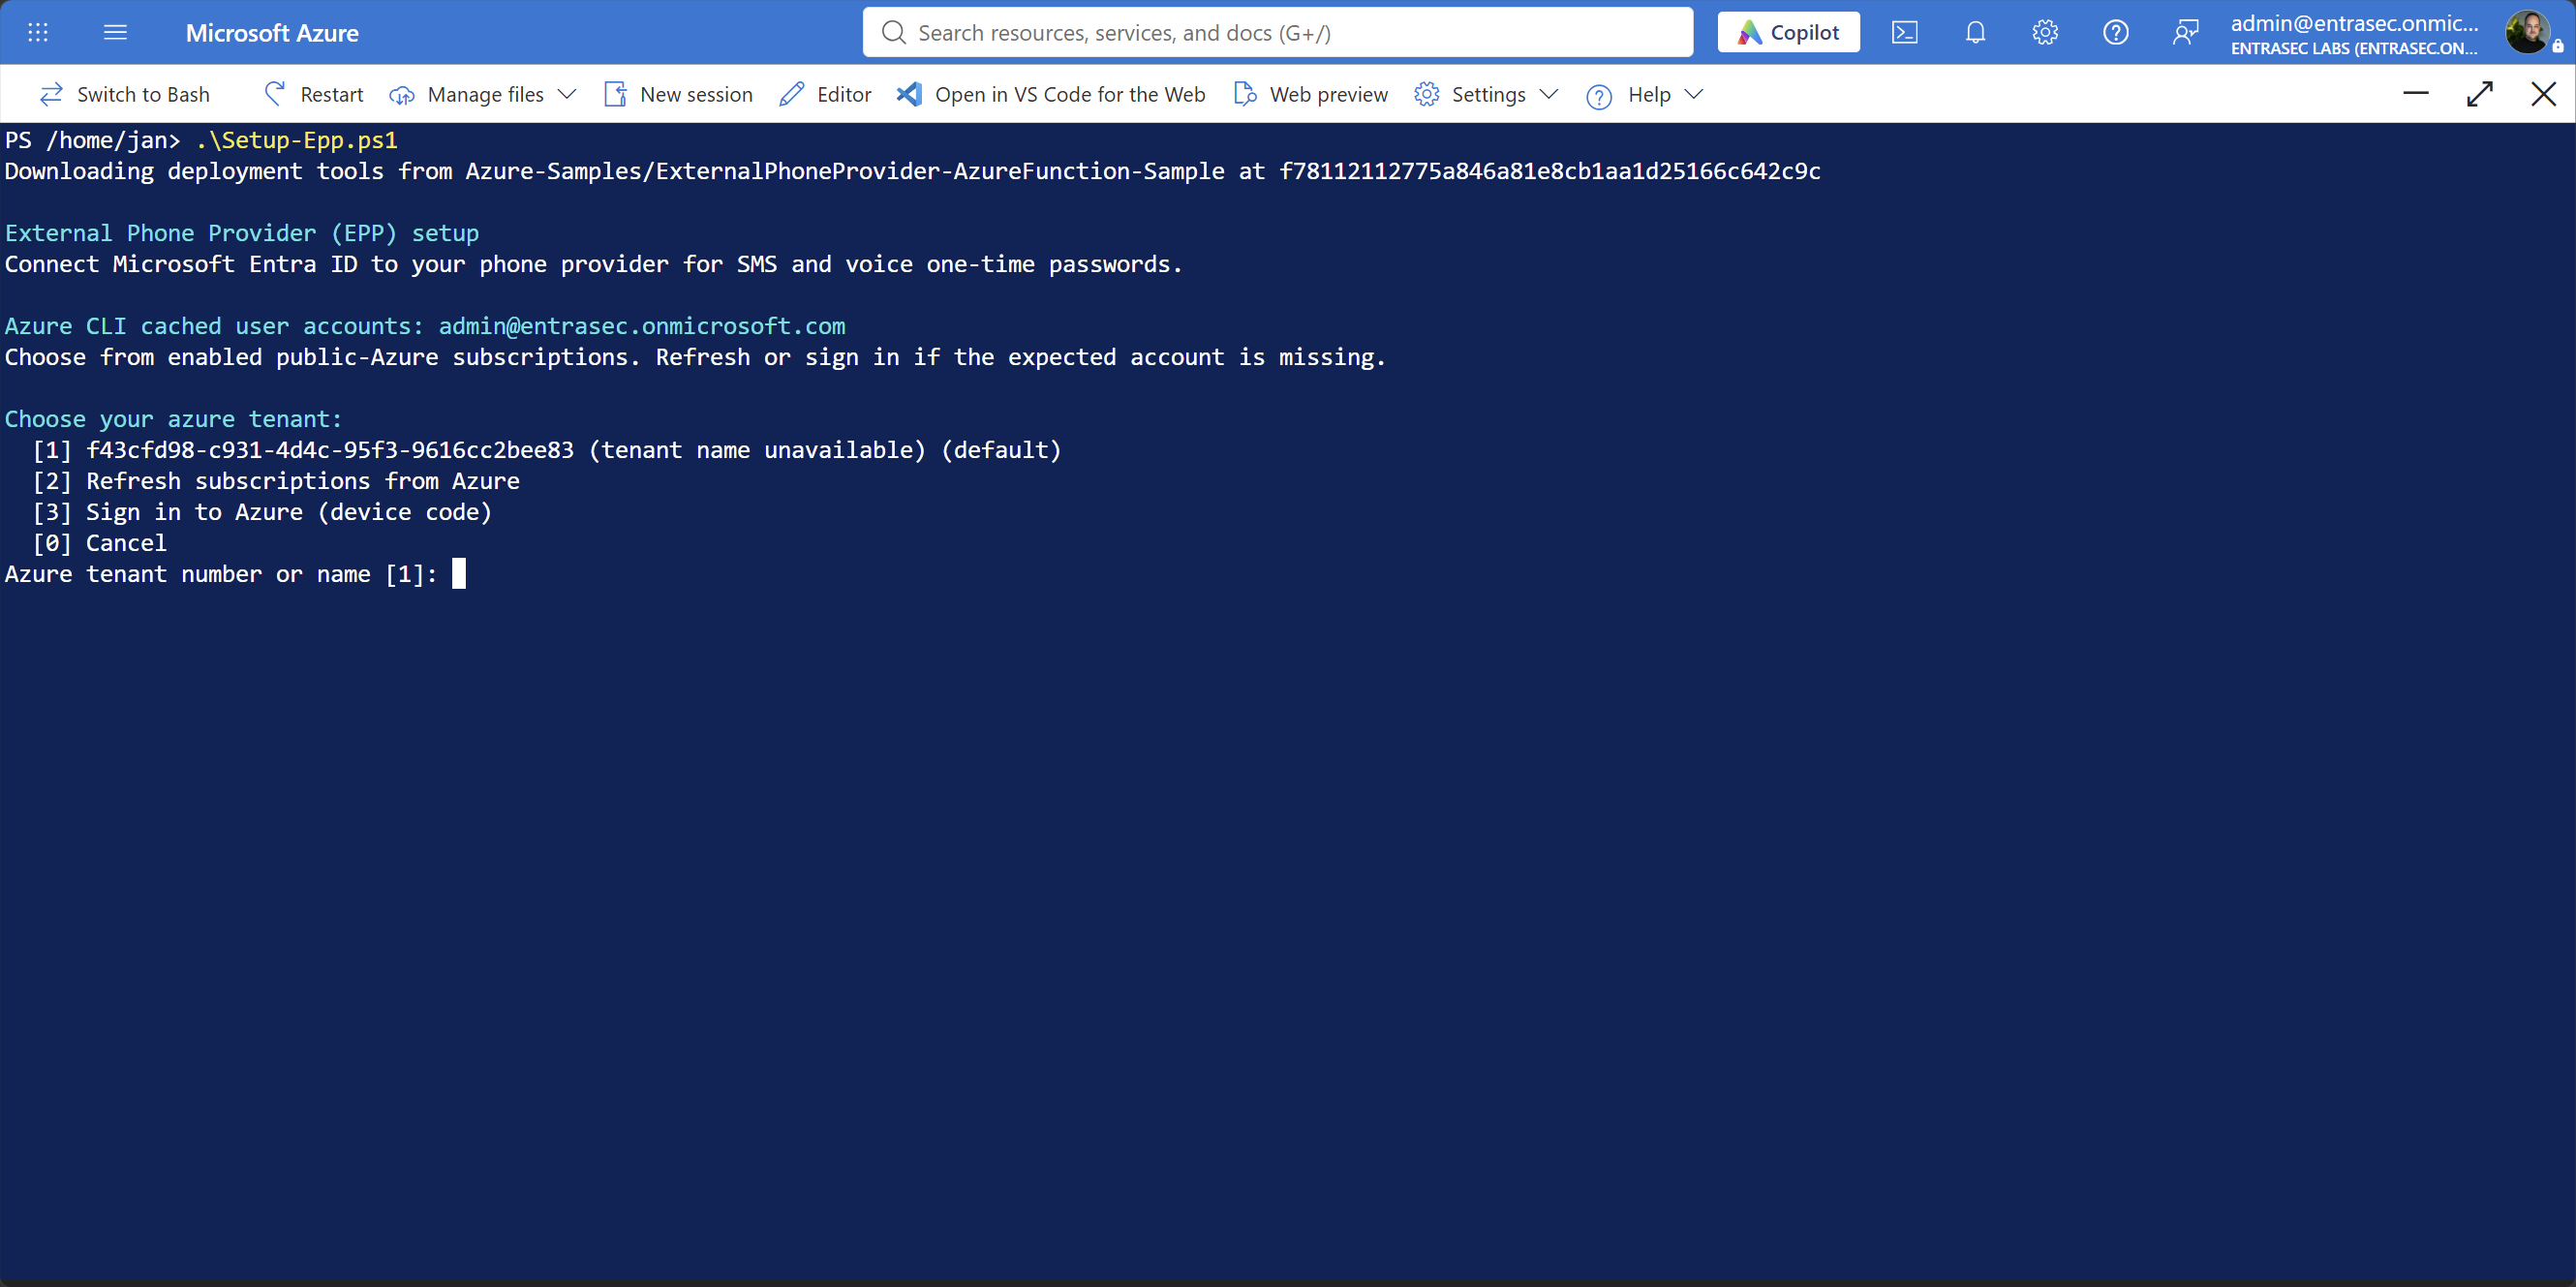
Azure tenant. Lists tenants from your cached Azure CLI accounts, with options to refresh or sign in with a device code. The default is your current CLI tenant. It only lists enabled public-cloud subscriptions owned by a user account, so refresh if yours is missing.
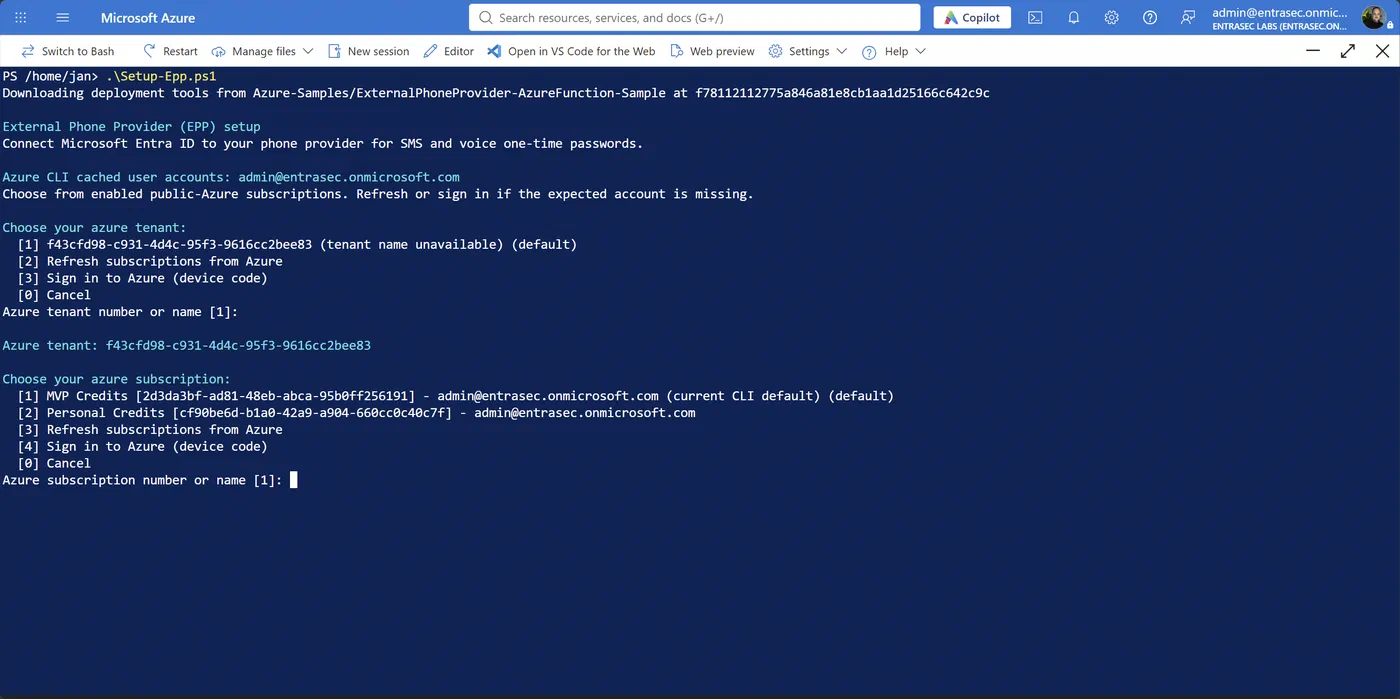
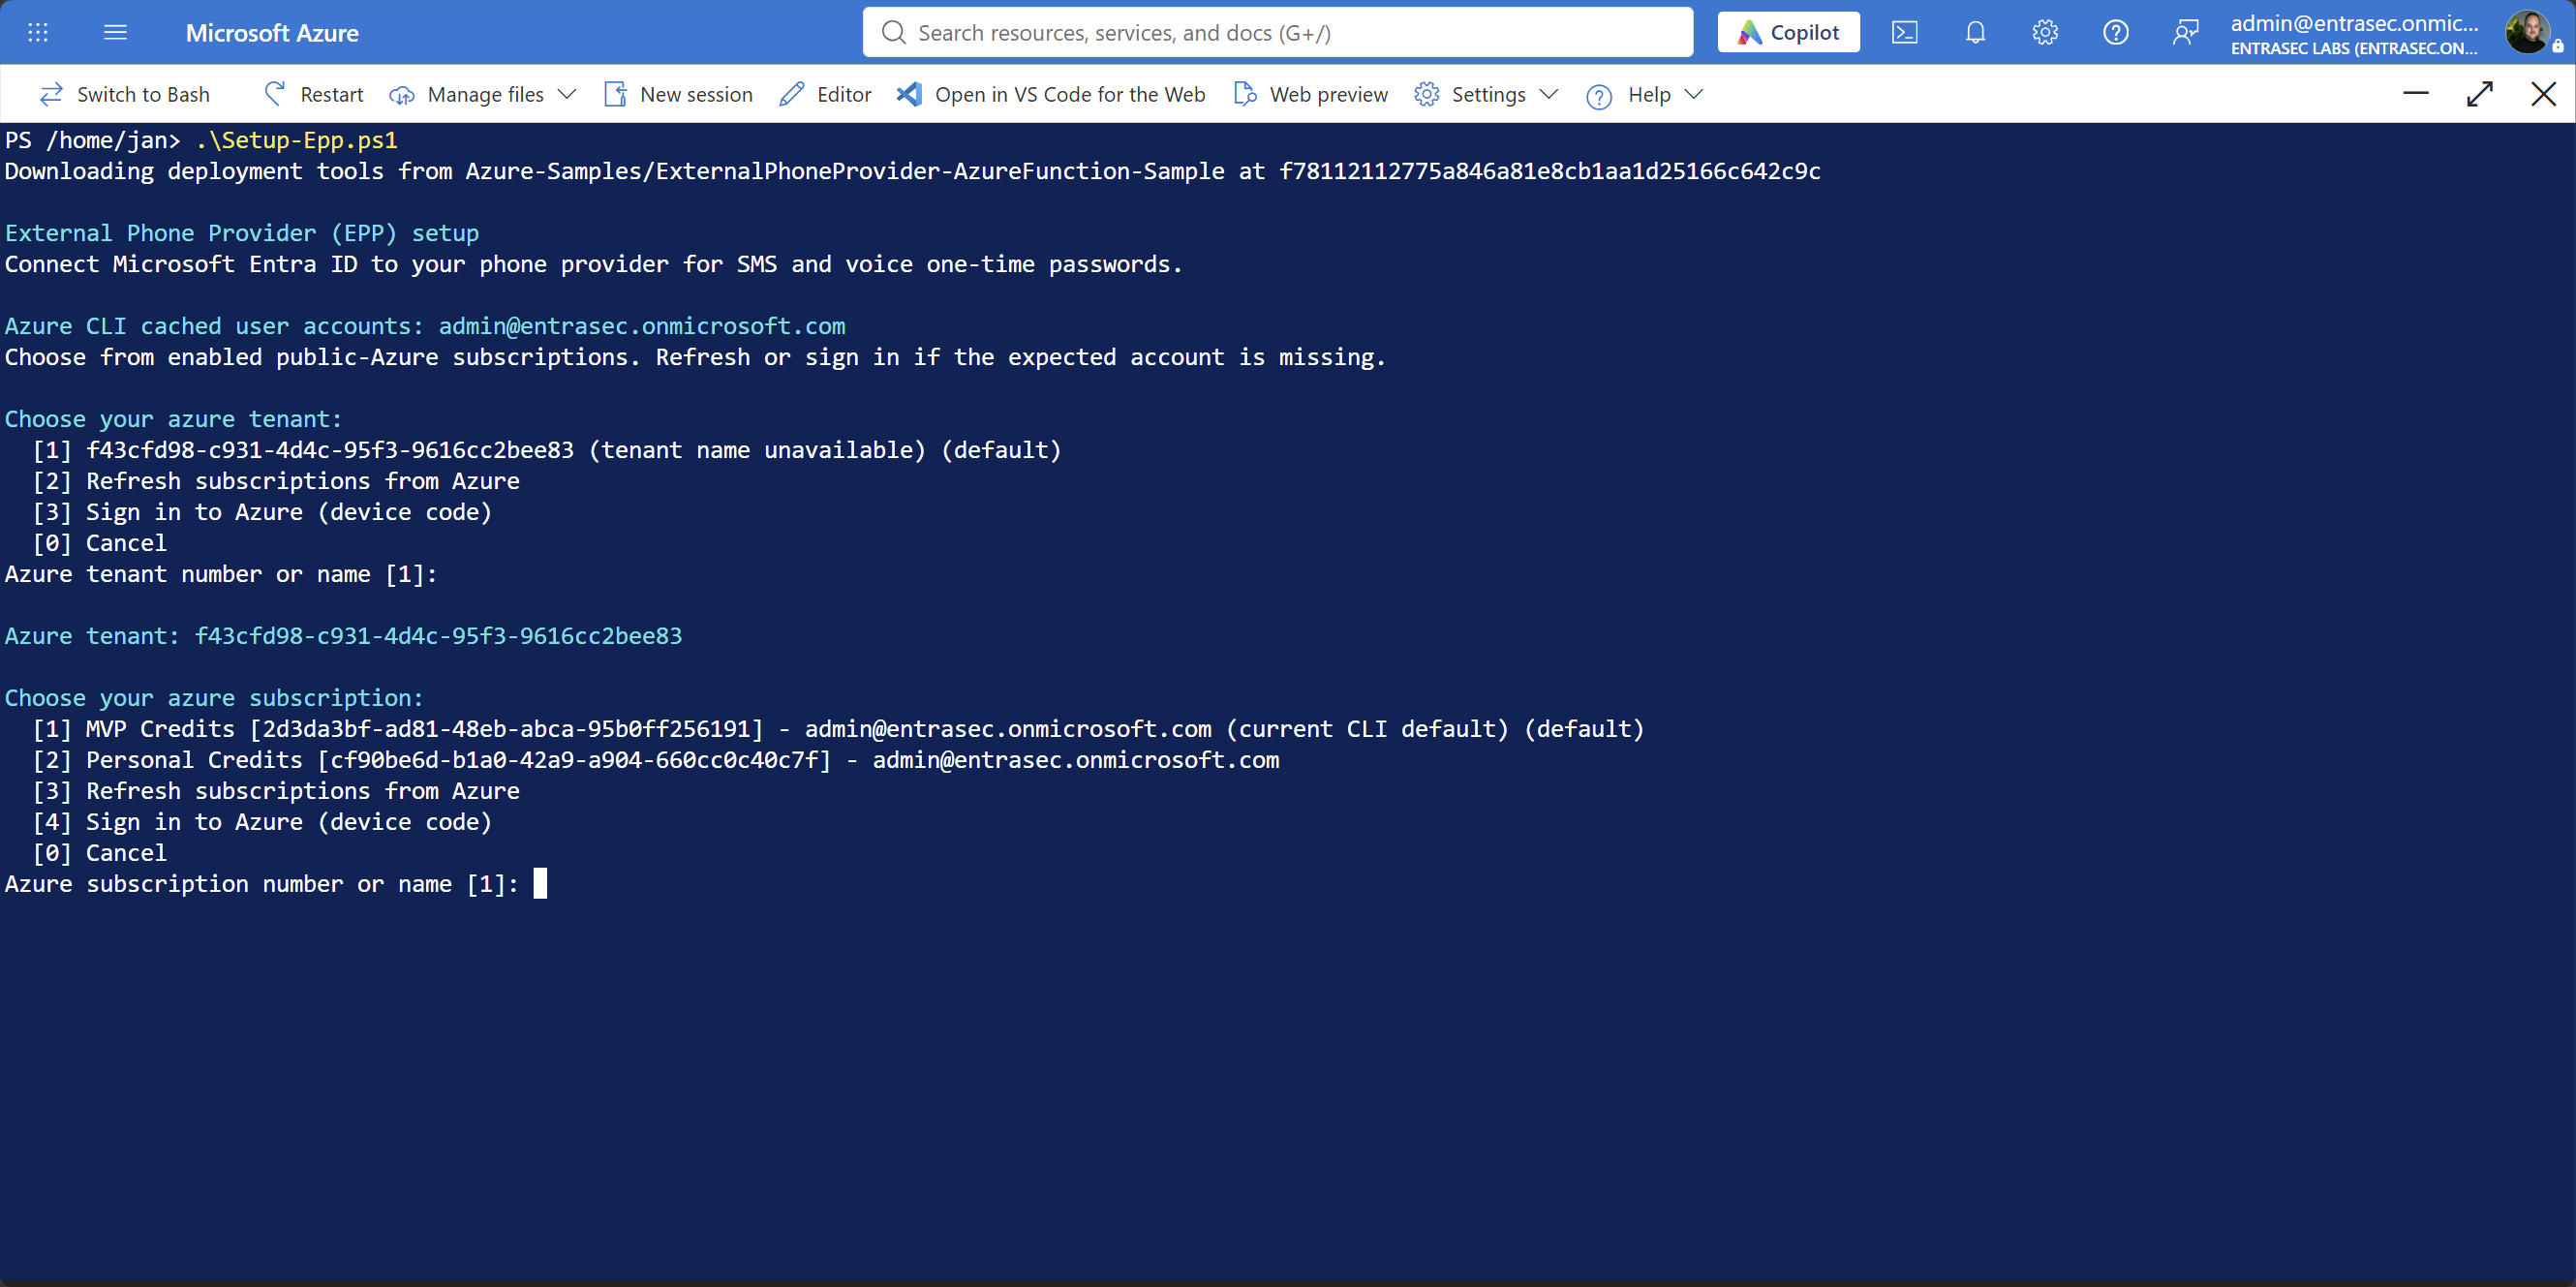
Azure subscription. The same pattern, scoped to that tenant. Your CLI default is marked, and pressing Enter selects it.
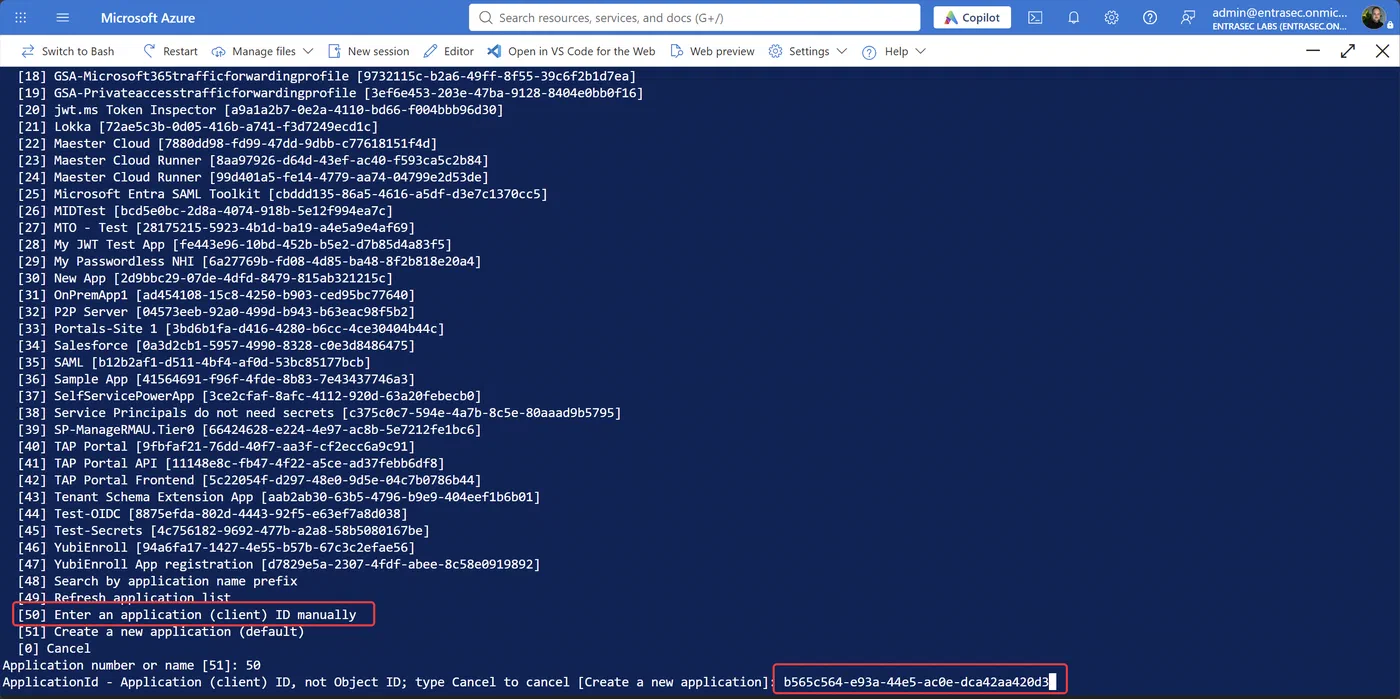
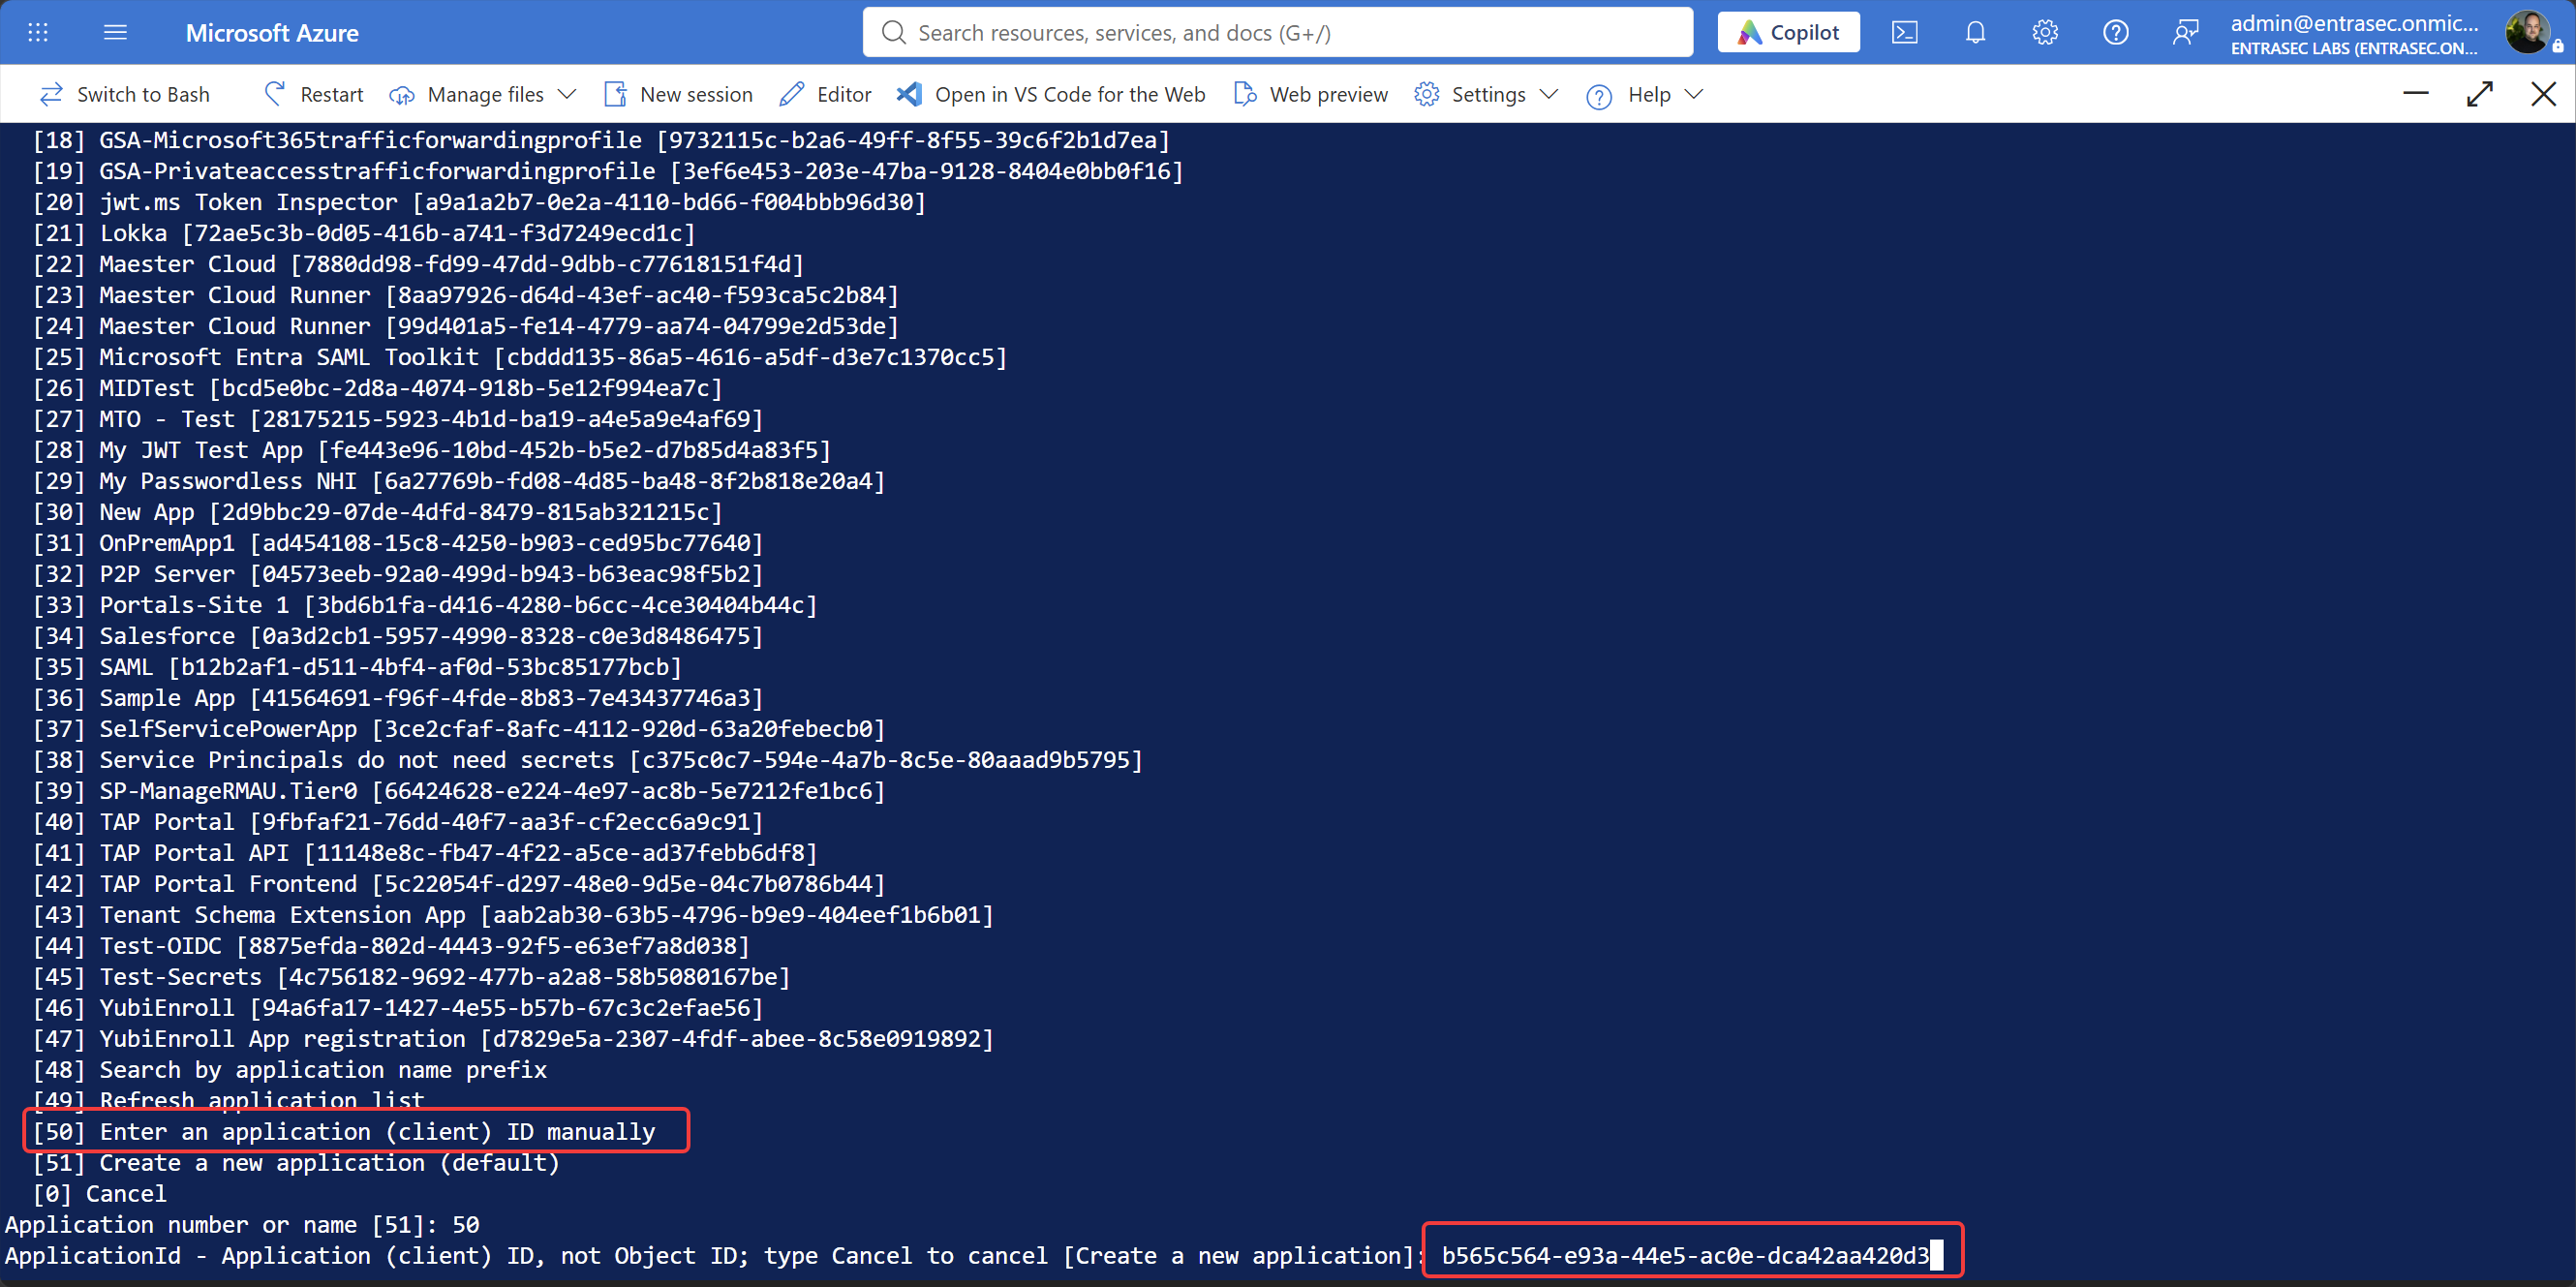
Application. Lists up to 50 app registrations and offers search, refresh, manual client ID entry, and “Create a new application”, which is the default. I took option 1 and entered the client ID of the app I had already registered.
If you let the wizard create the app, it then asks for a display name, defaulting to
EPP Application, and creates it only after you approve the plan.Routing. No prompt. The script reads your tenant’s
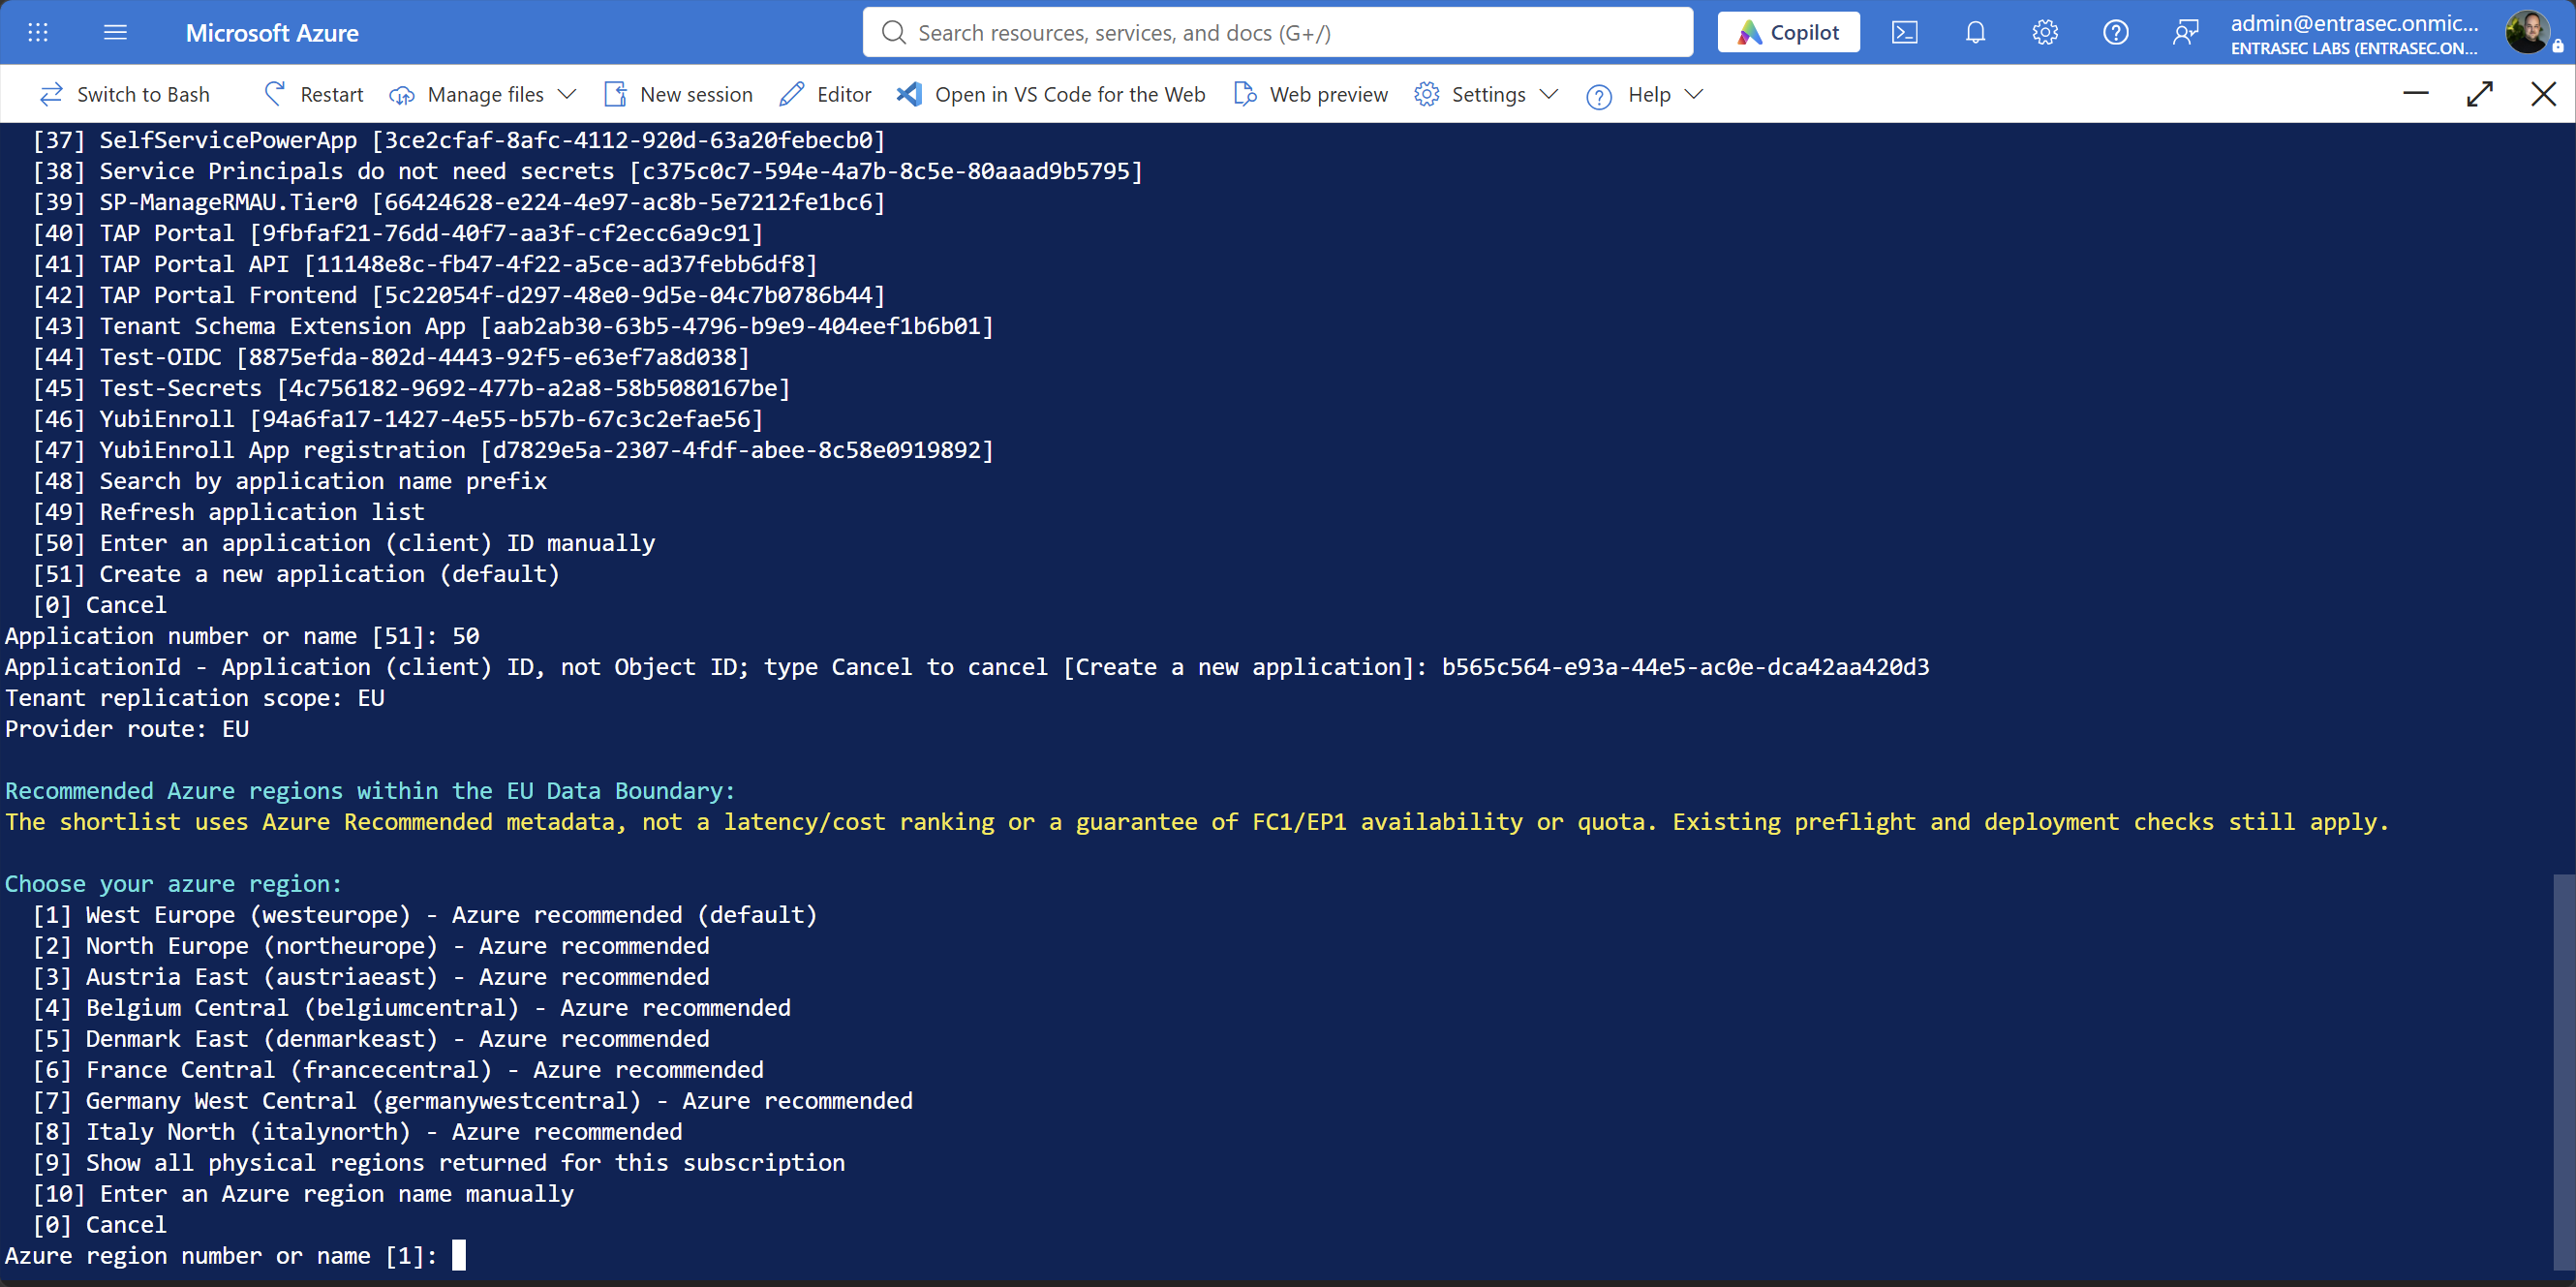
tenant_region_scopeand prints the replication scope and the provider route it derives from it.Azure region. For an EU tenant, it filters the shortlist to regions inside the EU Data Boundary, with options to show all regions or type one manually. I picked
westeurope. Out-of-boundary choices produce a warning but are not blocked.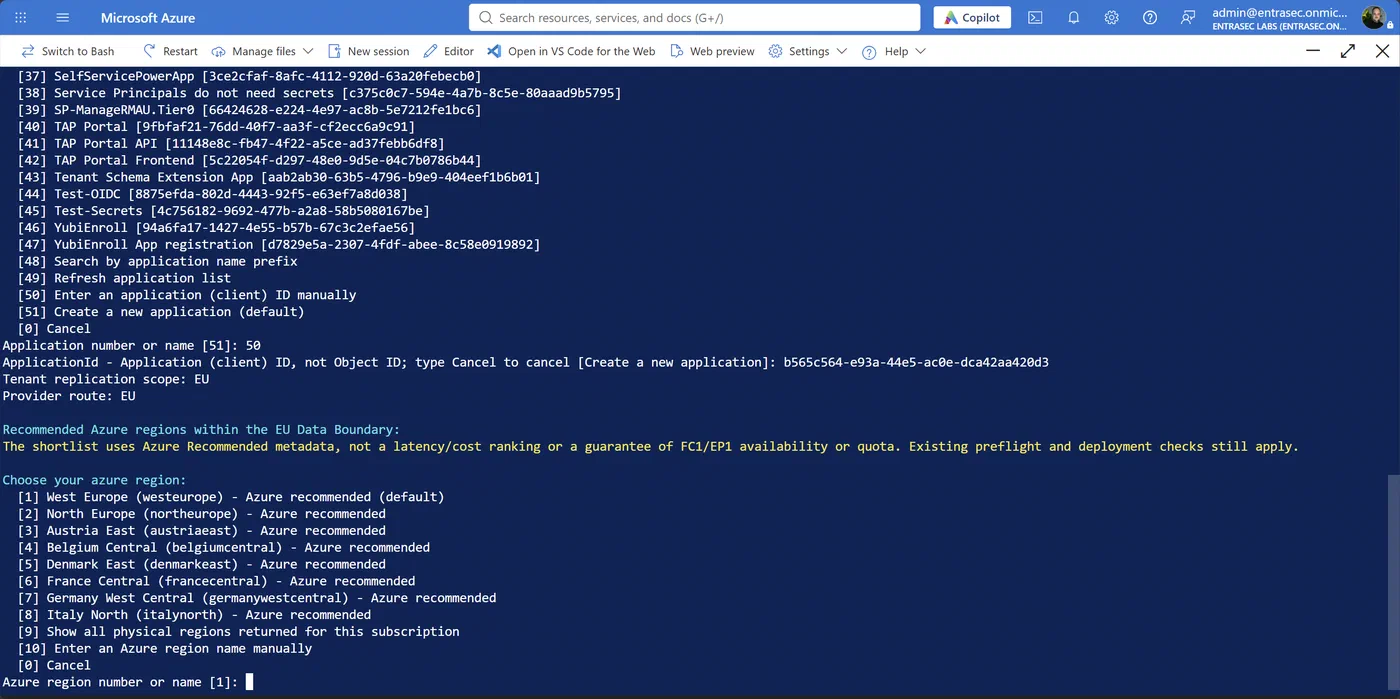
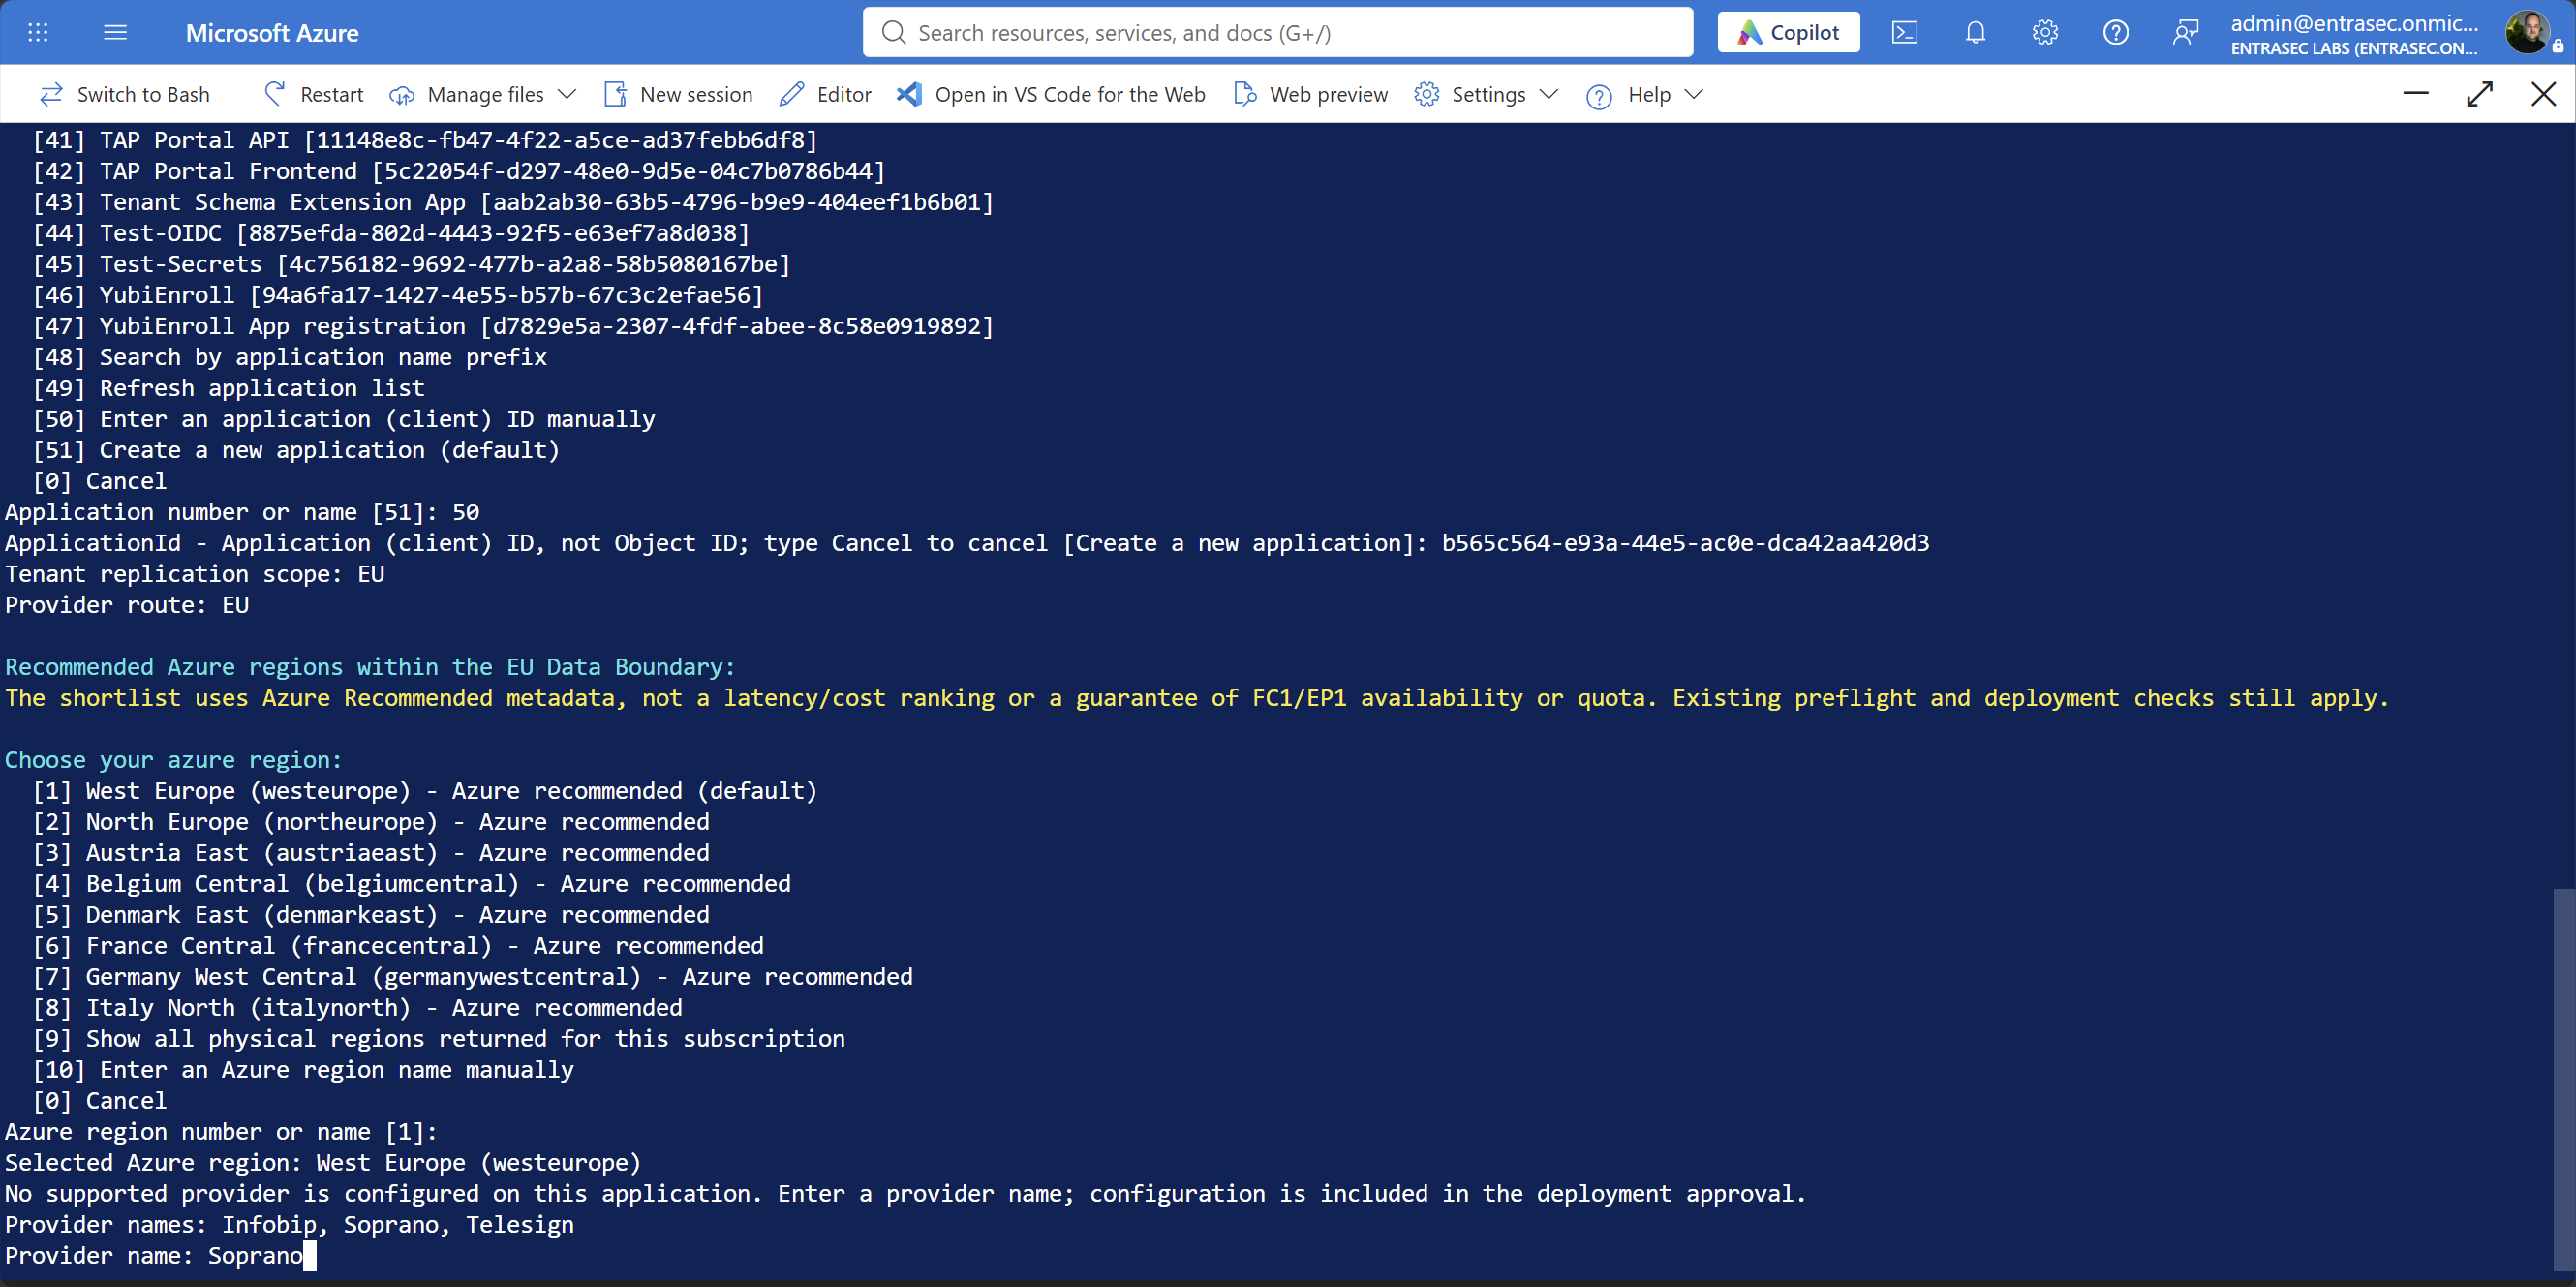
Provider. On a fresh app, you type the provider name, not a number, and there is no default. If the app is already configured for a provider, as on any rerun, you instead get a confirmation:
Application is configured for Soprano. Use this provider? Enter Yes or Y, or No or N to cancel [No]. Note that the default is No, so pressing Enter cancels the whole setup.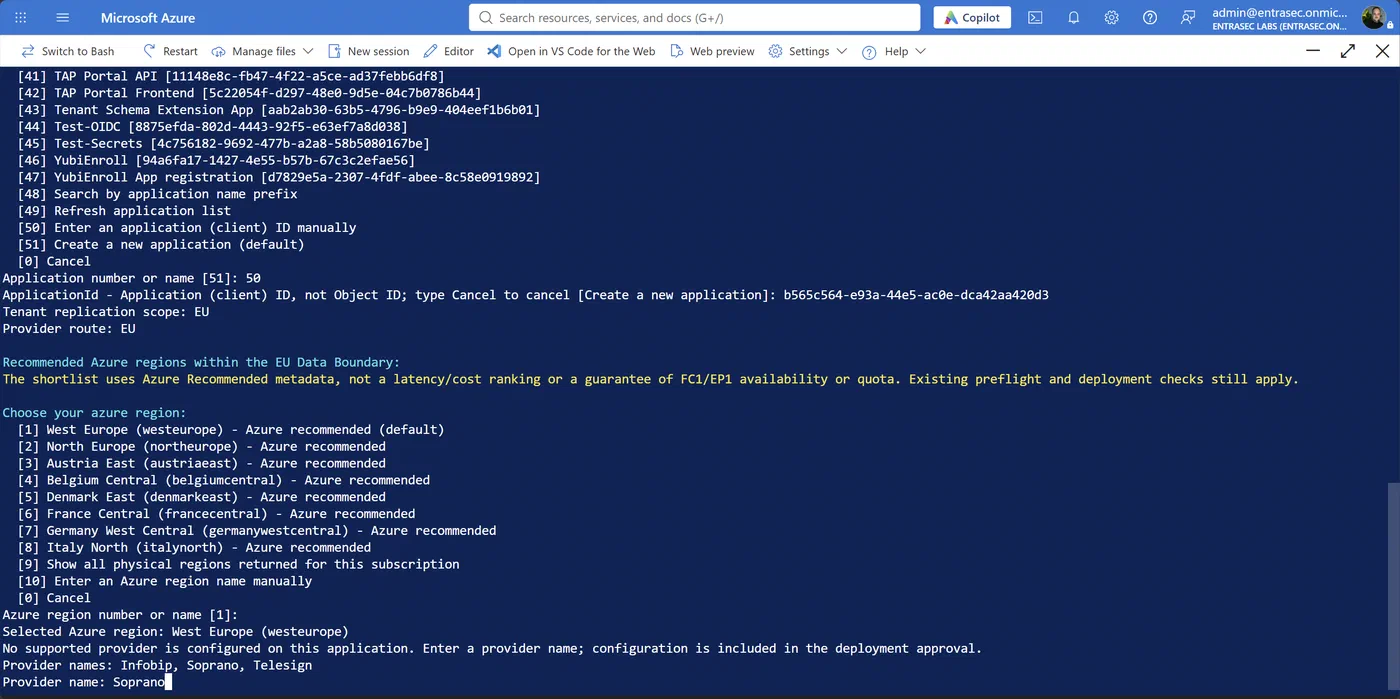
Runtime. No prompt. JavaScript is the default; C# and Python are only available through
-Language, so decide before you start.Service plan.
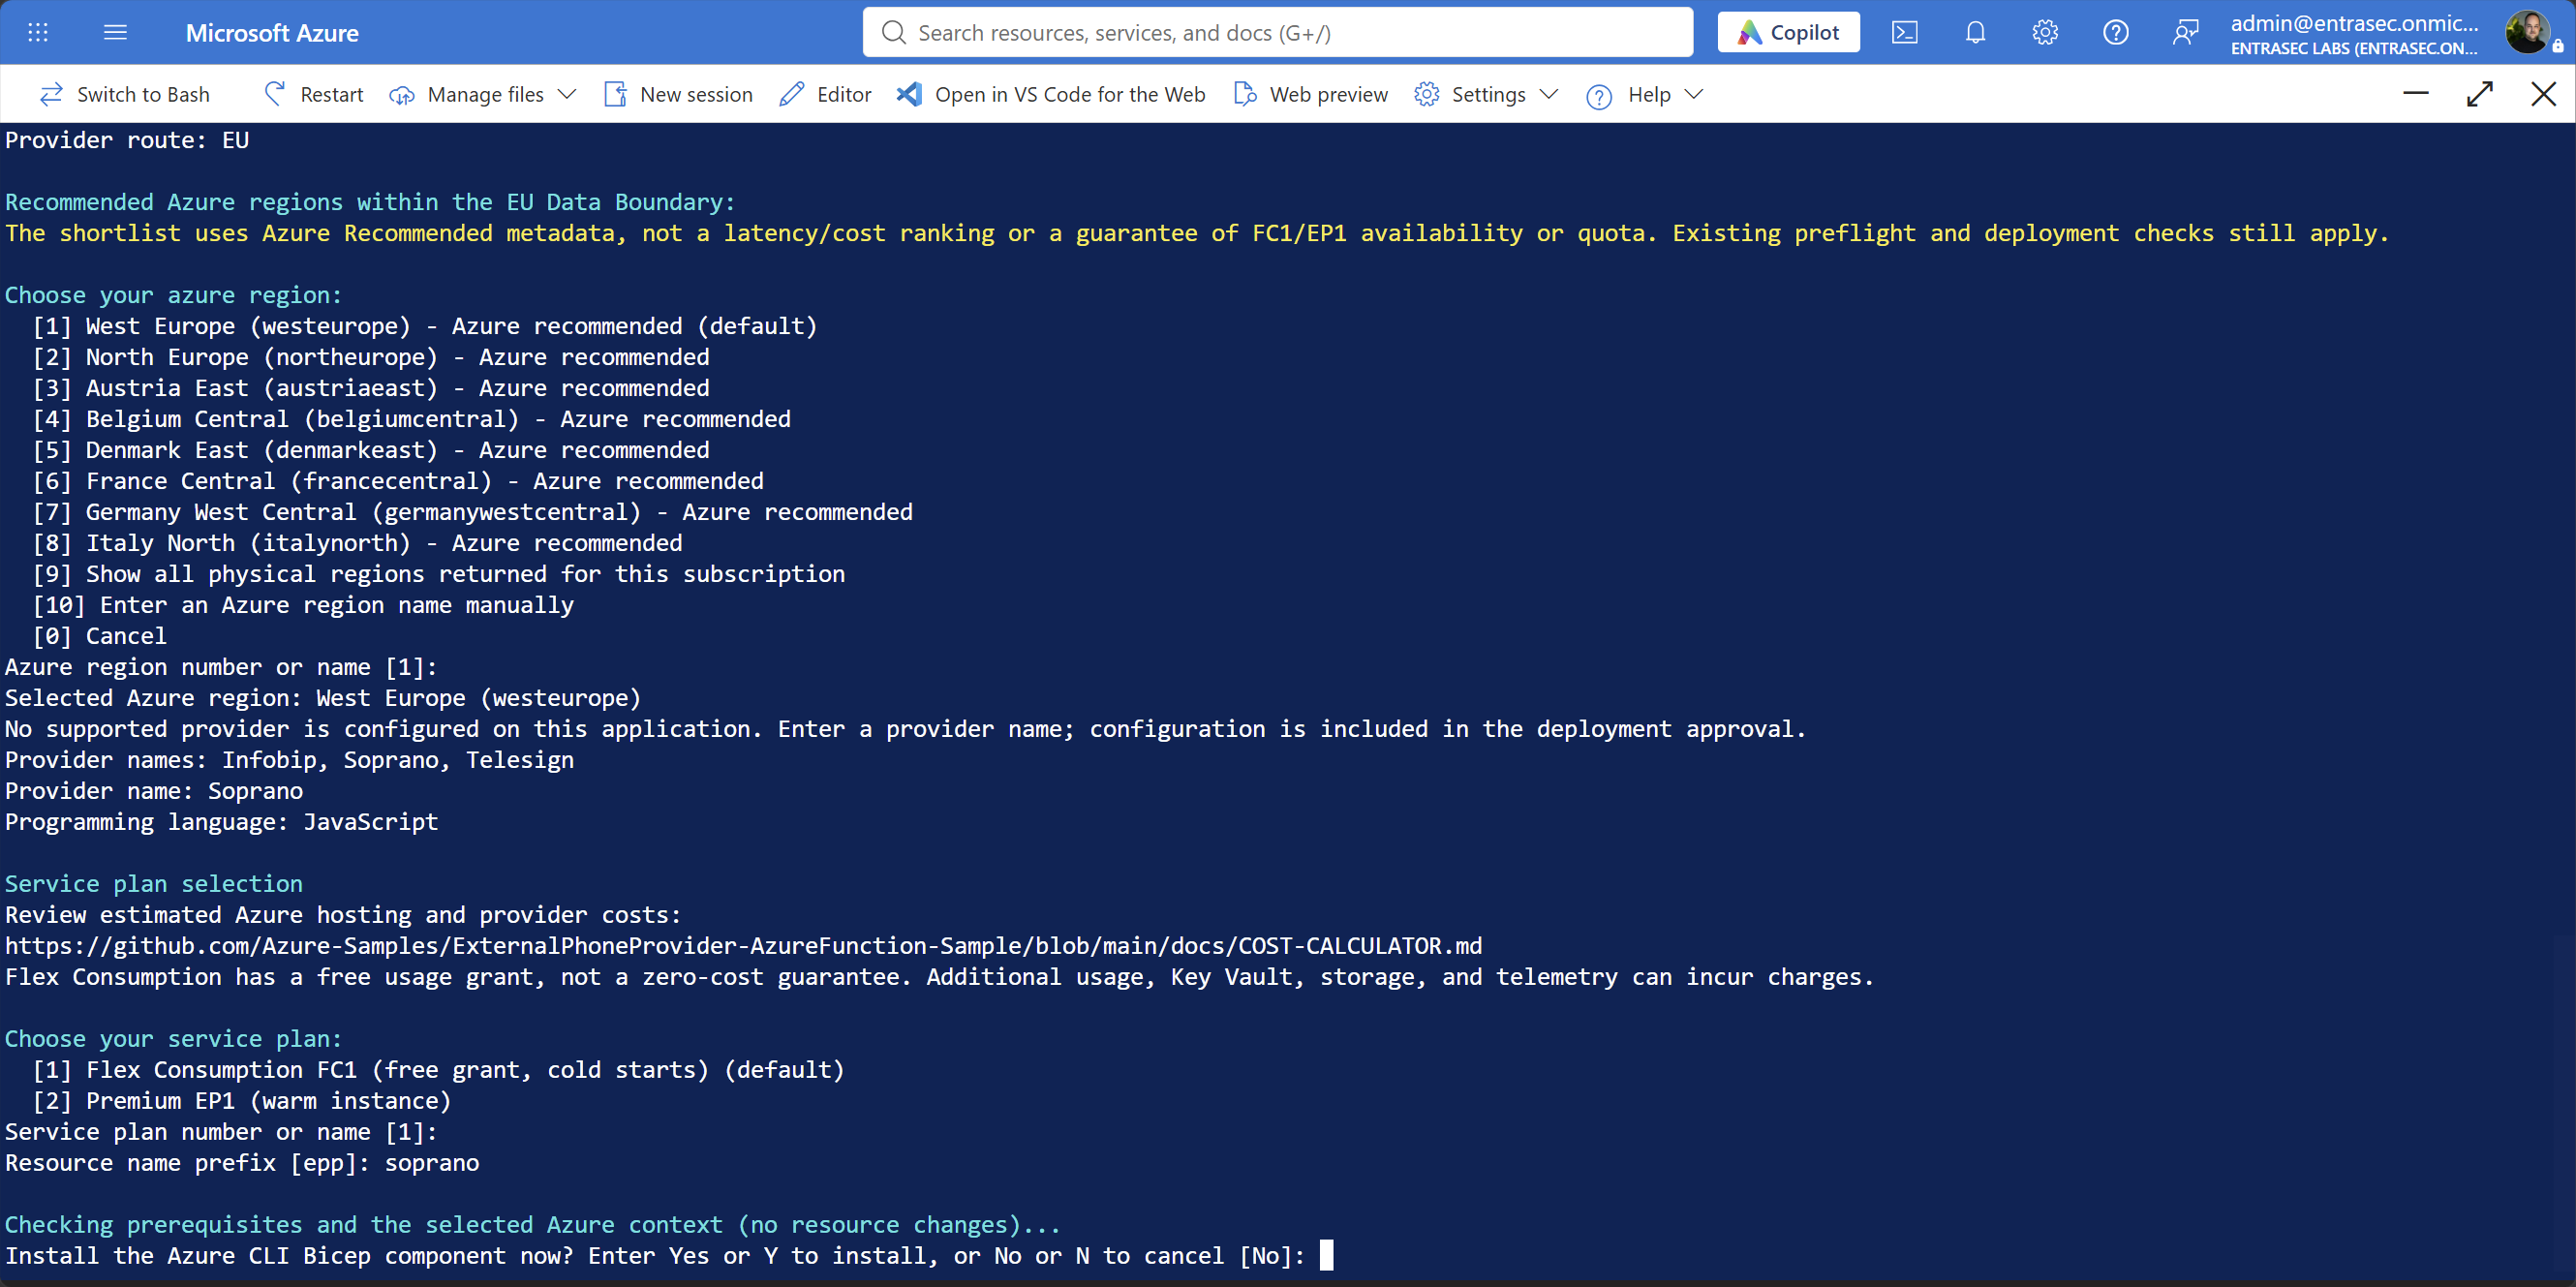
[1]Flex Consumption FC1, the default, or[2]Premium EP1. I picked FC1. Consider this carefully: FC1 has a free usage grant and up to 40 on-demand instances but zero always-ready instances, so cold starts are a concern with a provider timeout of 1500 ms. EP1 keeps one warm instance and bills continuously. The free grant is not a zero-cost guarantee either; Key Vault, storage, and telemetry bill regardless.Resource name prefix. Two to eight lowercase characters, default
epp. I usedsoprano. Names come out as<prefix>-epp-func-<hash>, and the hash is derived from your subscription, app ID, and prefix, so it is deterministic: rerun with the same app ID and prefix and you land on the same resources; change the prefix and you build a second set. Write your prefix down next to the client ID.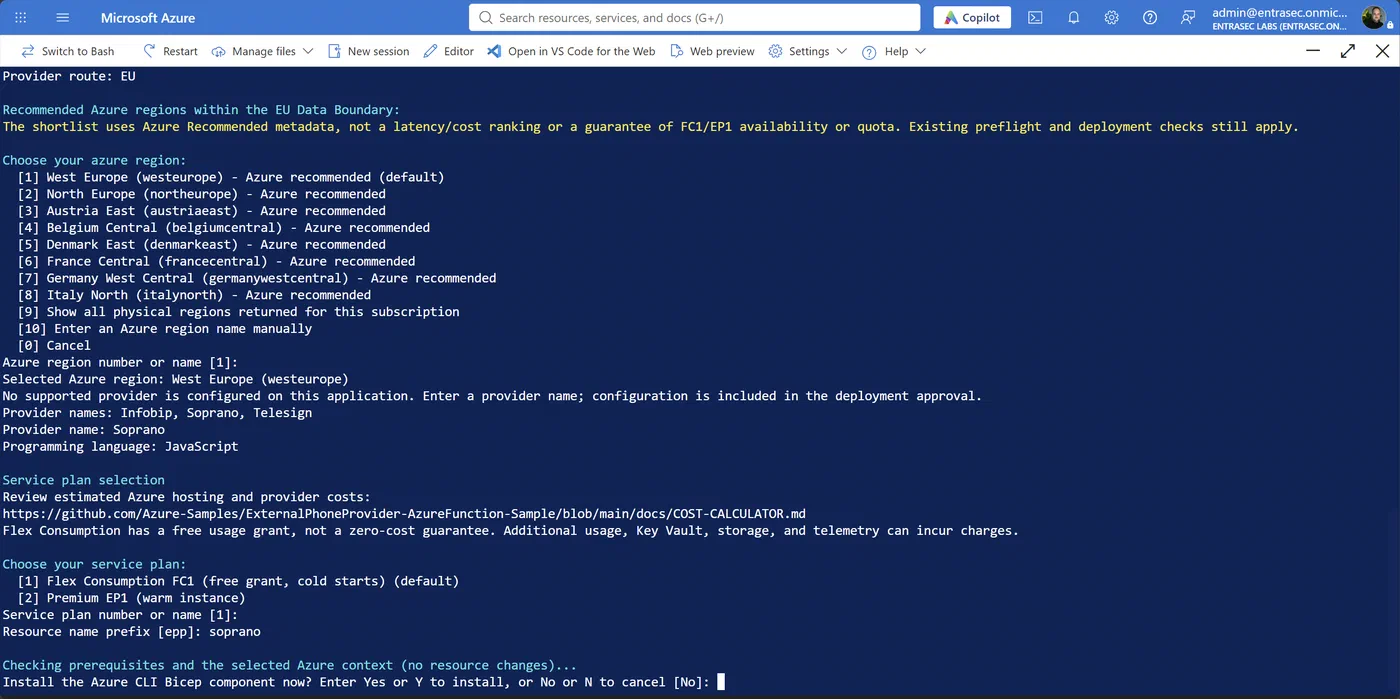
Prerequisite checks. No input unless something is missing, in which case the script offers to install the Azure CLI Bicep component.
Encryption certificate. On a fresh app registration, there is no prompt, and you just see
Registered encryption certificates: 0.The plan and the only approval. The script prints everything: settings, every Azure resource, every RBAC assignment, every Entra change, and the endpoint security configuration. Read it. Then:
Proceed with deployment? Enter Yes or Y to deploy, or No or N to cancel [No]Deployment takes several minutes.
What lands in Azure#
While you wait, let’s see what happens in the backend:
One resource group, tagged managedBy: EPP-Setup:
| Resource | Name | Purpose |
|---|---|---|
| Resource group | soprano-epp-rg-<hash> | Contains everything |
| Function App | soprano-epp-func-<hash> | Hosts the endpoint |
| Hosting plan | soprano-epp-plan-<hash> | FC1, 2048 MB, 0 always-ready |
| Storage account | sopranoeppsa<hash> | Host storage and private package blob |
| Key Vault | soprano-epp-kv-<hash> | Encryption certificate |
| User-assigned identity | soprano-epp-outbound-<hash> | Outbound provider authentication |
| Log Analytics | soprano-epp-logs-<hash> | Platform and application logs |
| Application Insights | soprano-epp-insights-<hash> | Function telemetry |
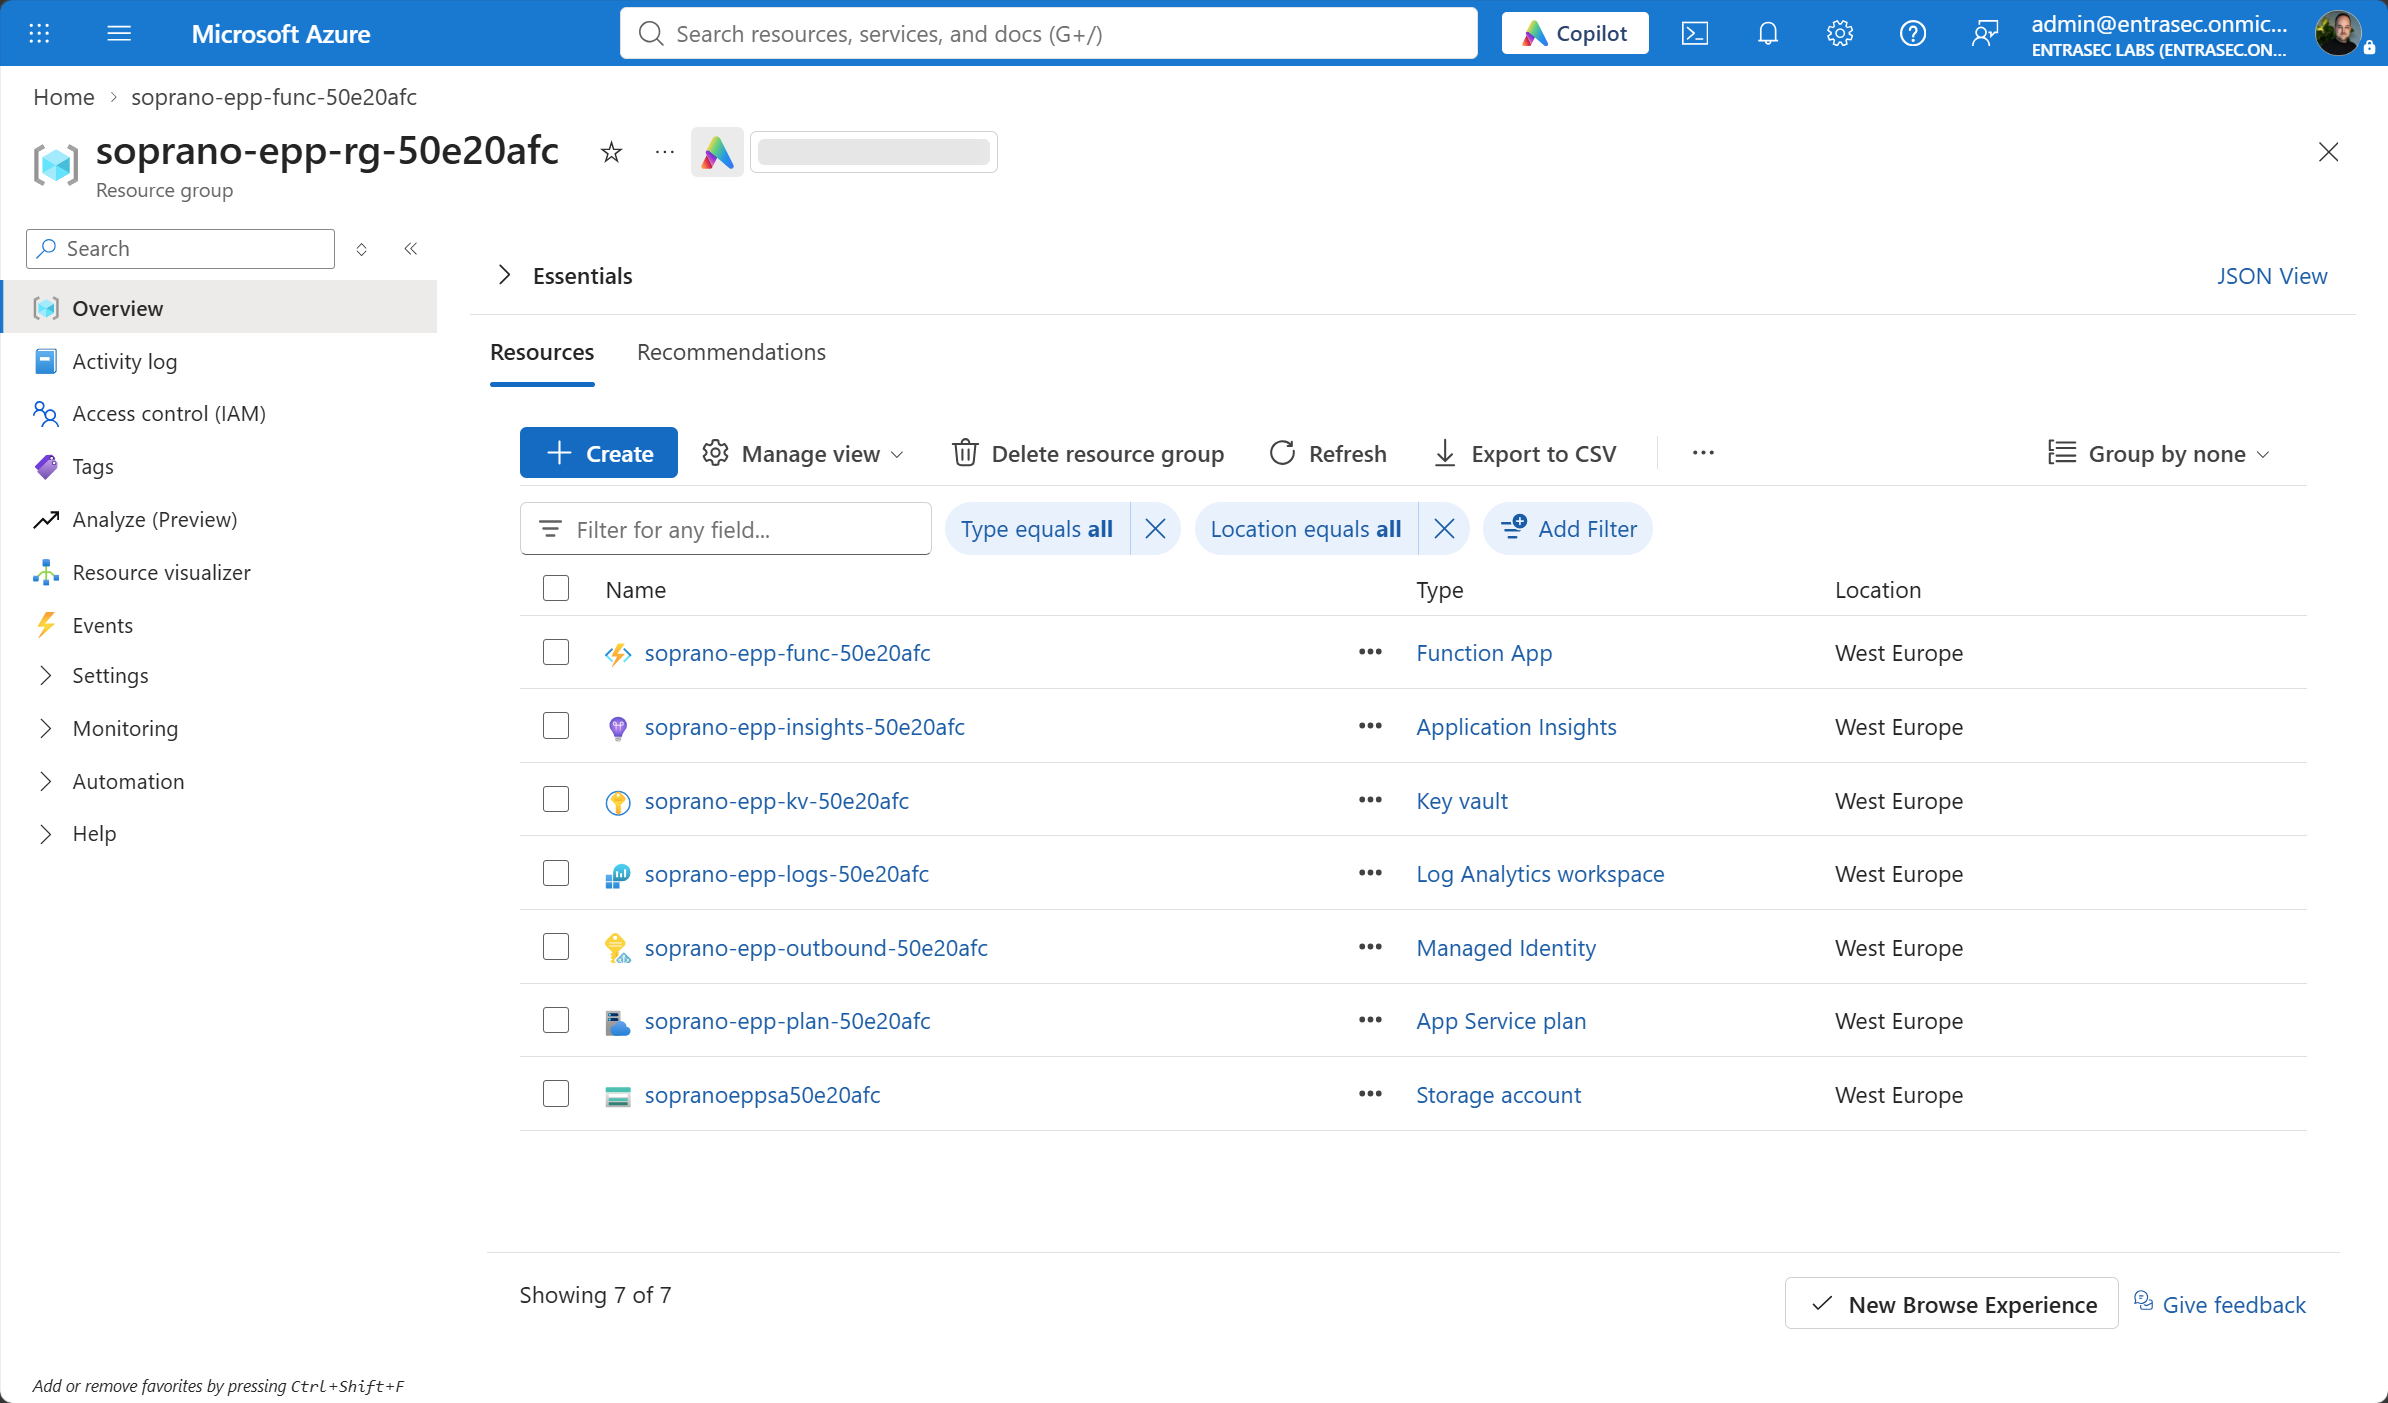
The Function also gets a system-assigned identity with data-plane access to storage, Key Vault secrets, and metrics. You get the certificate and secret officer roles, scoped to that vault only.
The Function App deploys with publicNetworkAccess: Disabled, Easy Auth is configured, and the script then reads the configuration back and validates it before opening ingress. If the readback does not match, ingress stays shut. Among the things it insists on: HTTPS only, 401 for unauthenticated callers, no excluded paths, a single allowed audience, and allowedApplications containing exactly 25ec60fa-f18d-41a4-b398-50044c90ce13. The endpoint is callable by one application in the world.
Deployment done?#
At the end you get the endpoint URL and the Application (client) ID. Save the output.
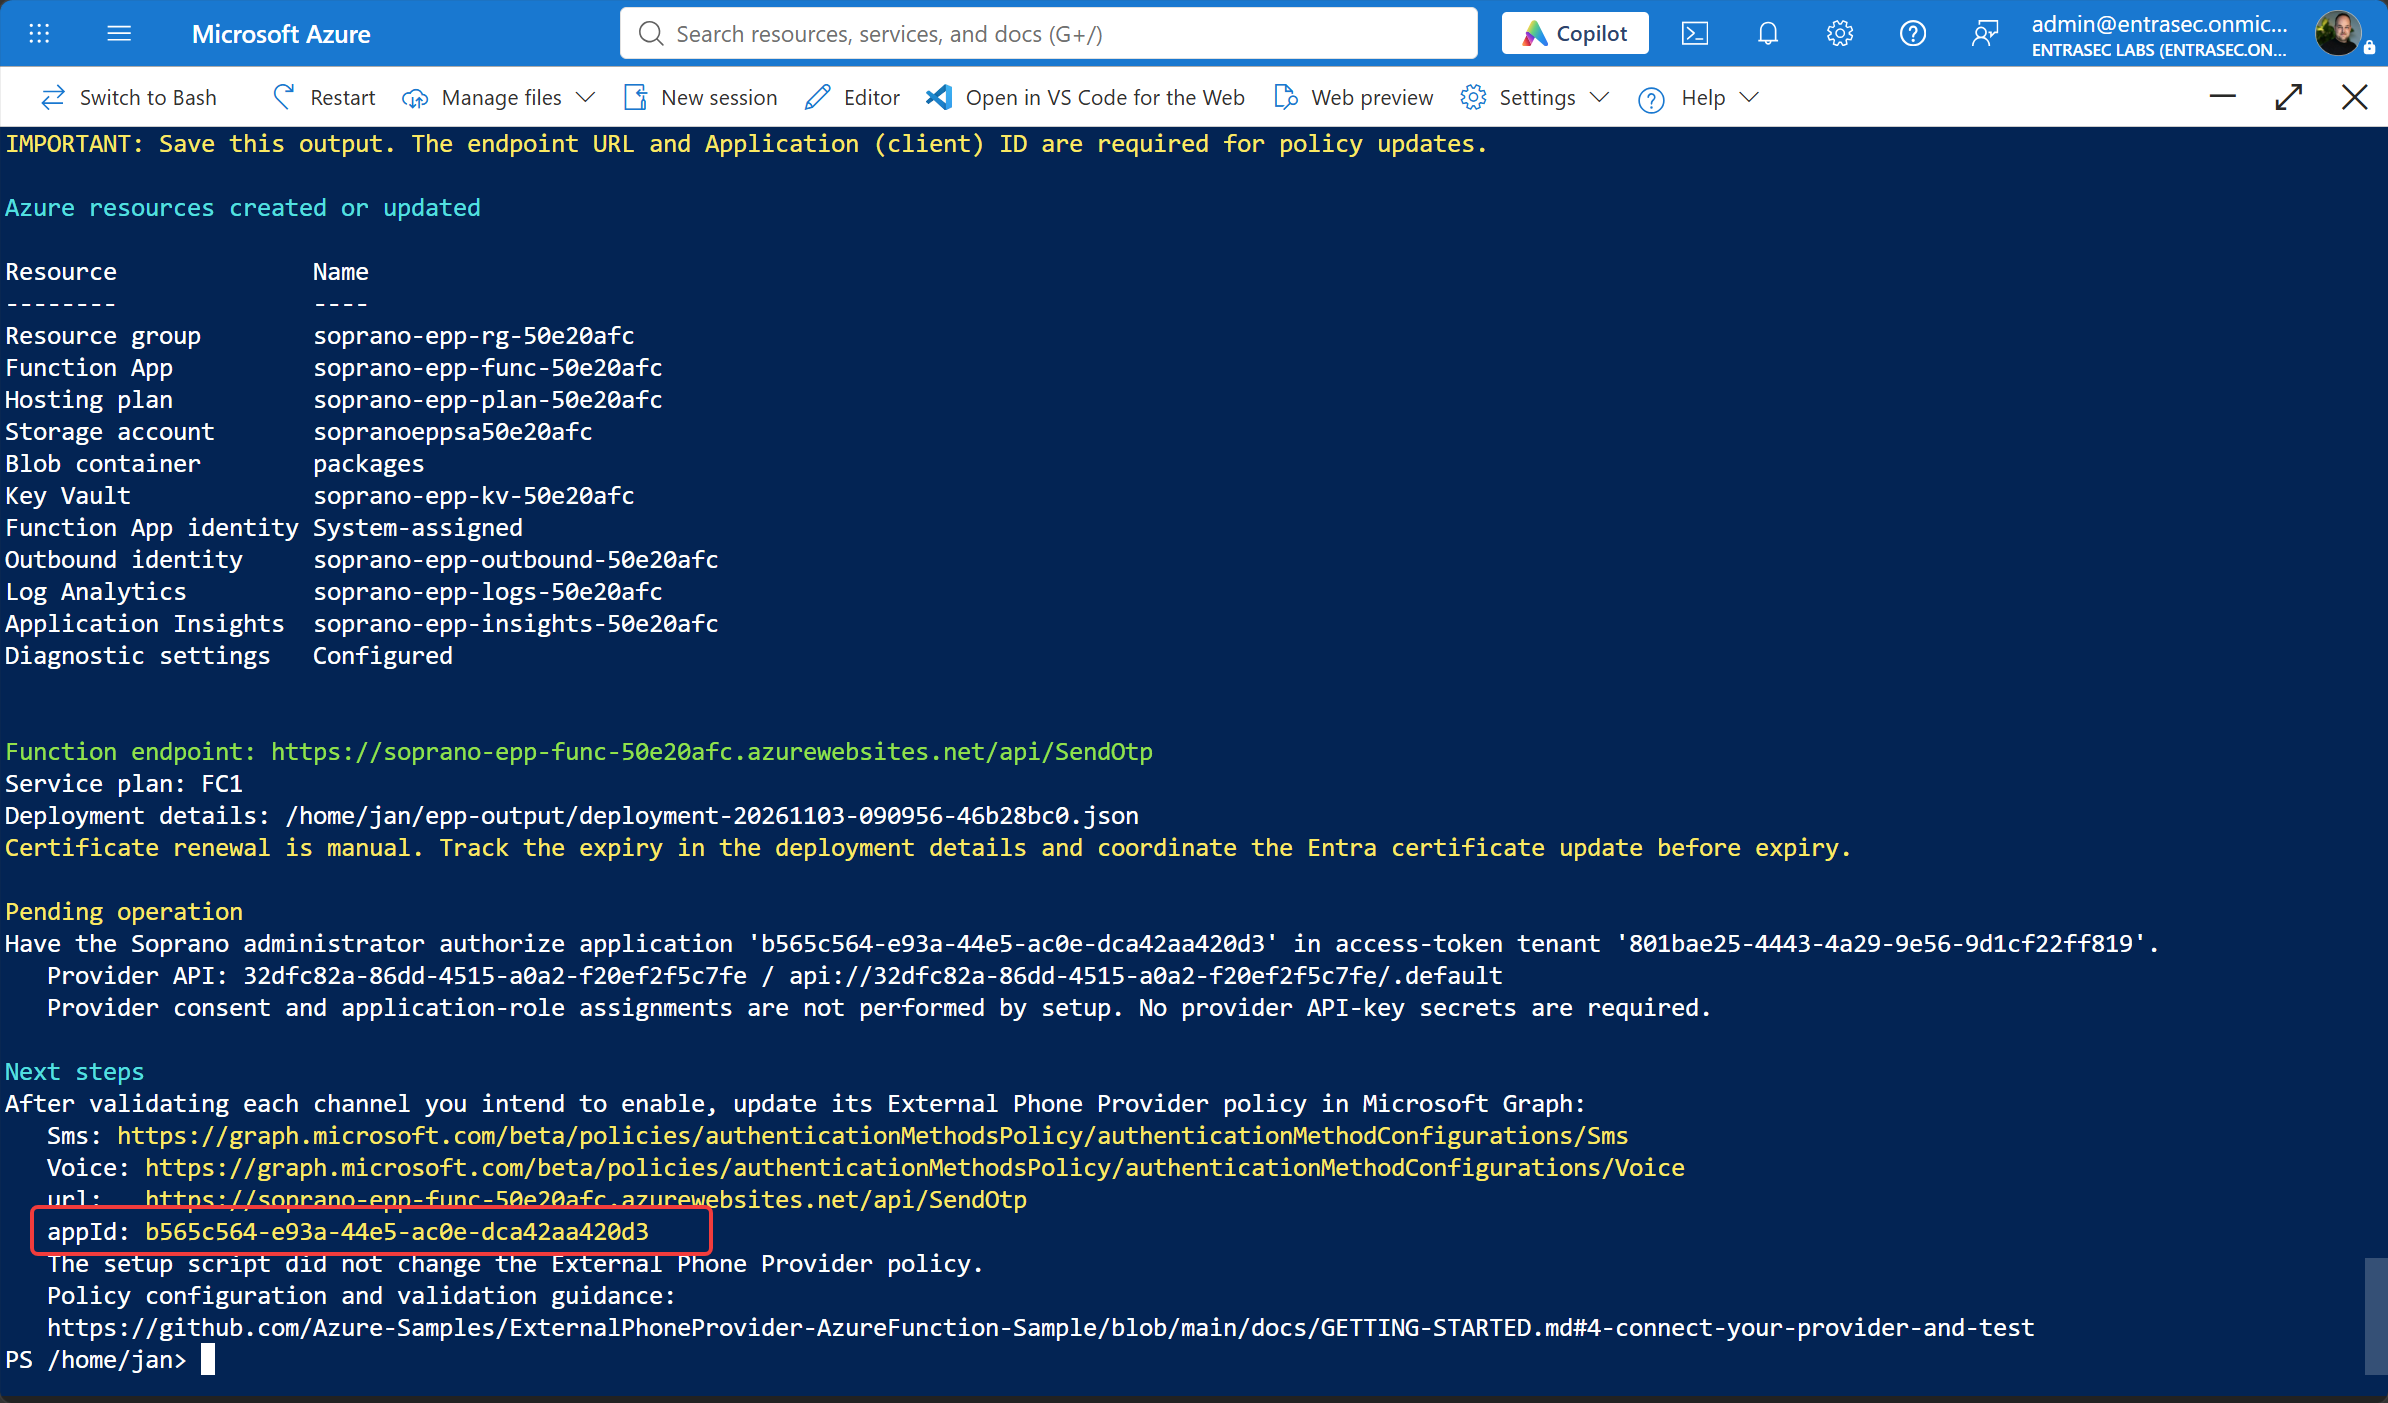
Note: This is the part where everything comes together, so pay close attention.
You can now copy the Application ID and continue where you left off on the Soprano configuration page:
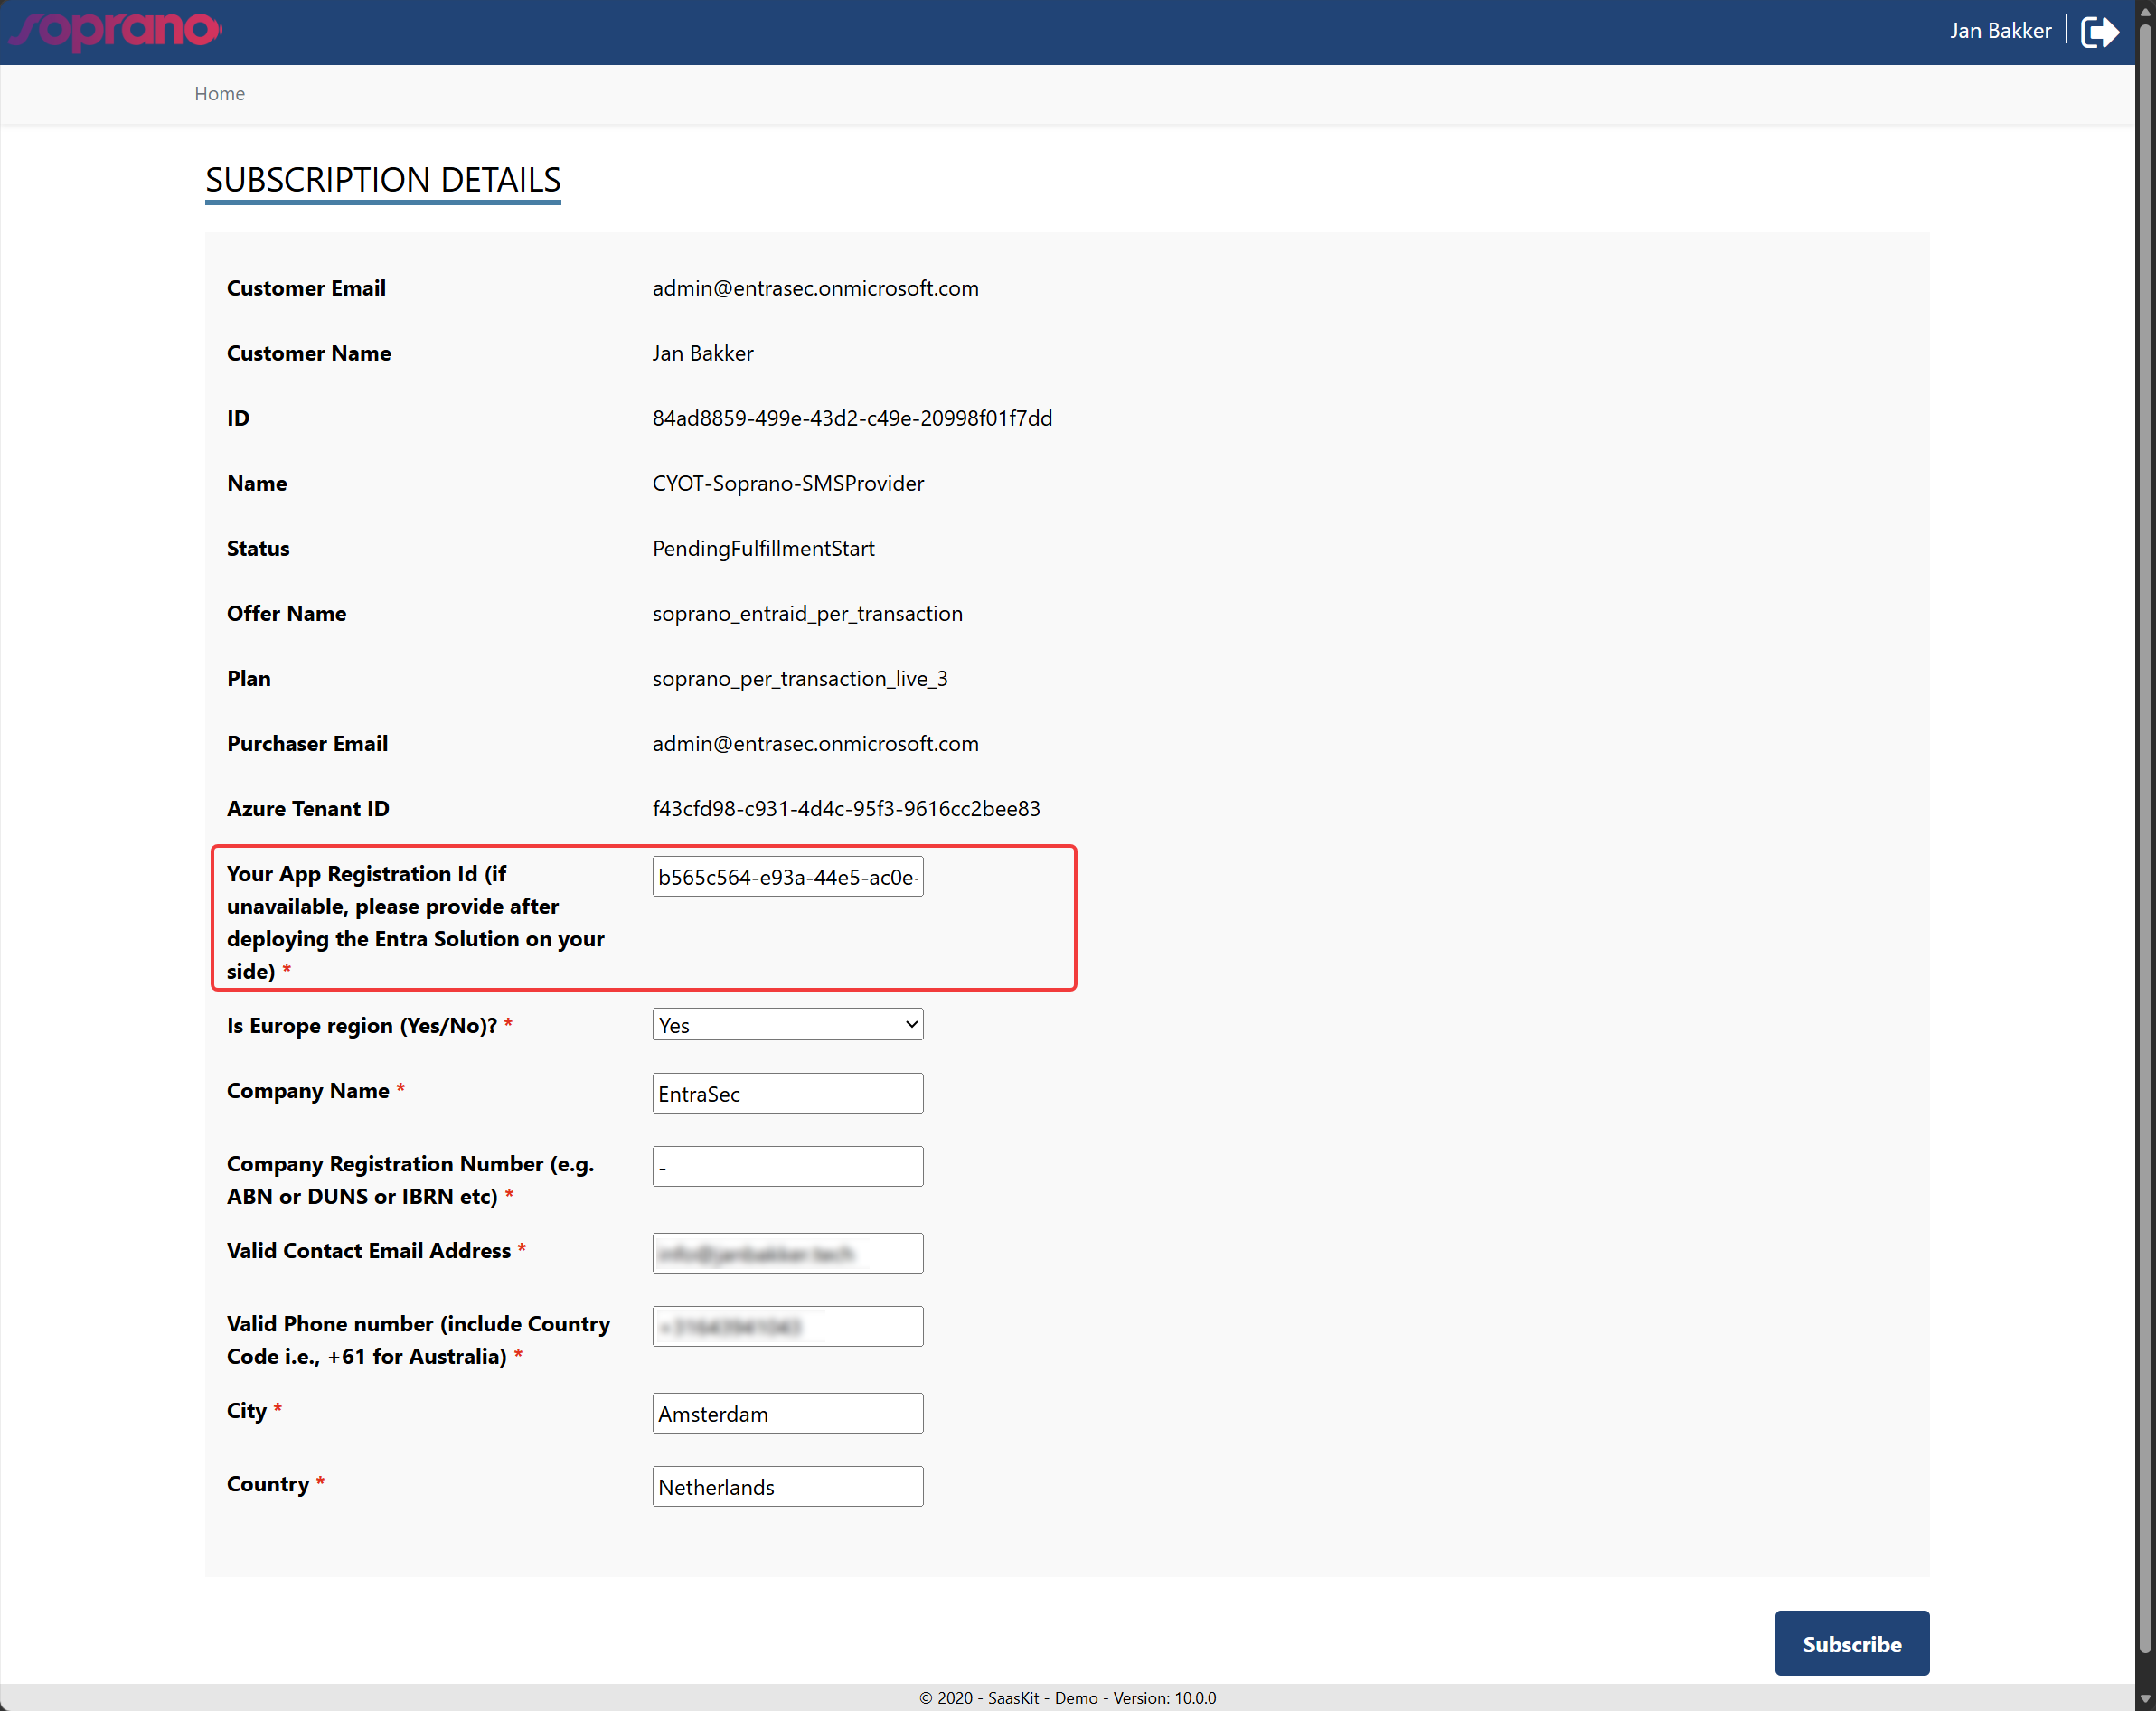
For Soprano, you also get a pending operation: their administrator must authorise your client ID in their tenant. This can take a while, but should happen in a few hours.
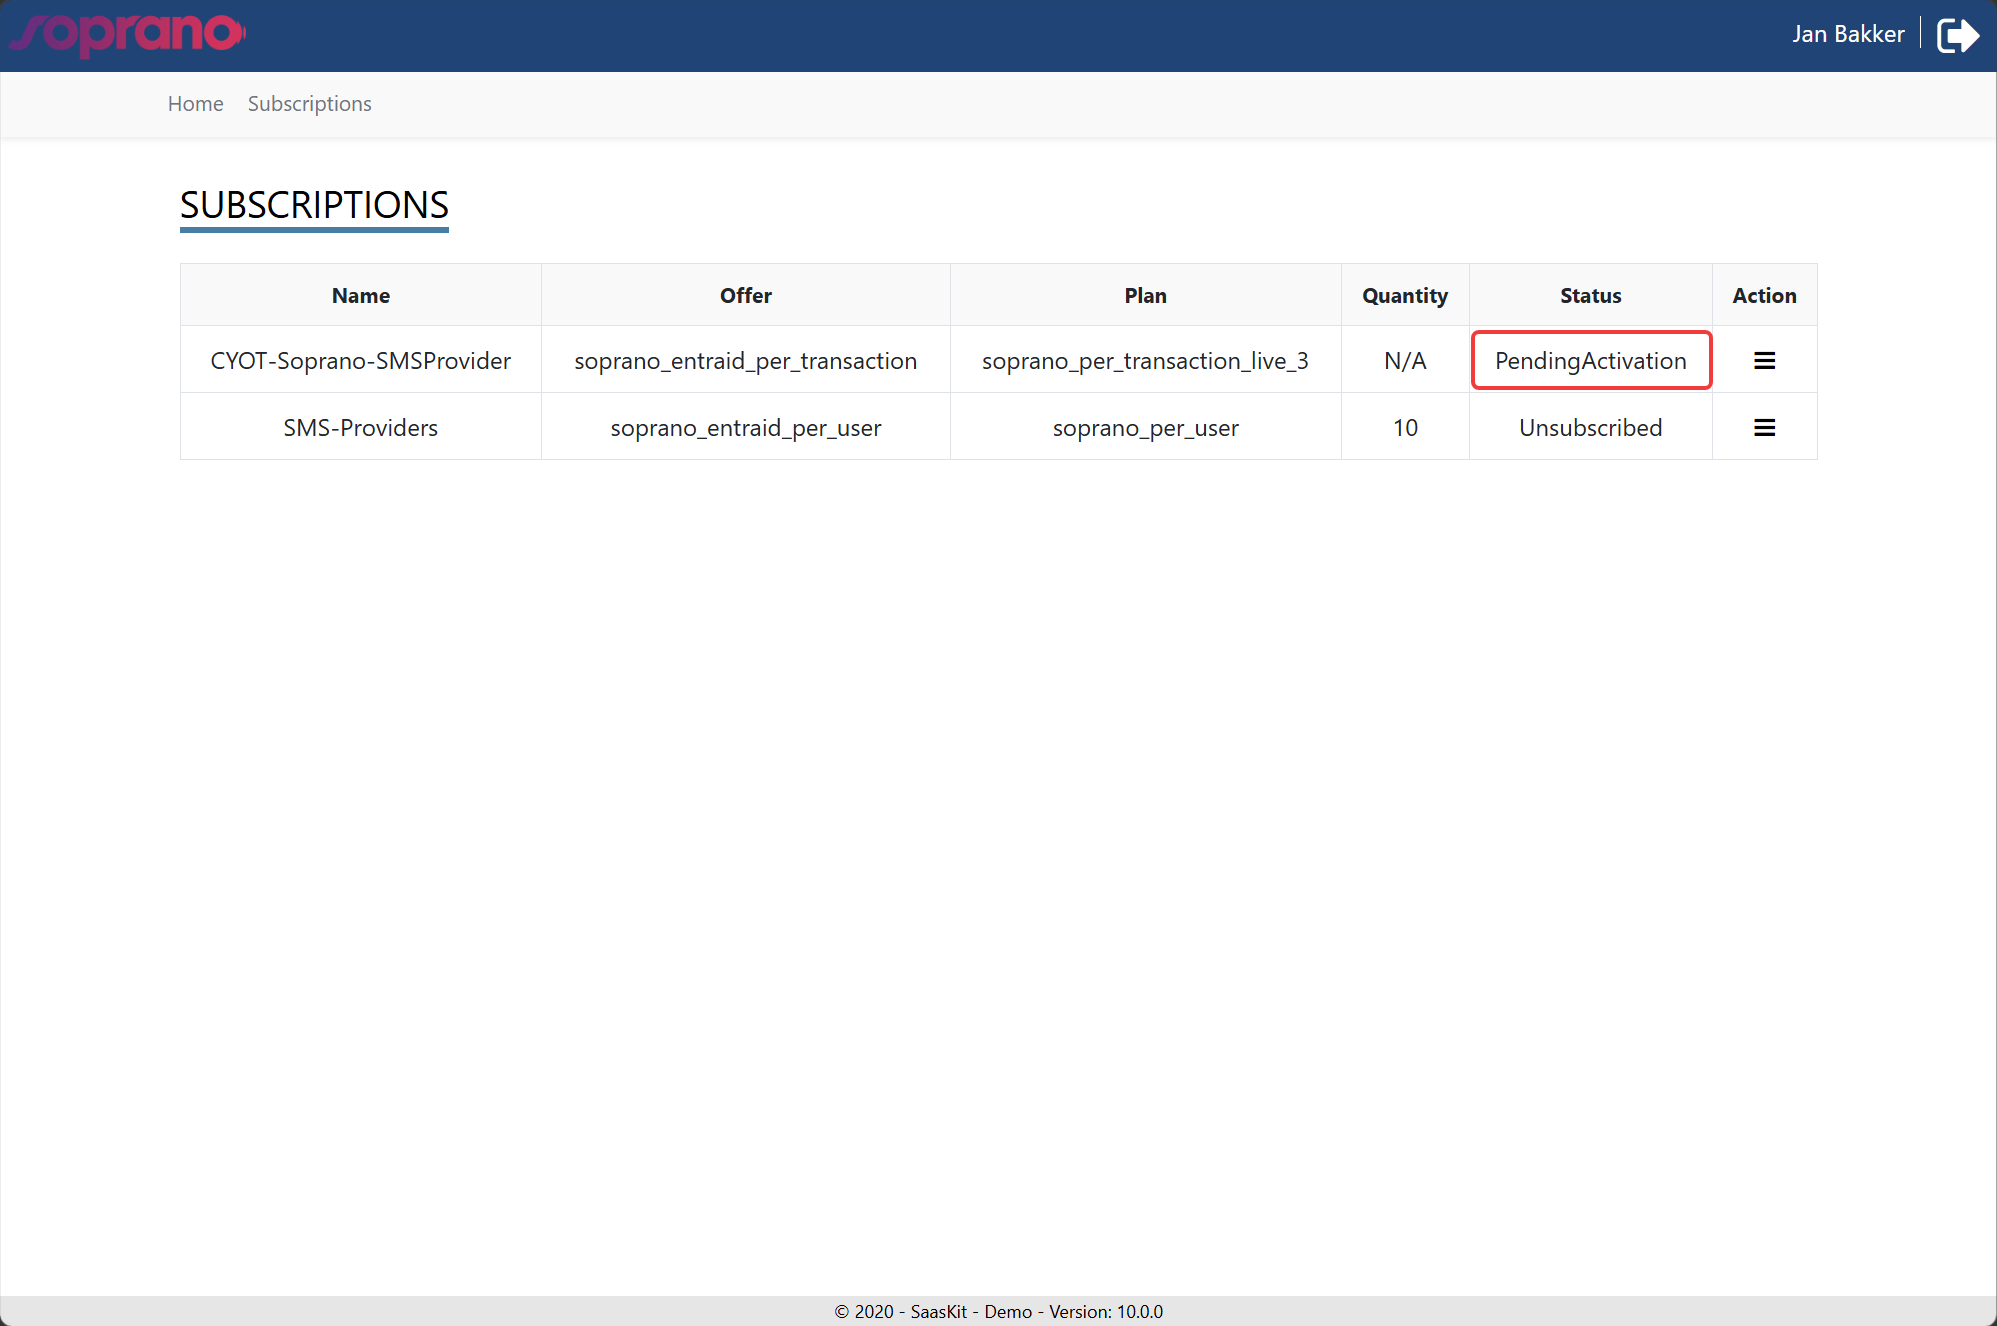
Once the provider has activated the subscription at their end, you can verify the configuration from the Entra admin center:
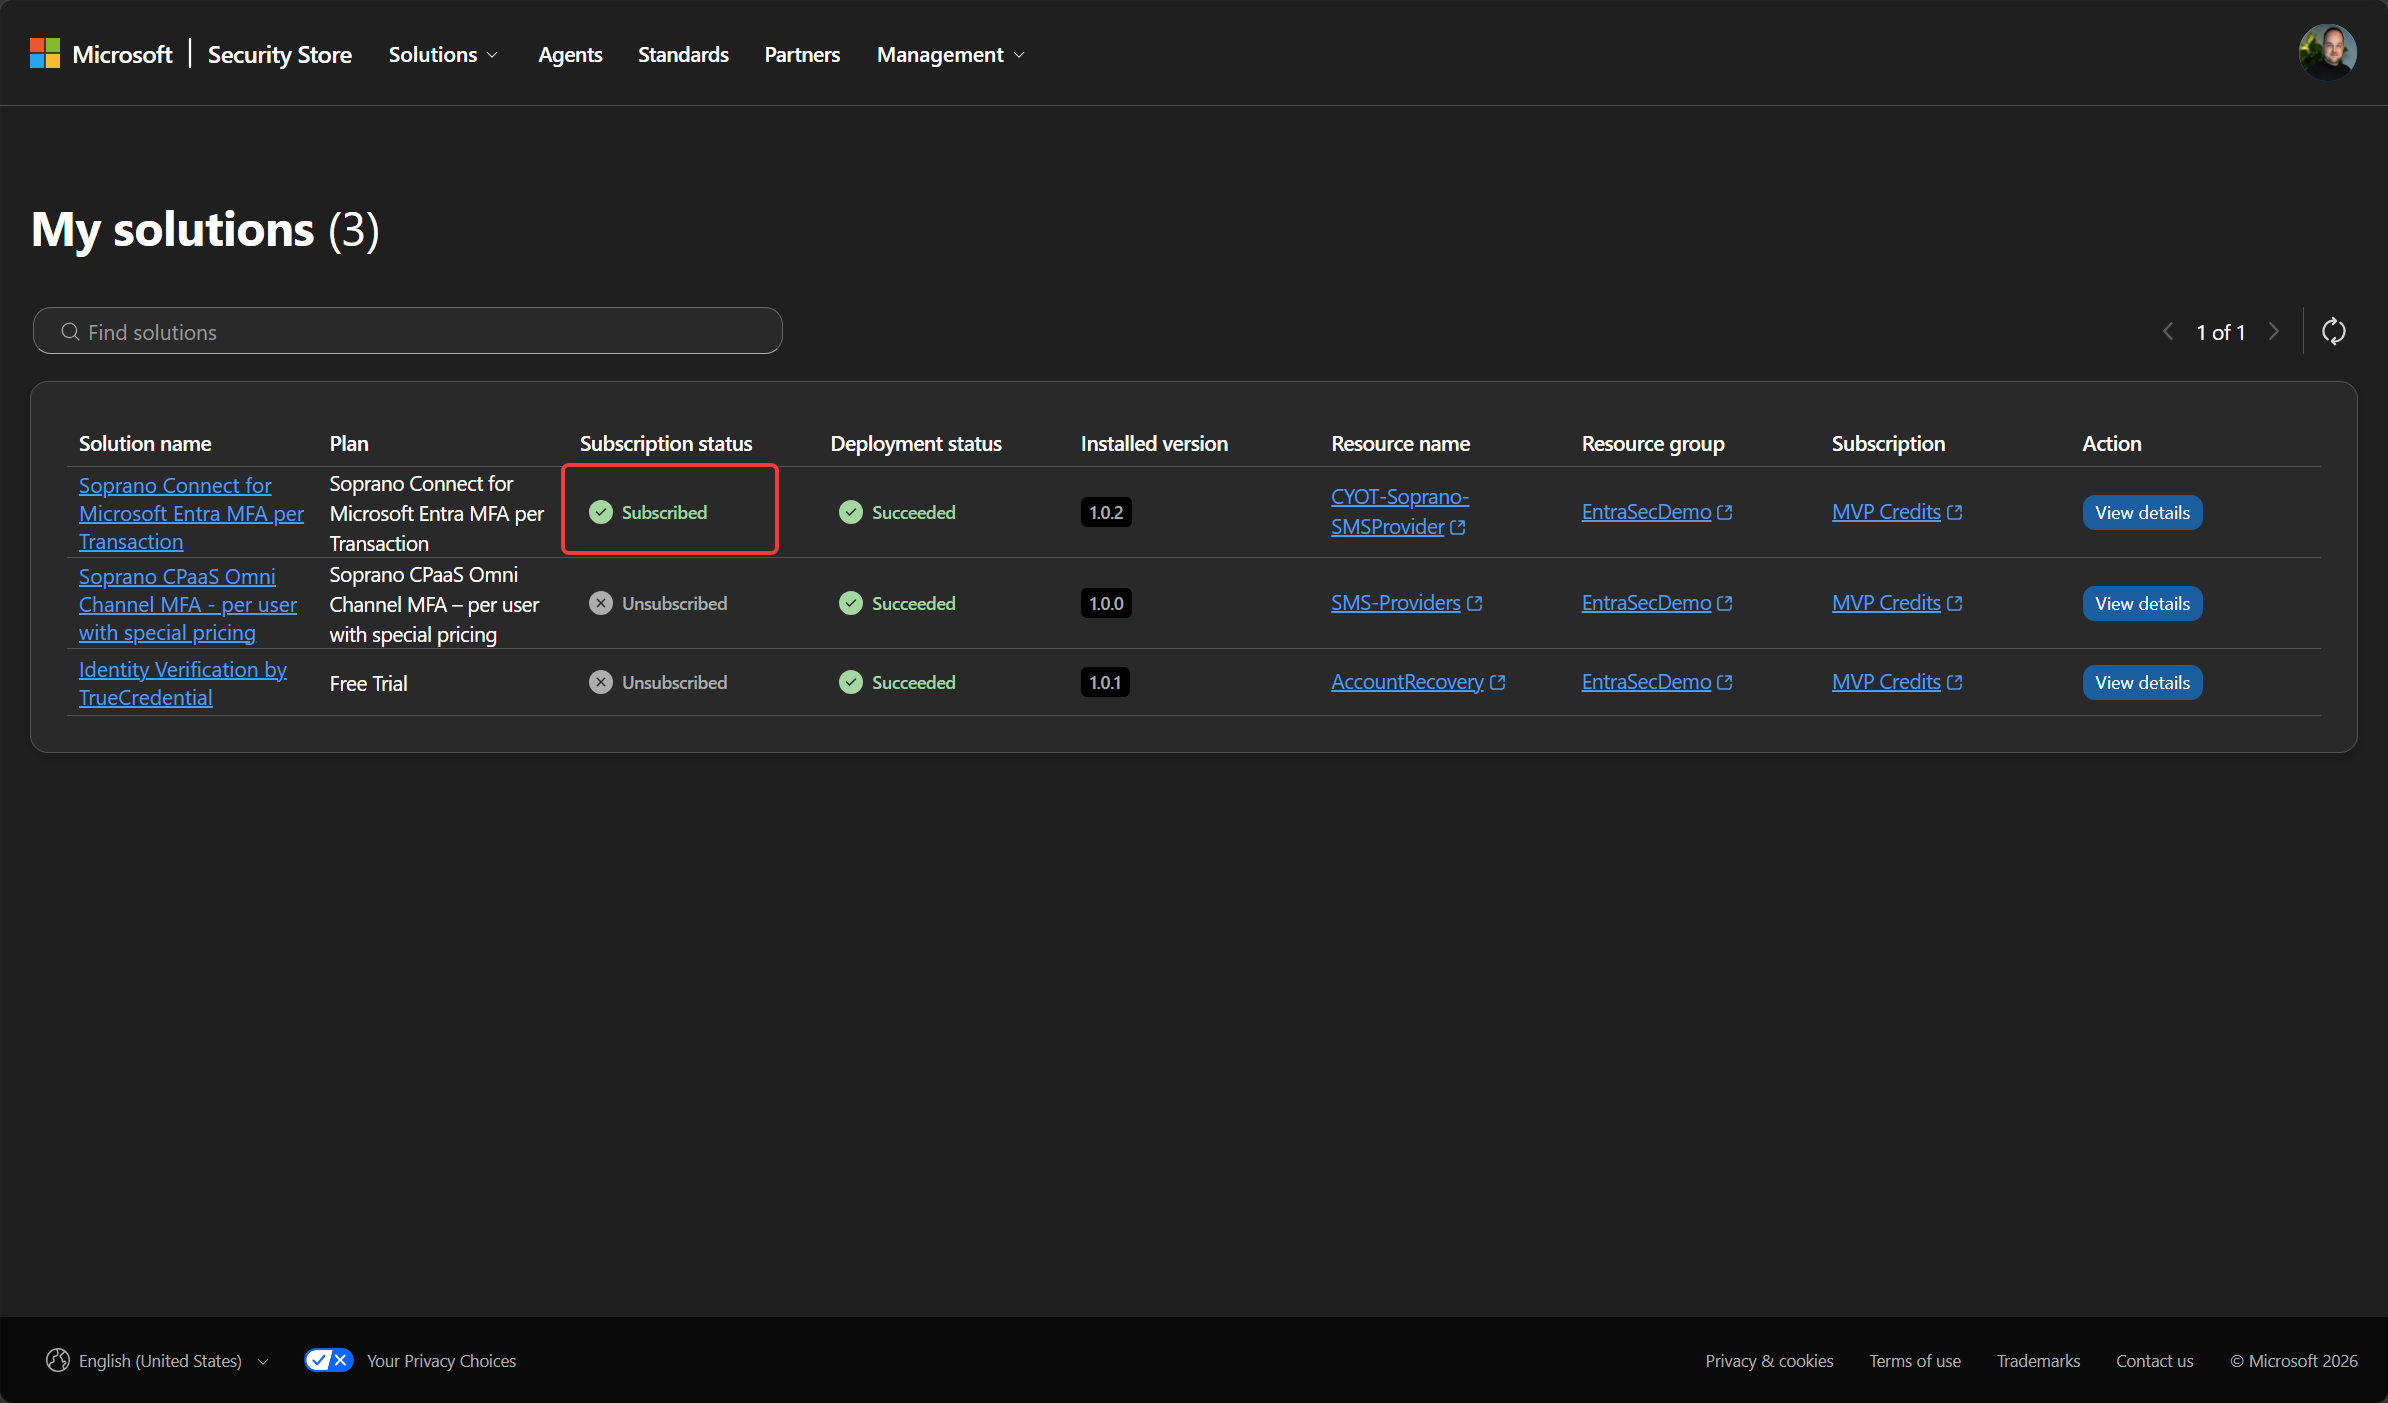
In the Microsoft Security Store, go to Management > My Solutions and confirm that the subscription status is Subscribed before continuing. Only then can you go to the next step.
Task 3: creating the profile#
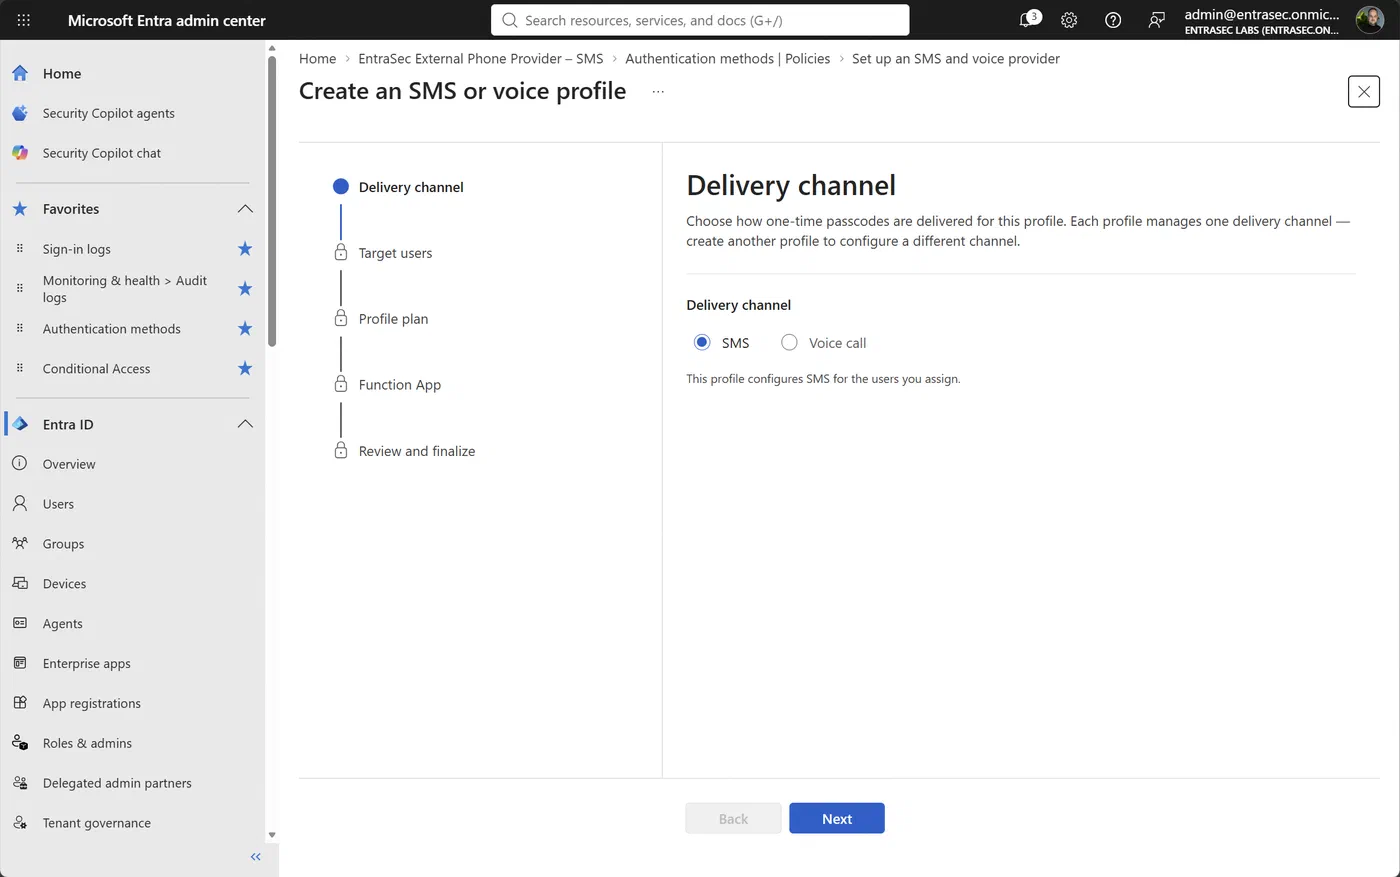
Back on Set up an SMS and voice provider, pick the third task, Create an SMS or voice profile. There is one profile per channel, so run it twice if you need both.
Delivery channel: SMS or Voice call.
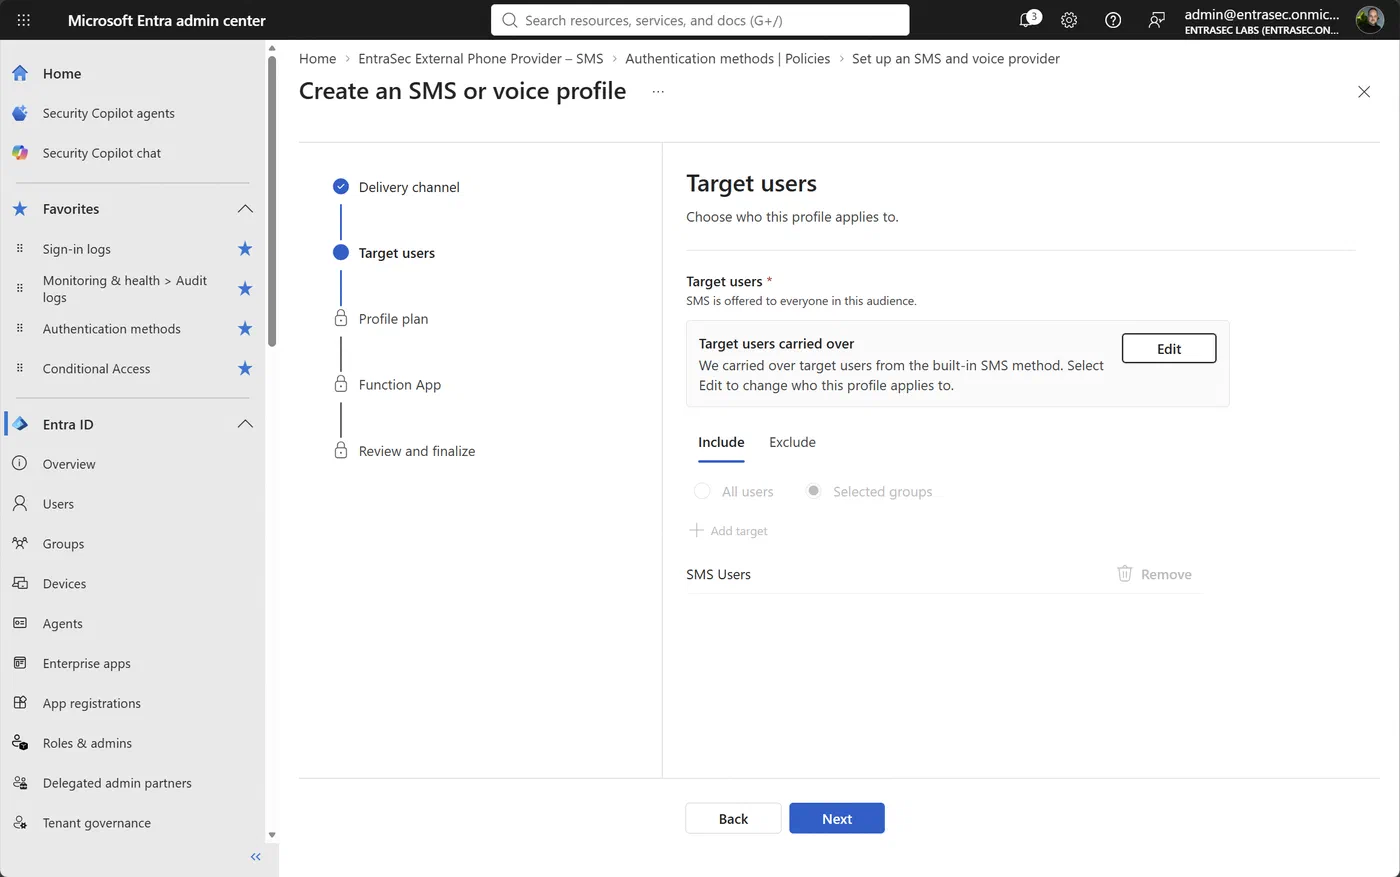
Target users: carried over from your existing configuration.
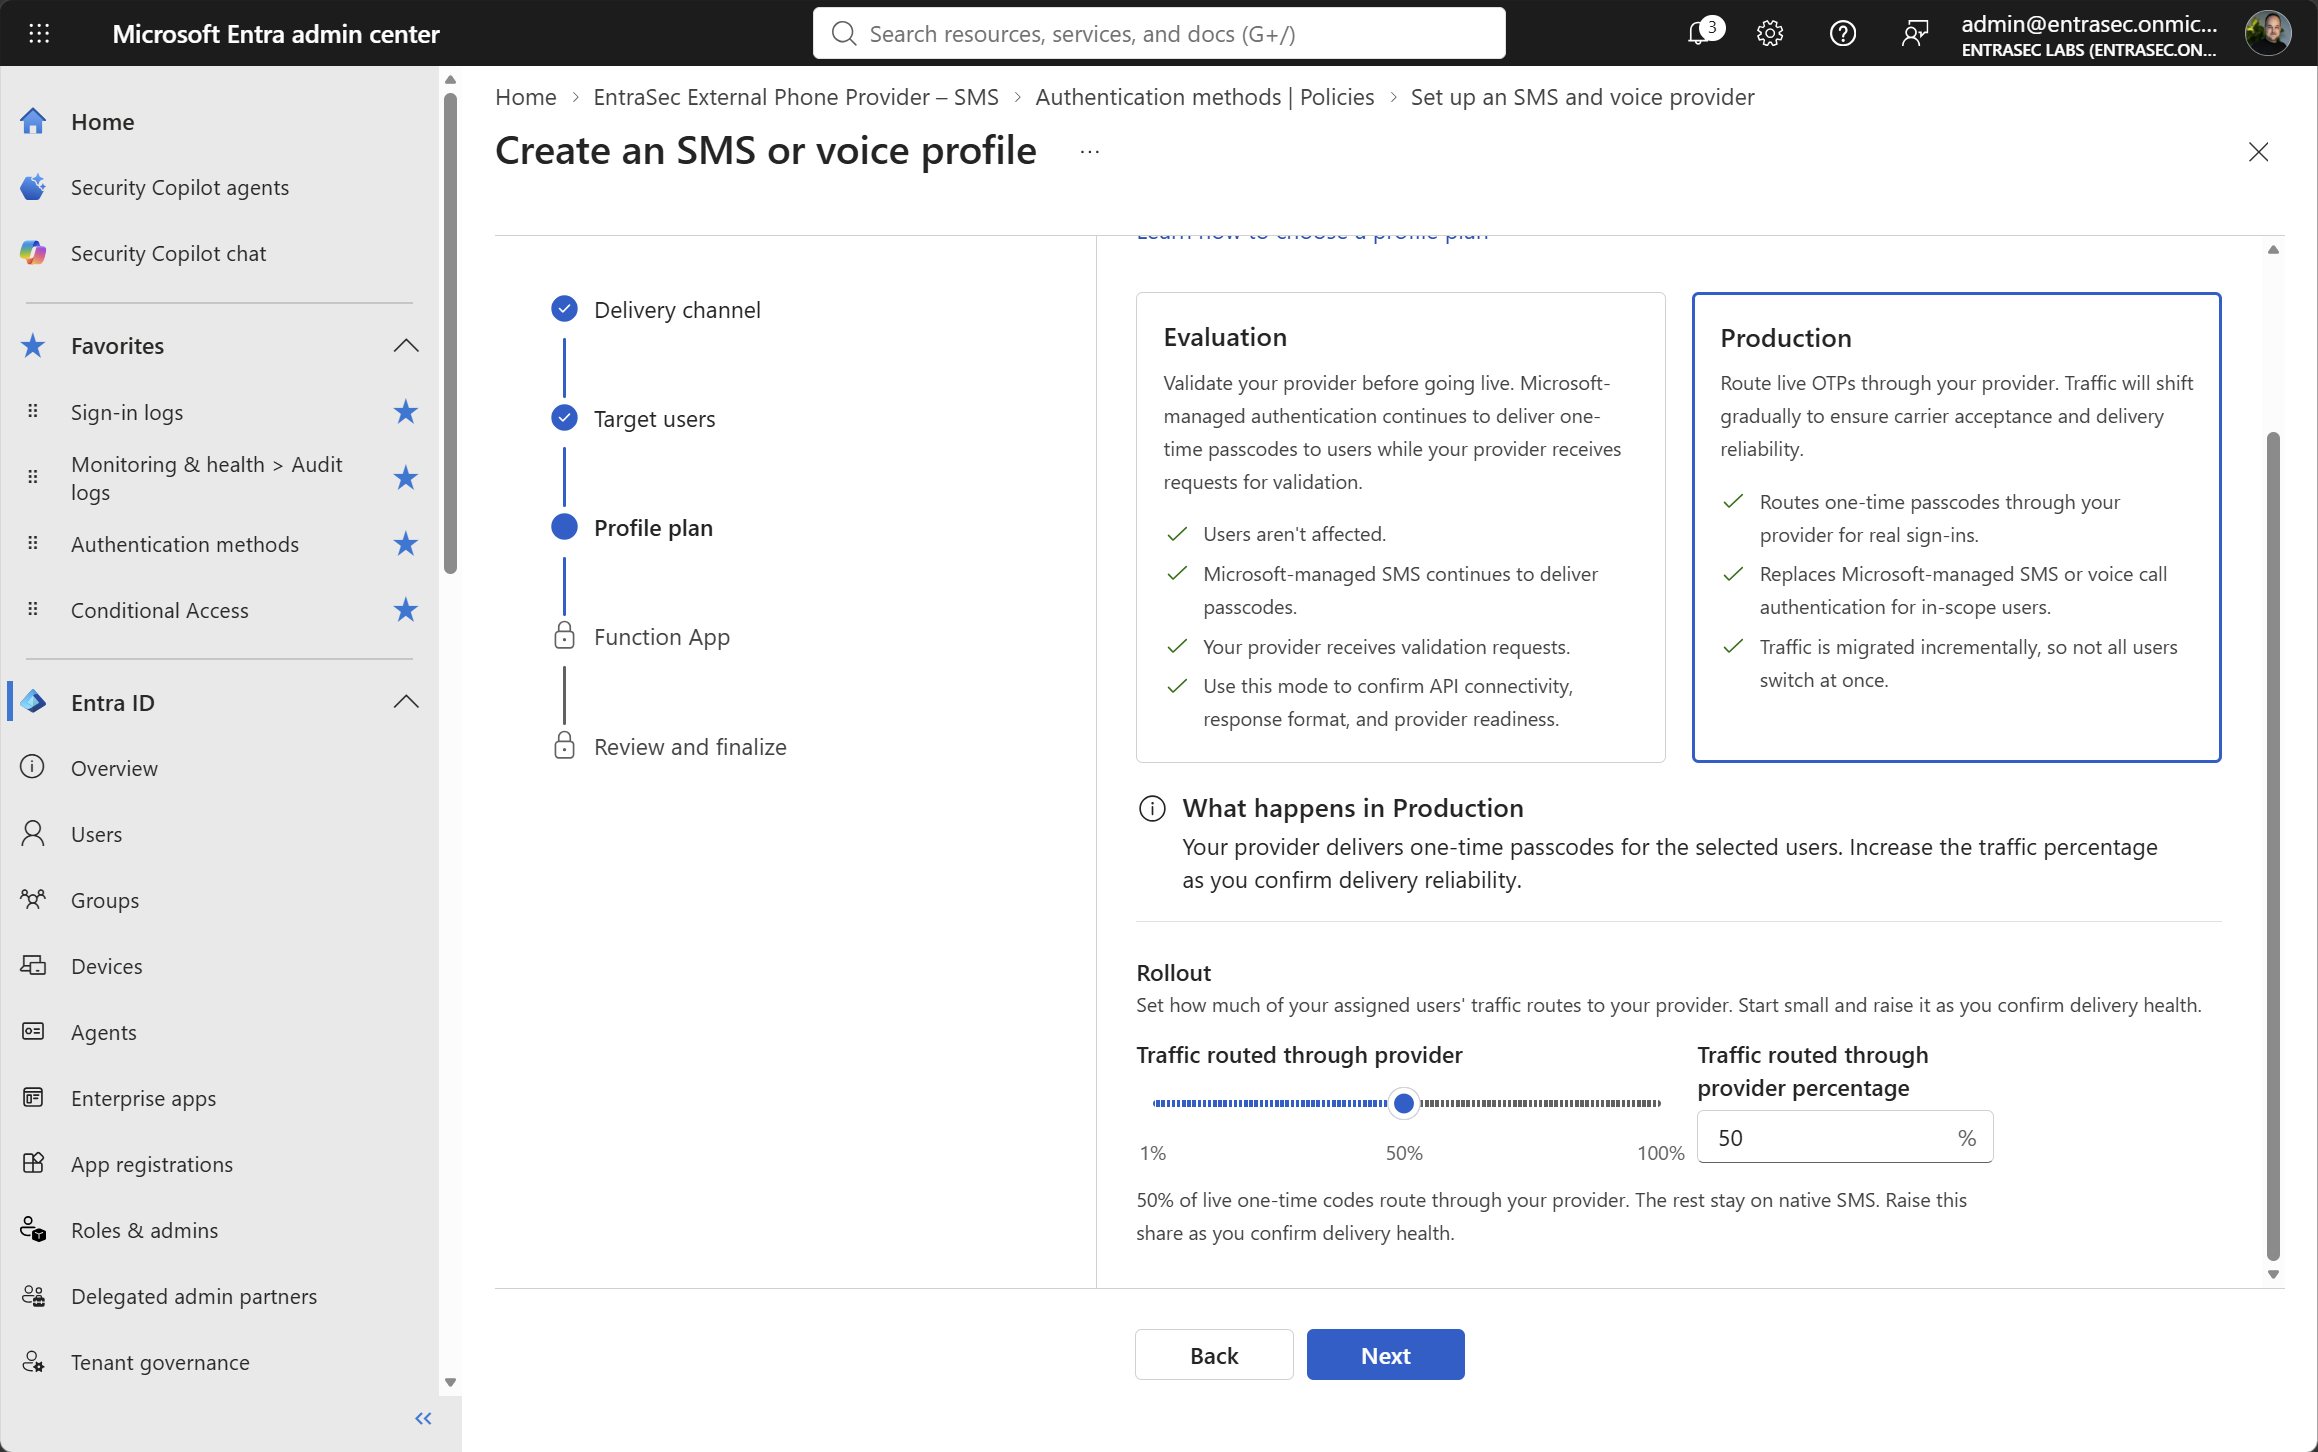
Profile plan: start with Evaluation and review the sampling percentage.
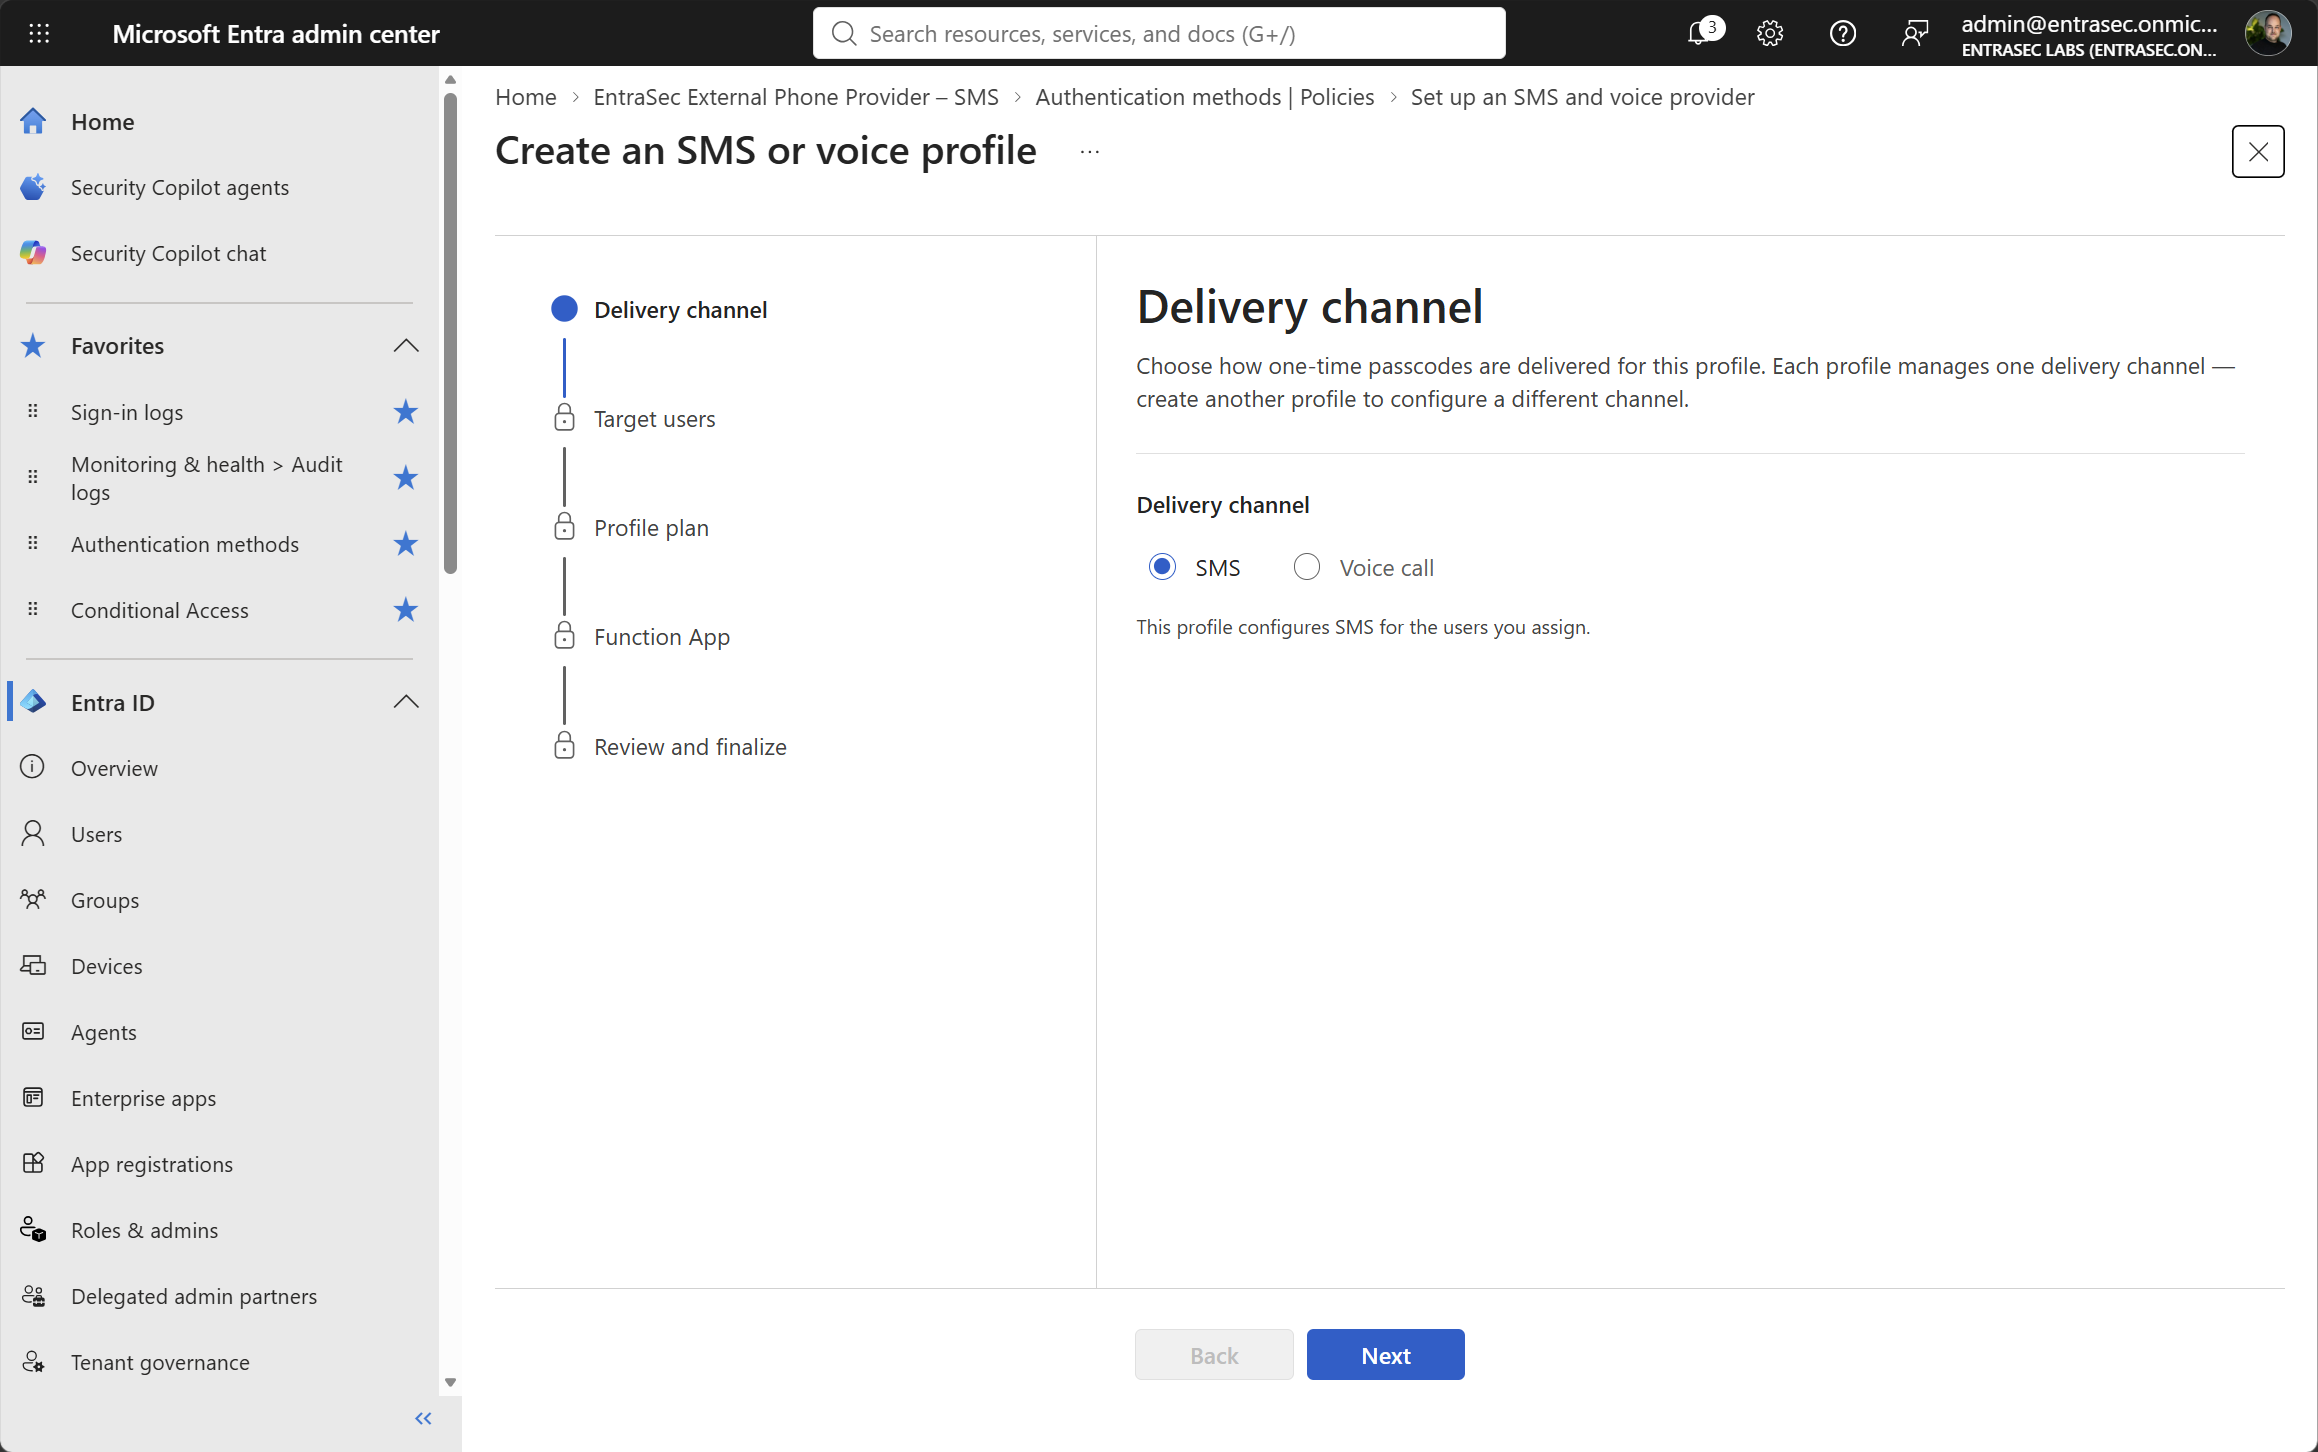
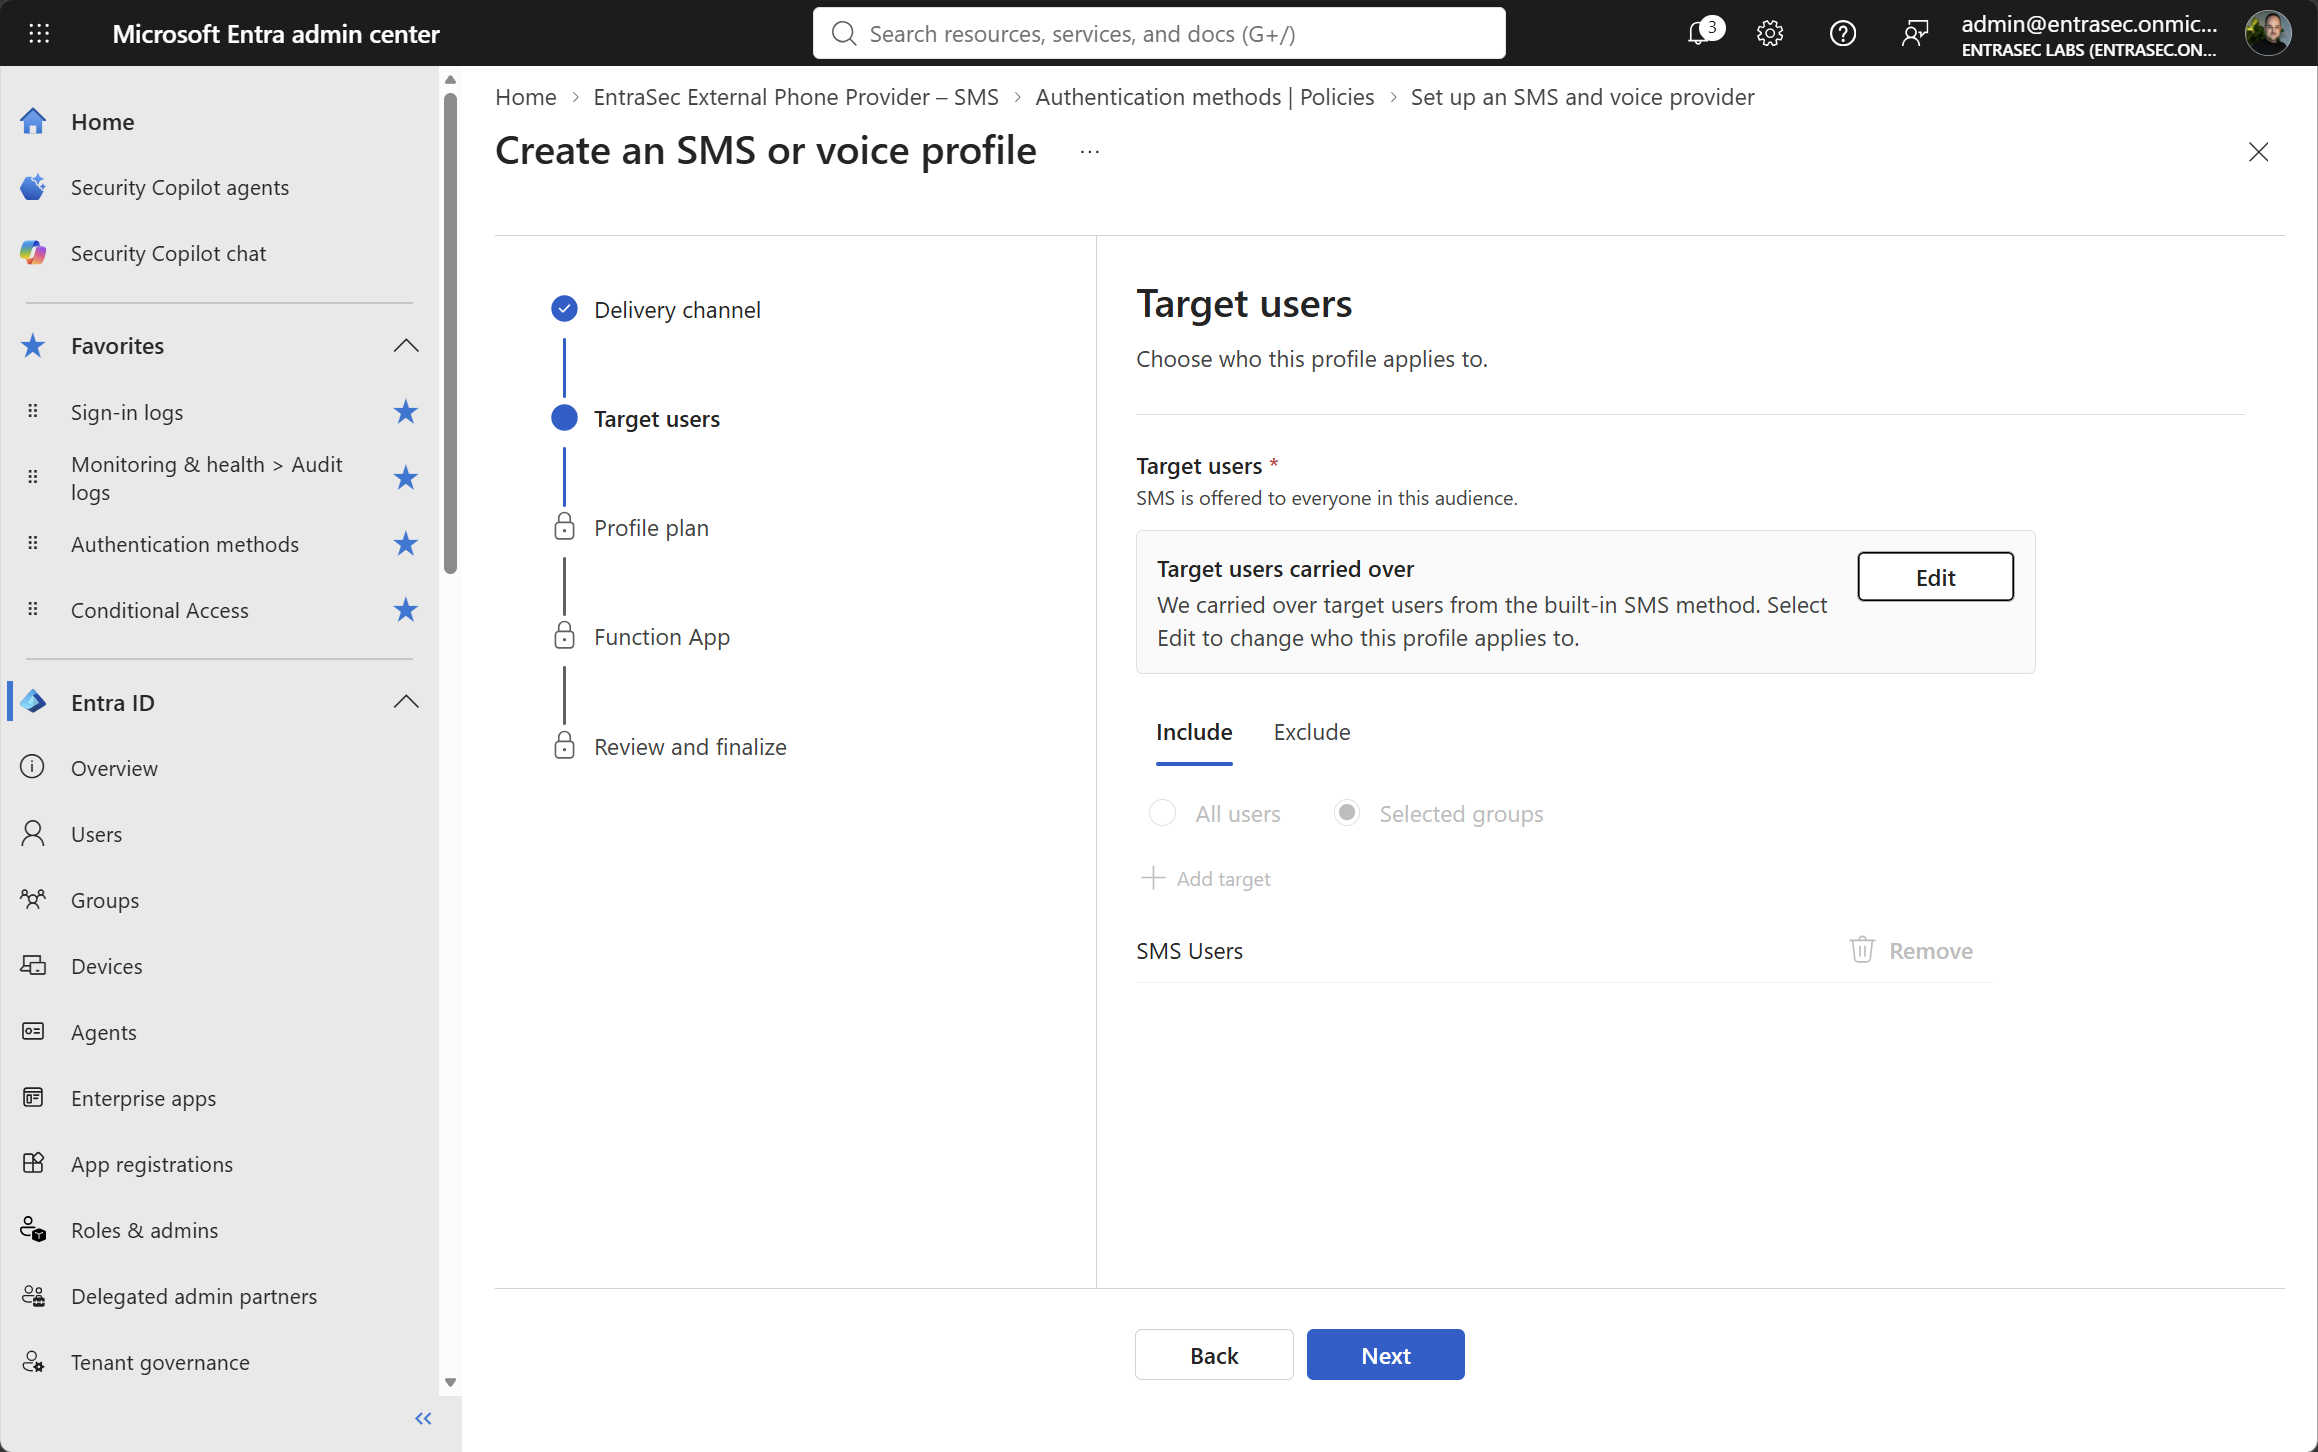
But evaluation does not call your provider. It proves the Entra-to-Function leg works and nothing about the Function-to-Soprano leg. Passing evaluation is not evidence that Soprano will deliver a message. Your first real provider test is switching to Production at a low percentage, so treat that as the actual go-live.
In my tenant, I go to Production straight away and split traffic 50/50.
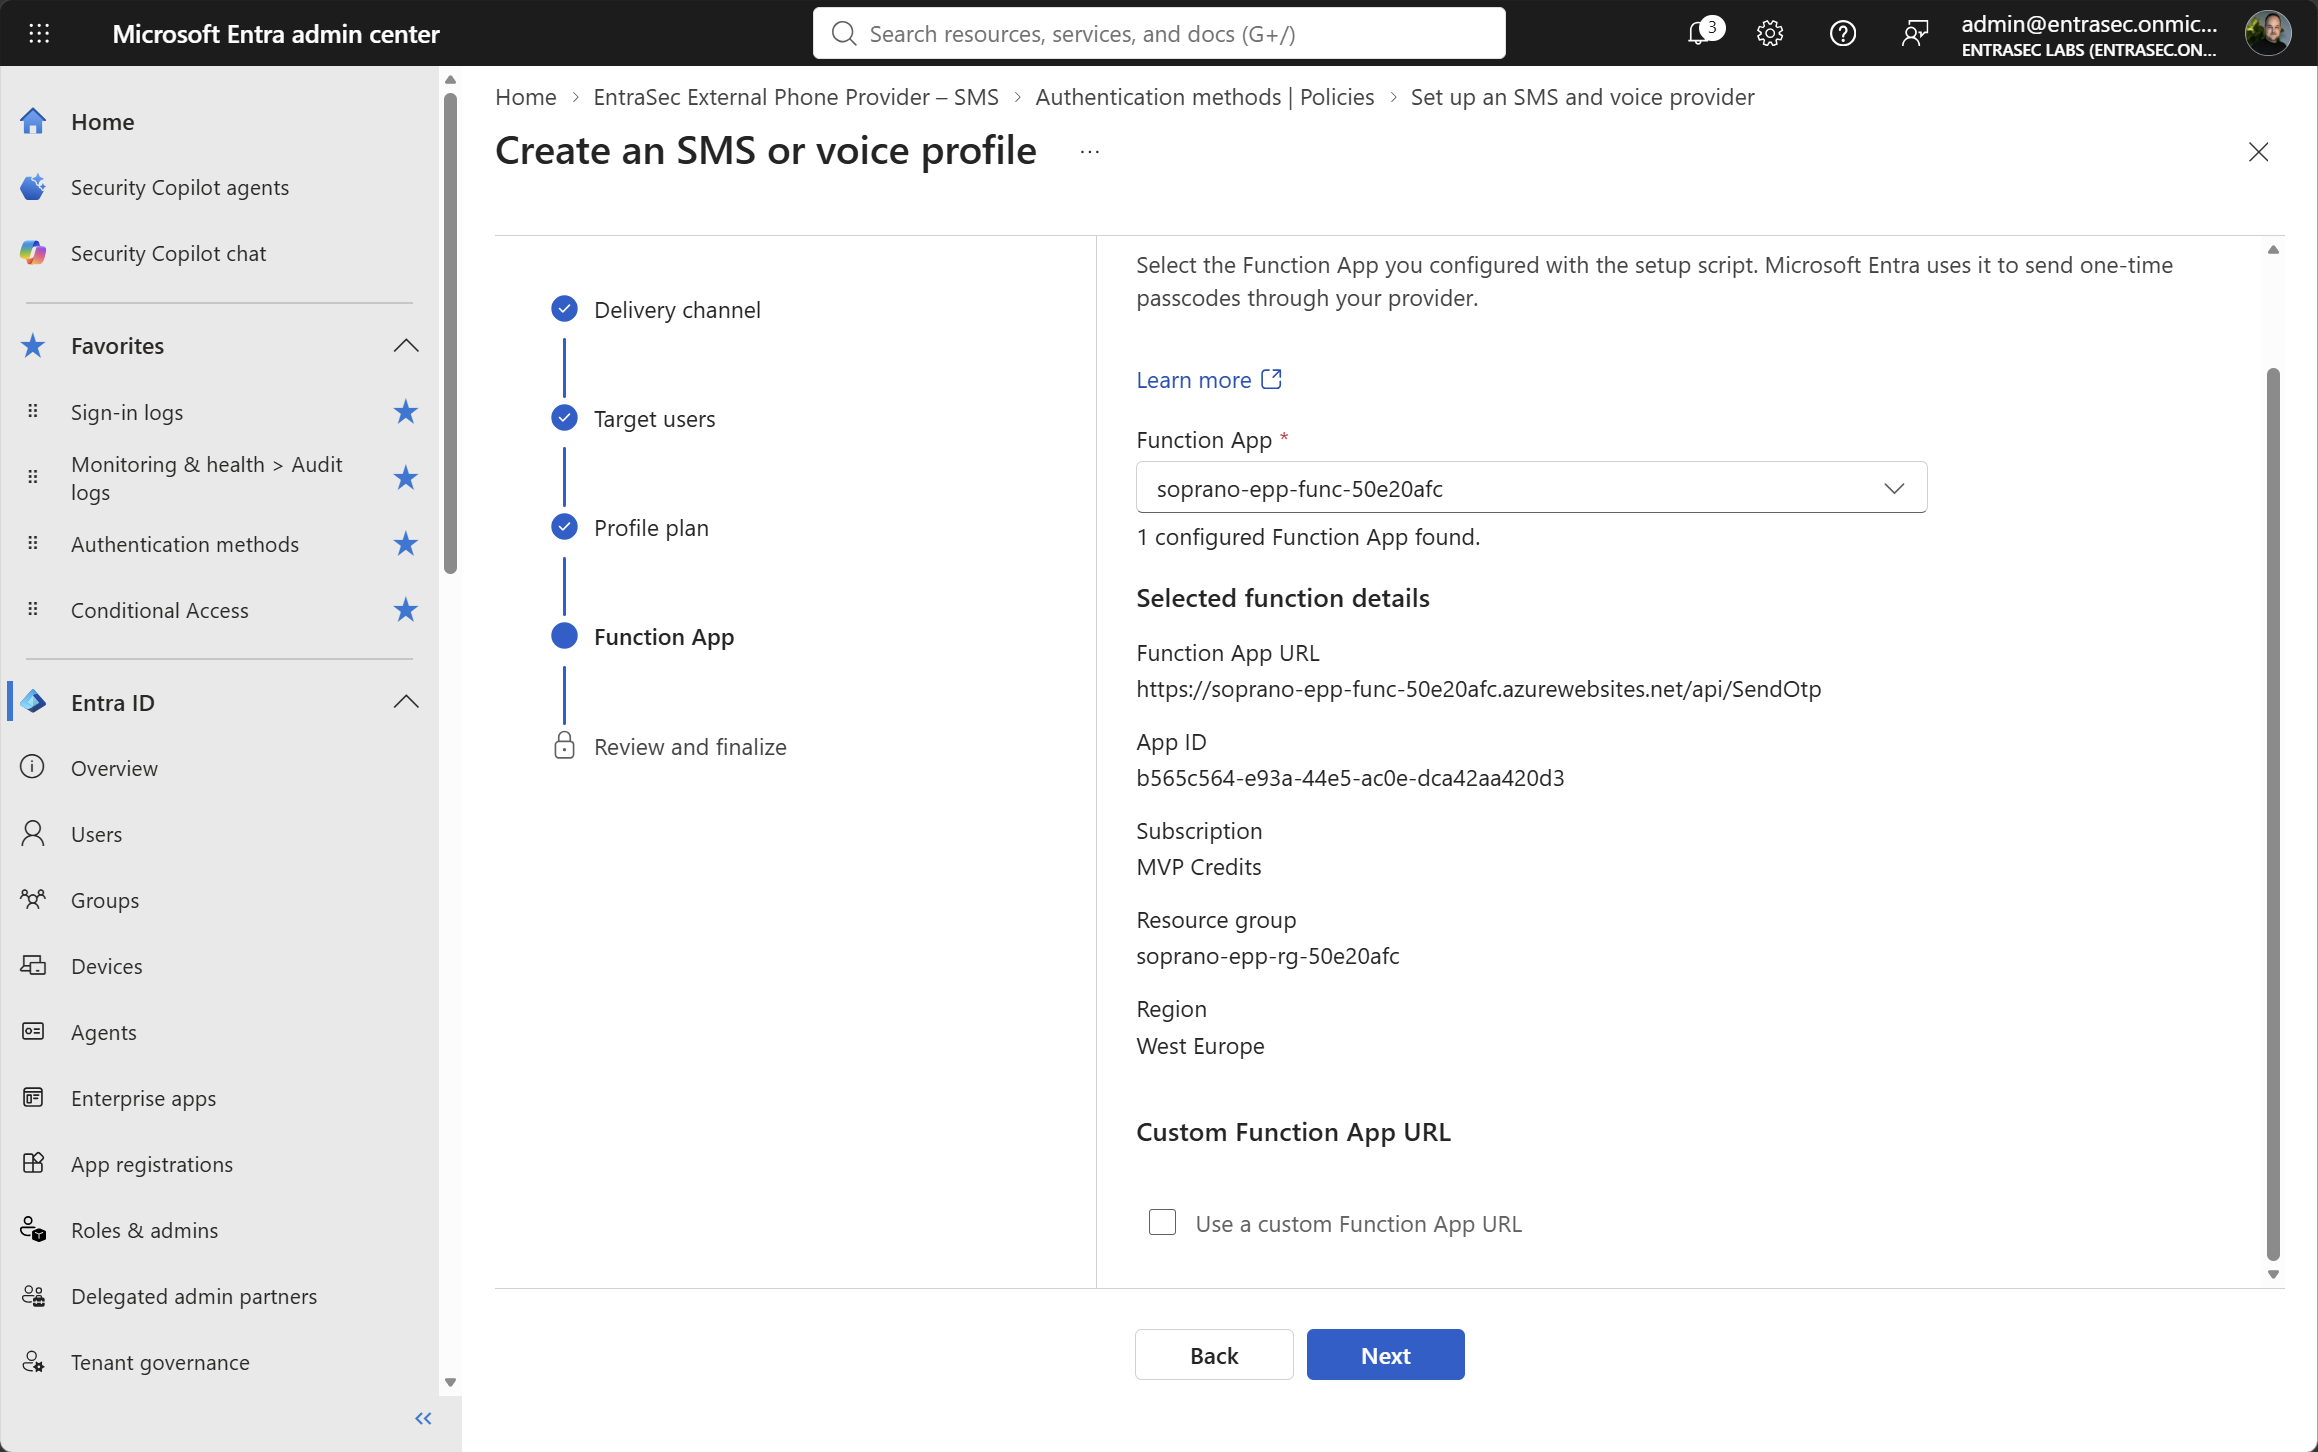
 4. Function App: select the deployed app. The wizard fills in the URL and app ID; compare them against your deployment summary.
 5. Review and finalize.
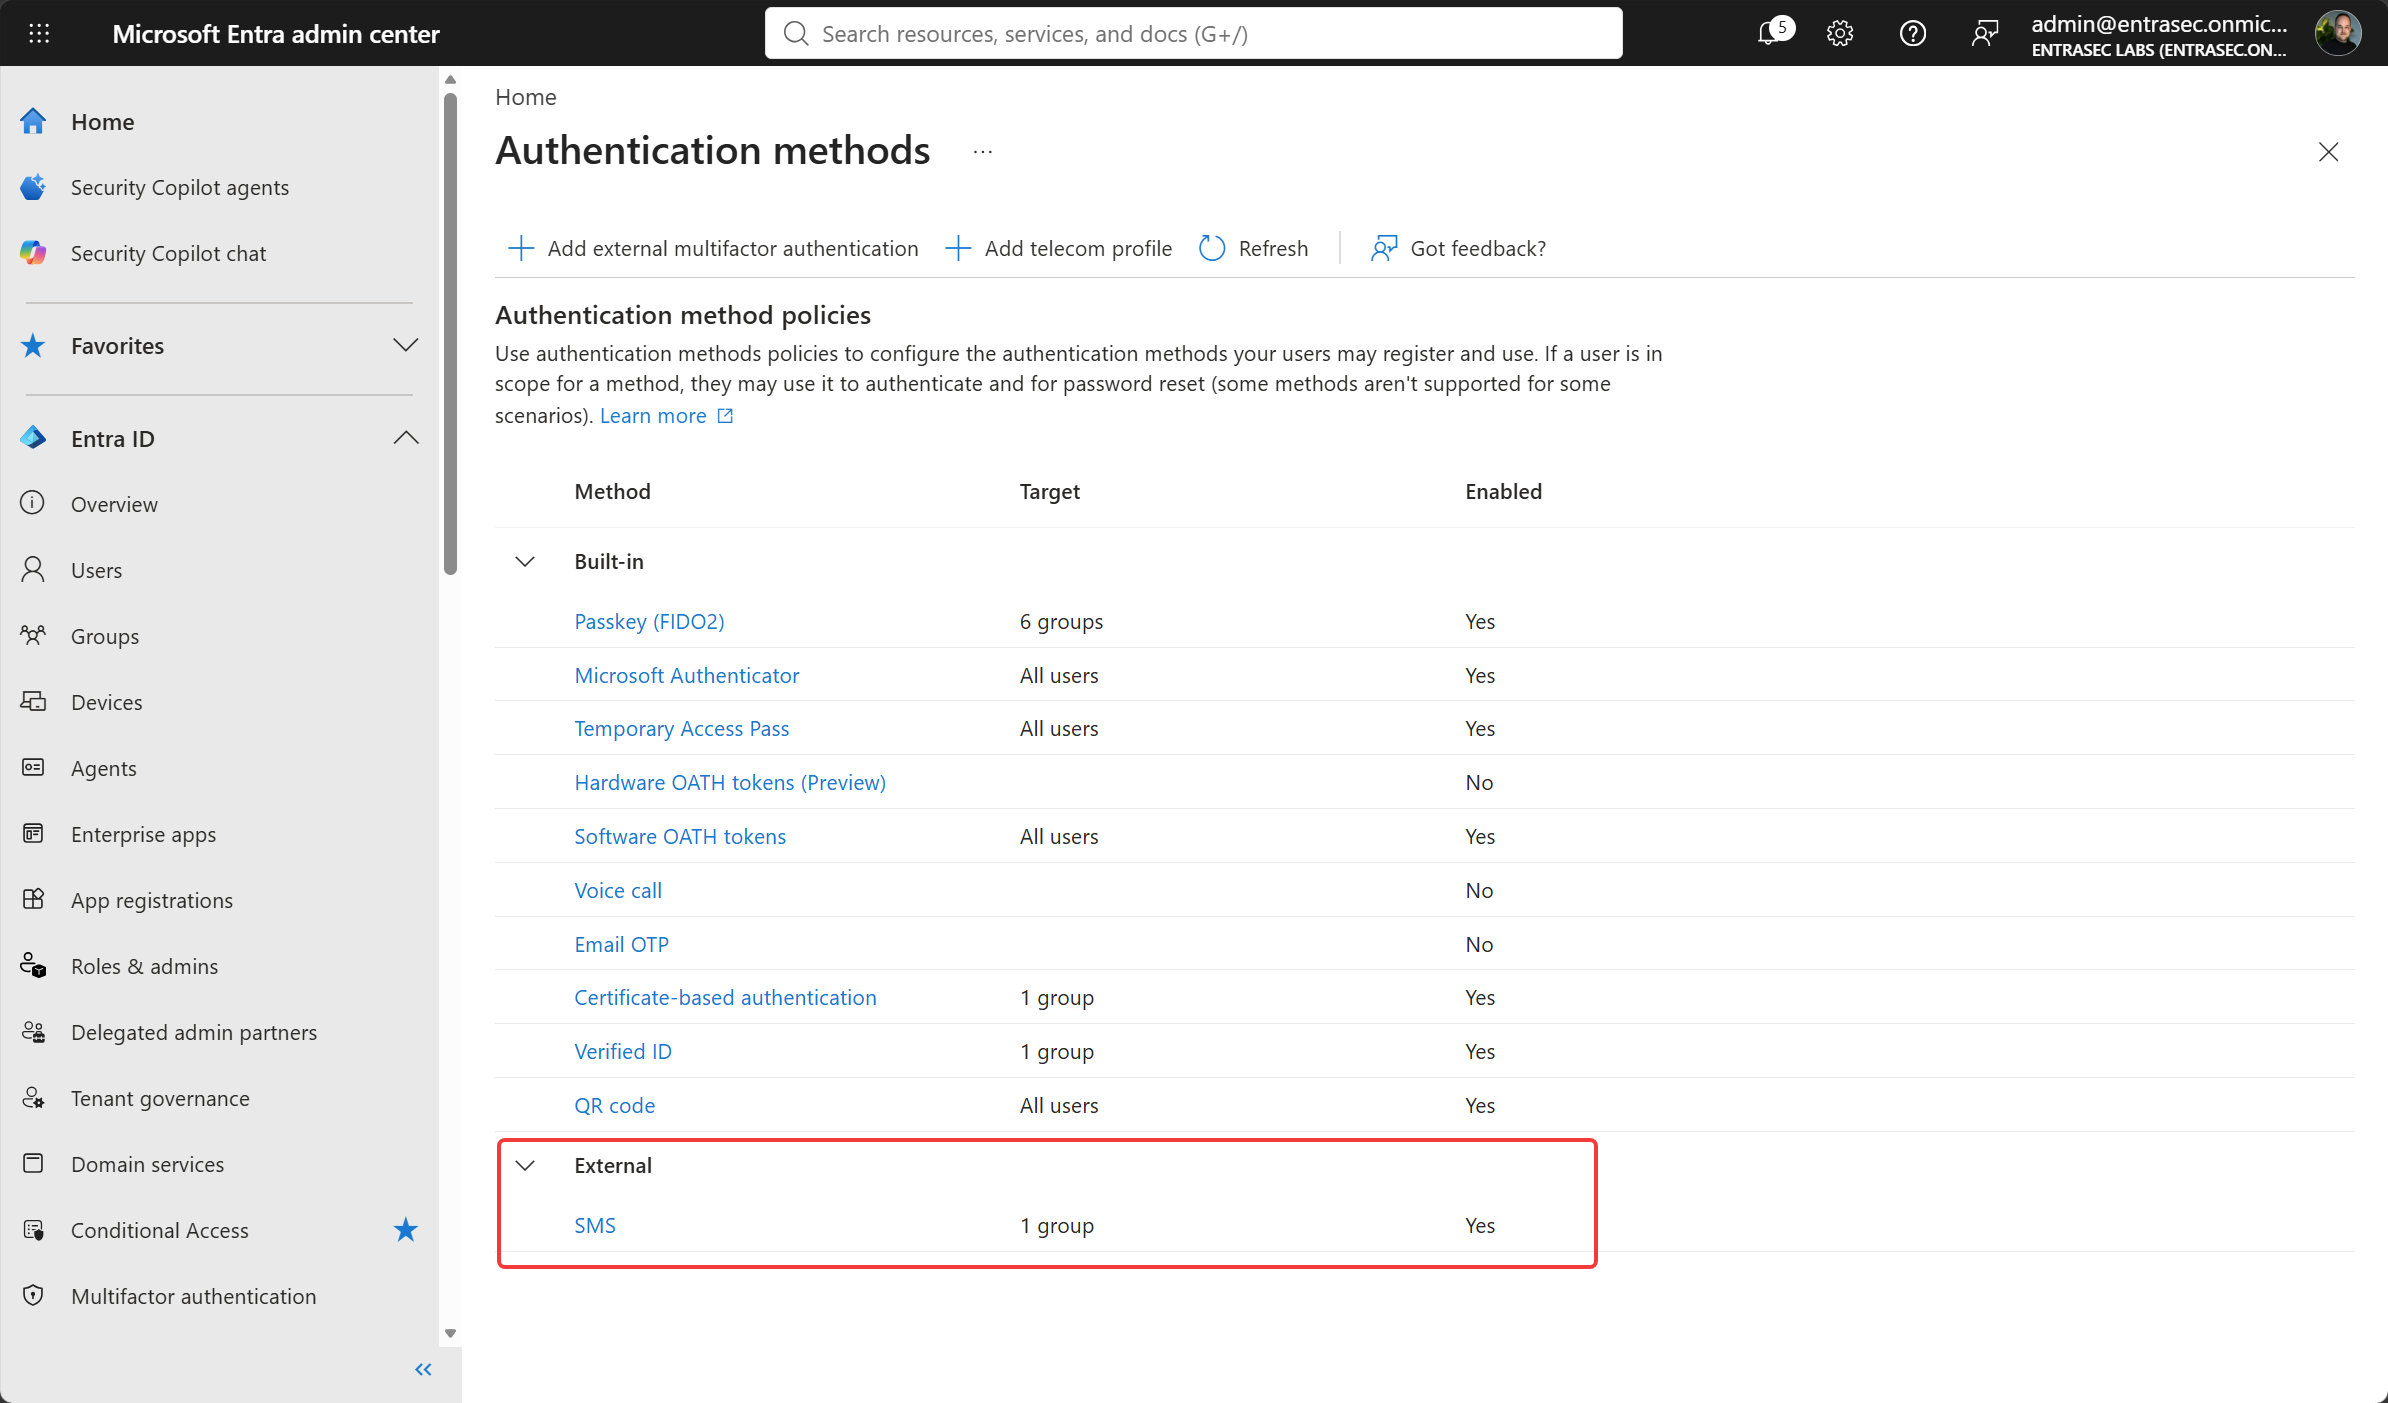
Once saved, the profile shows up on the Policies page under a new External heading, below the built-in methods, with its target and enabled state. That is your confirmation it took.
You can also check using Graph API:
GET https://graph.microsoft.com/beta/authenticationMethodsPolicy/authenticationMethodConfigurations/sms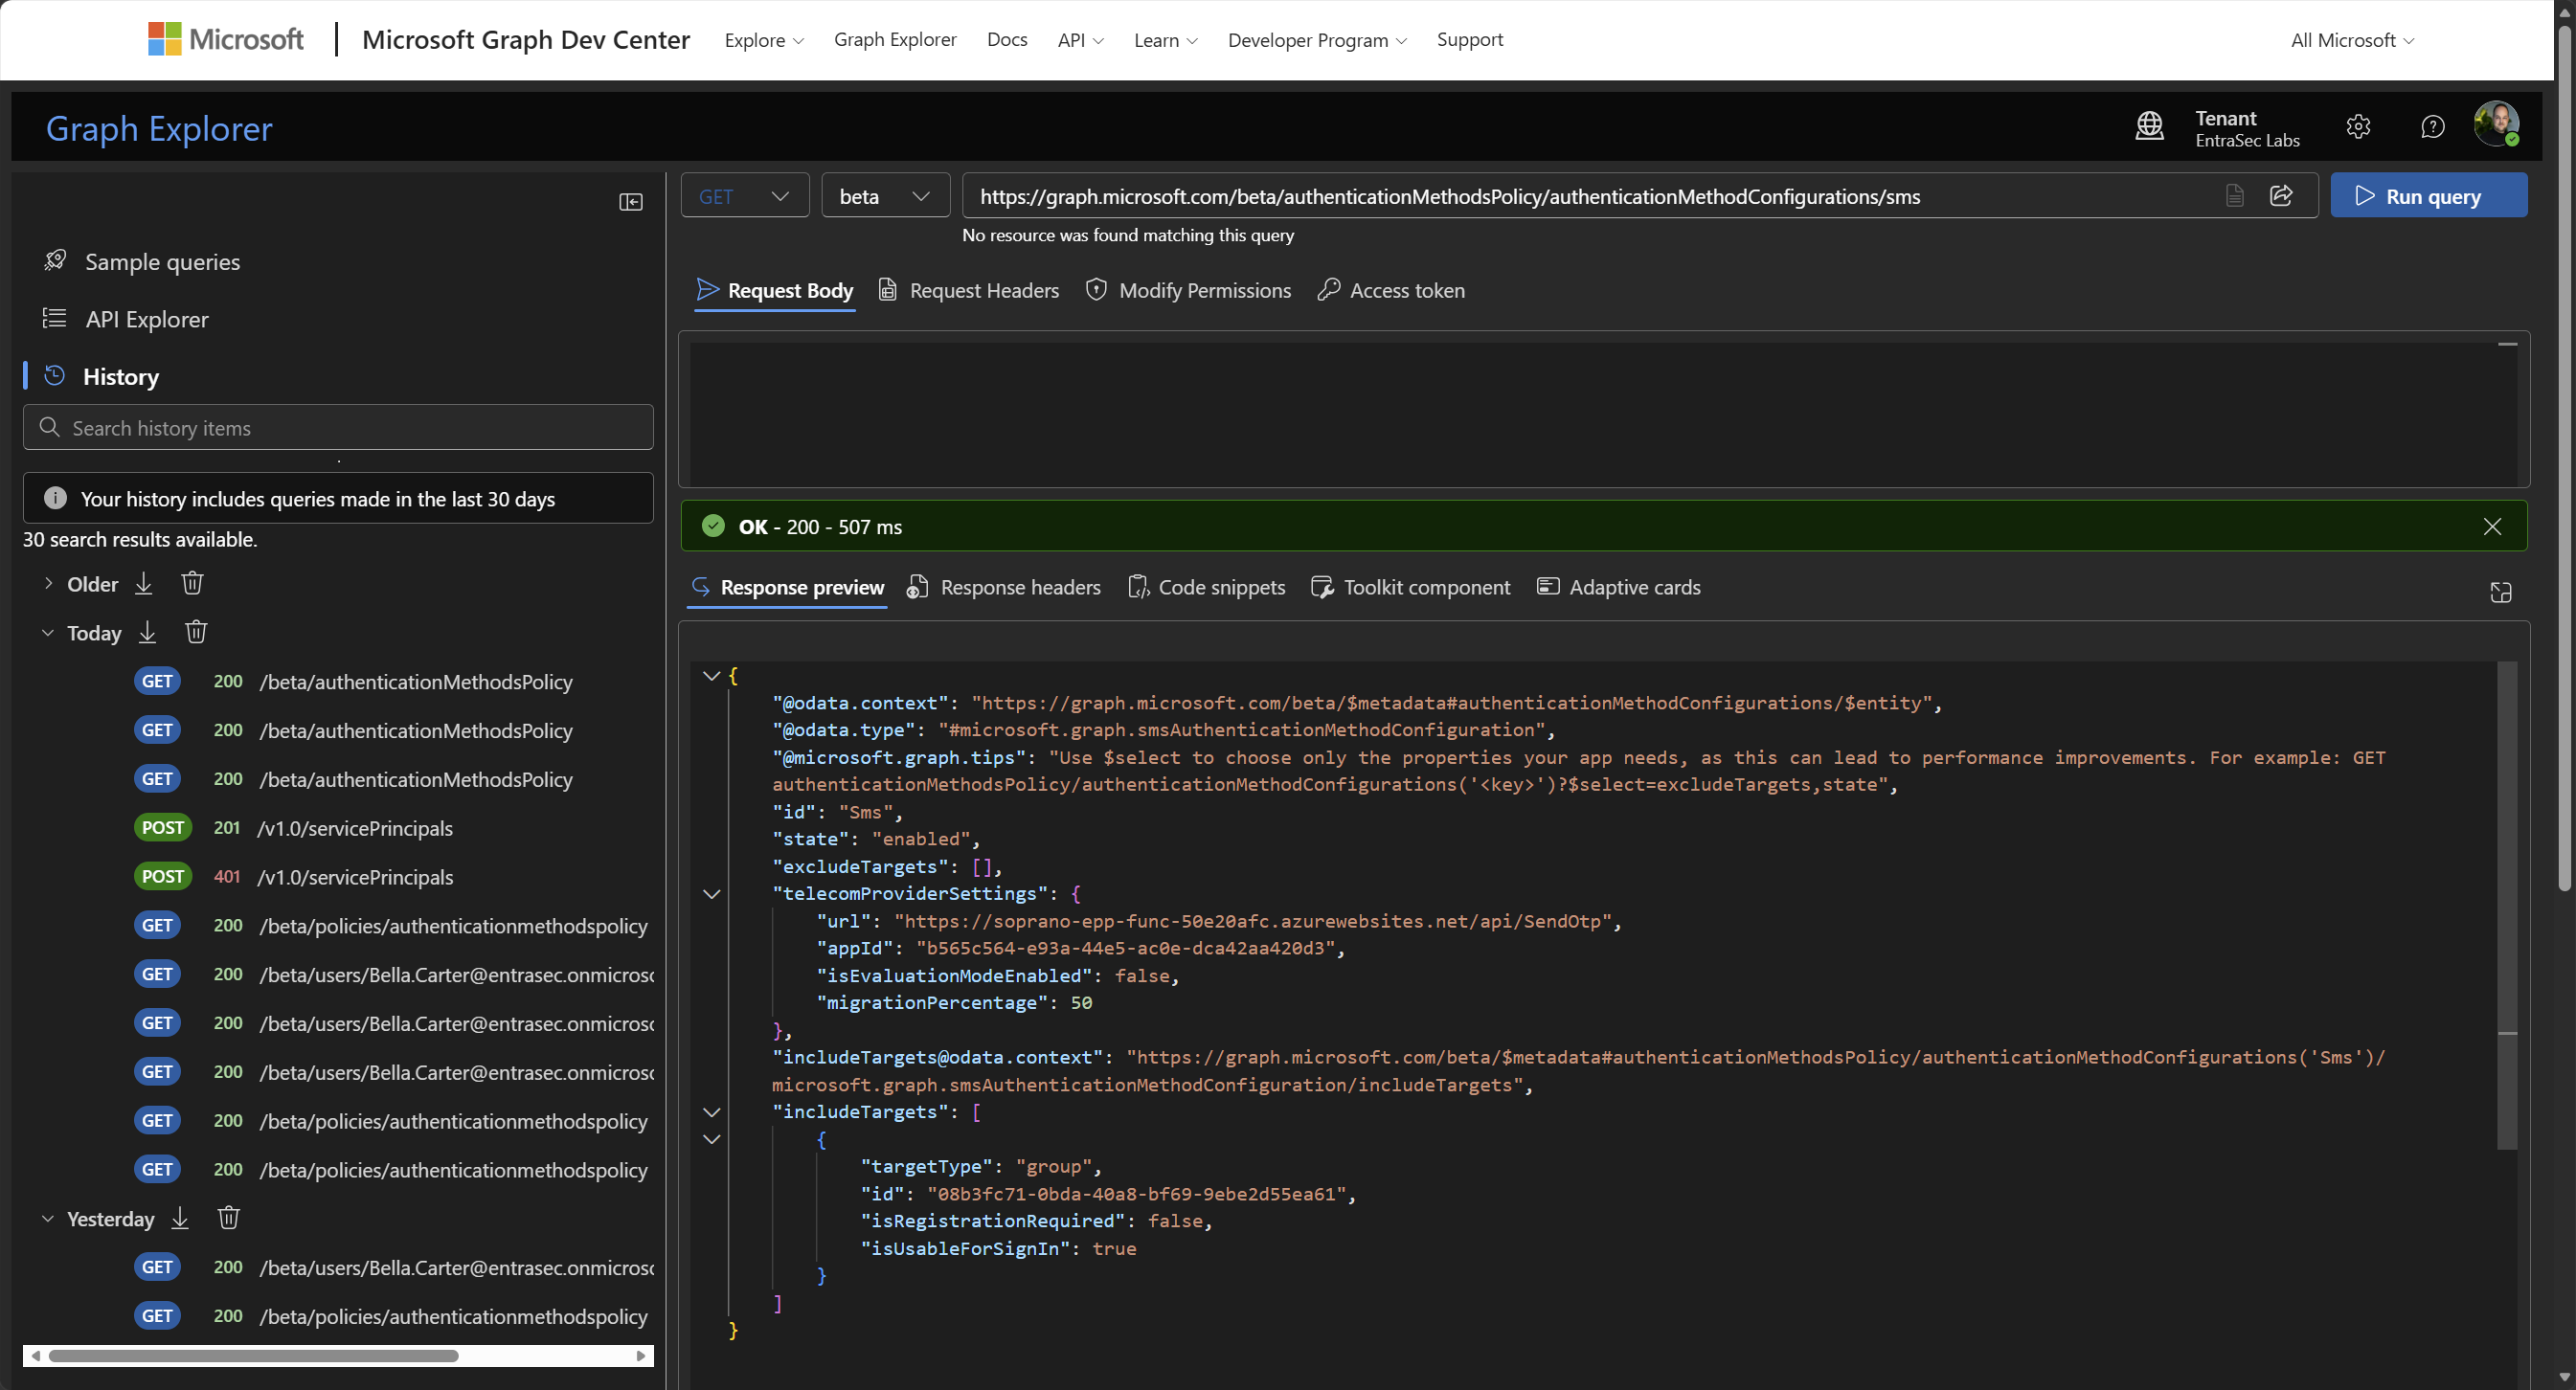
Warning: Target users are shared with your existing SMS and voice policy. Changing them here changes who gets SMS and voice MFA today. Leave production selections alone.
Note: Policy changes can take up to an hour. Mine was live within minutes, so do not sit on your hands. But if nothing arrives, rule this out before you start pulling the deployment apart.
Evaluation mode, and its limit#
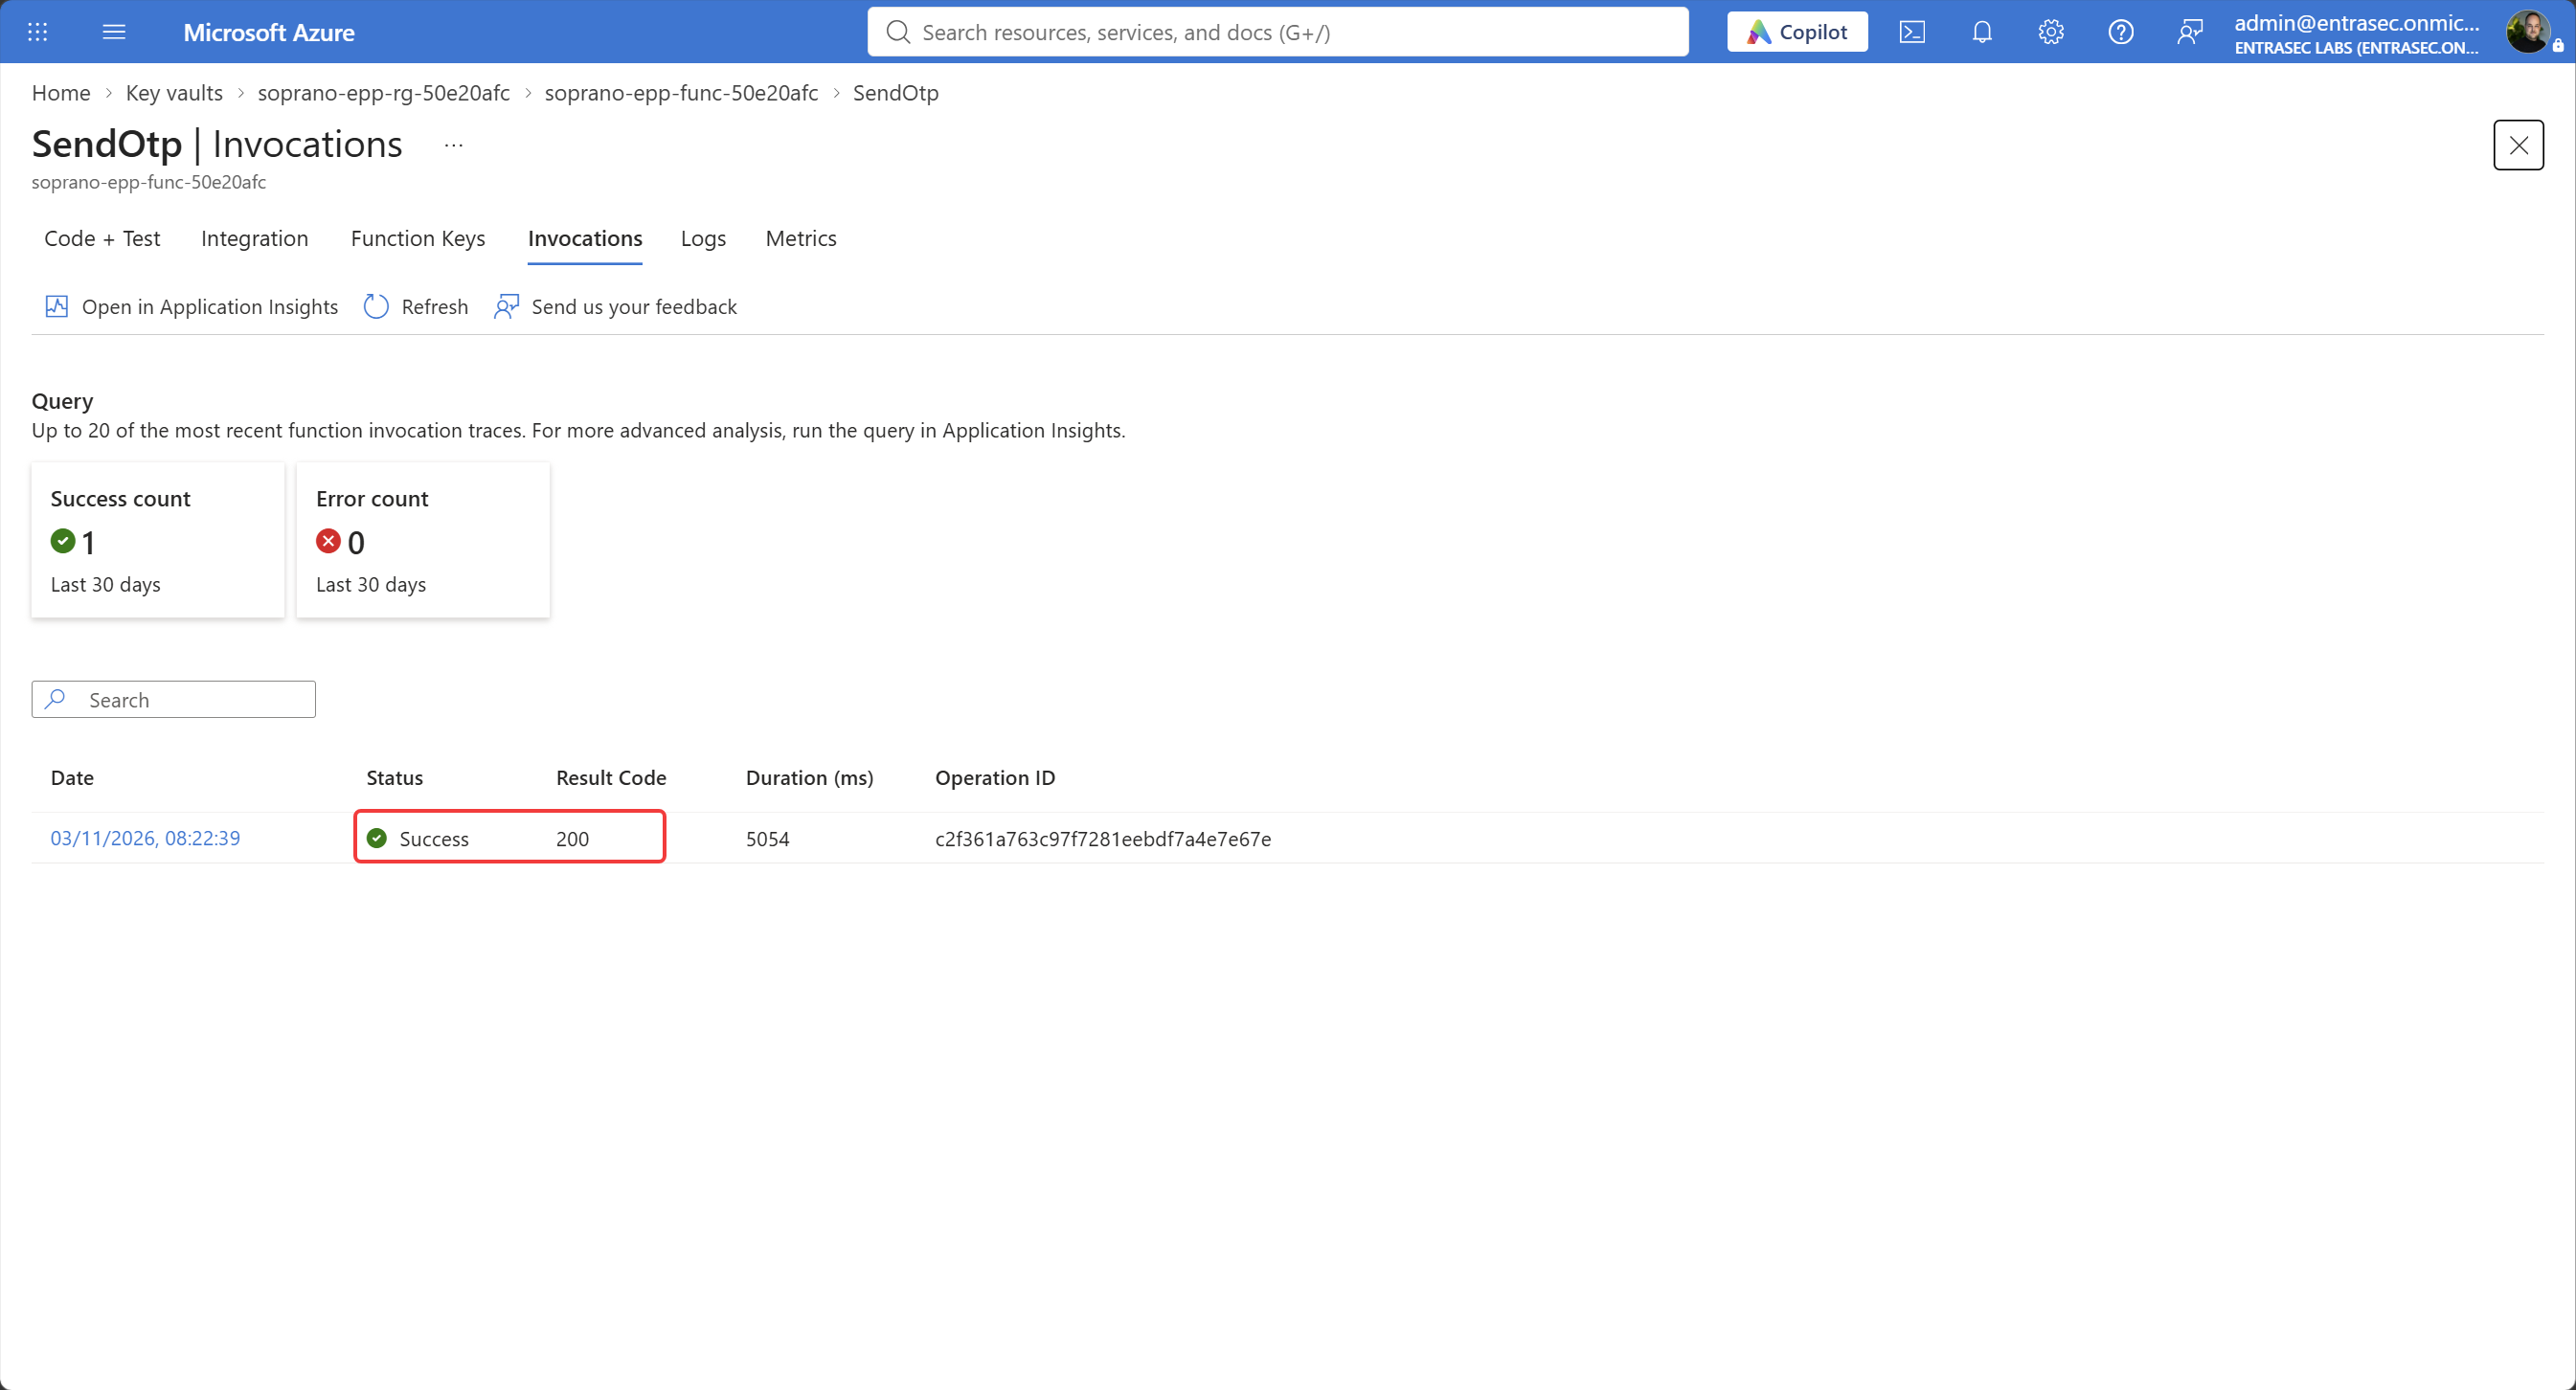
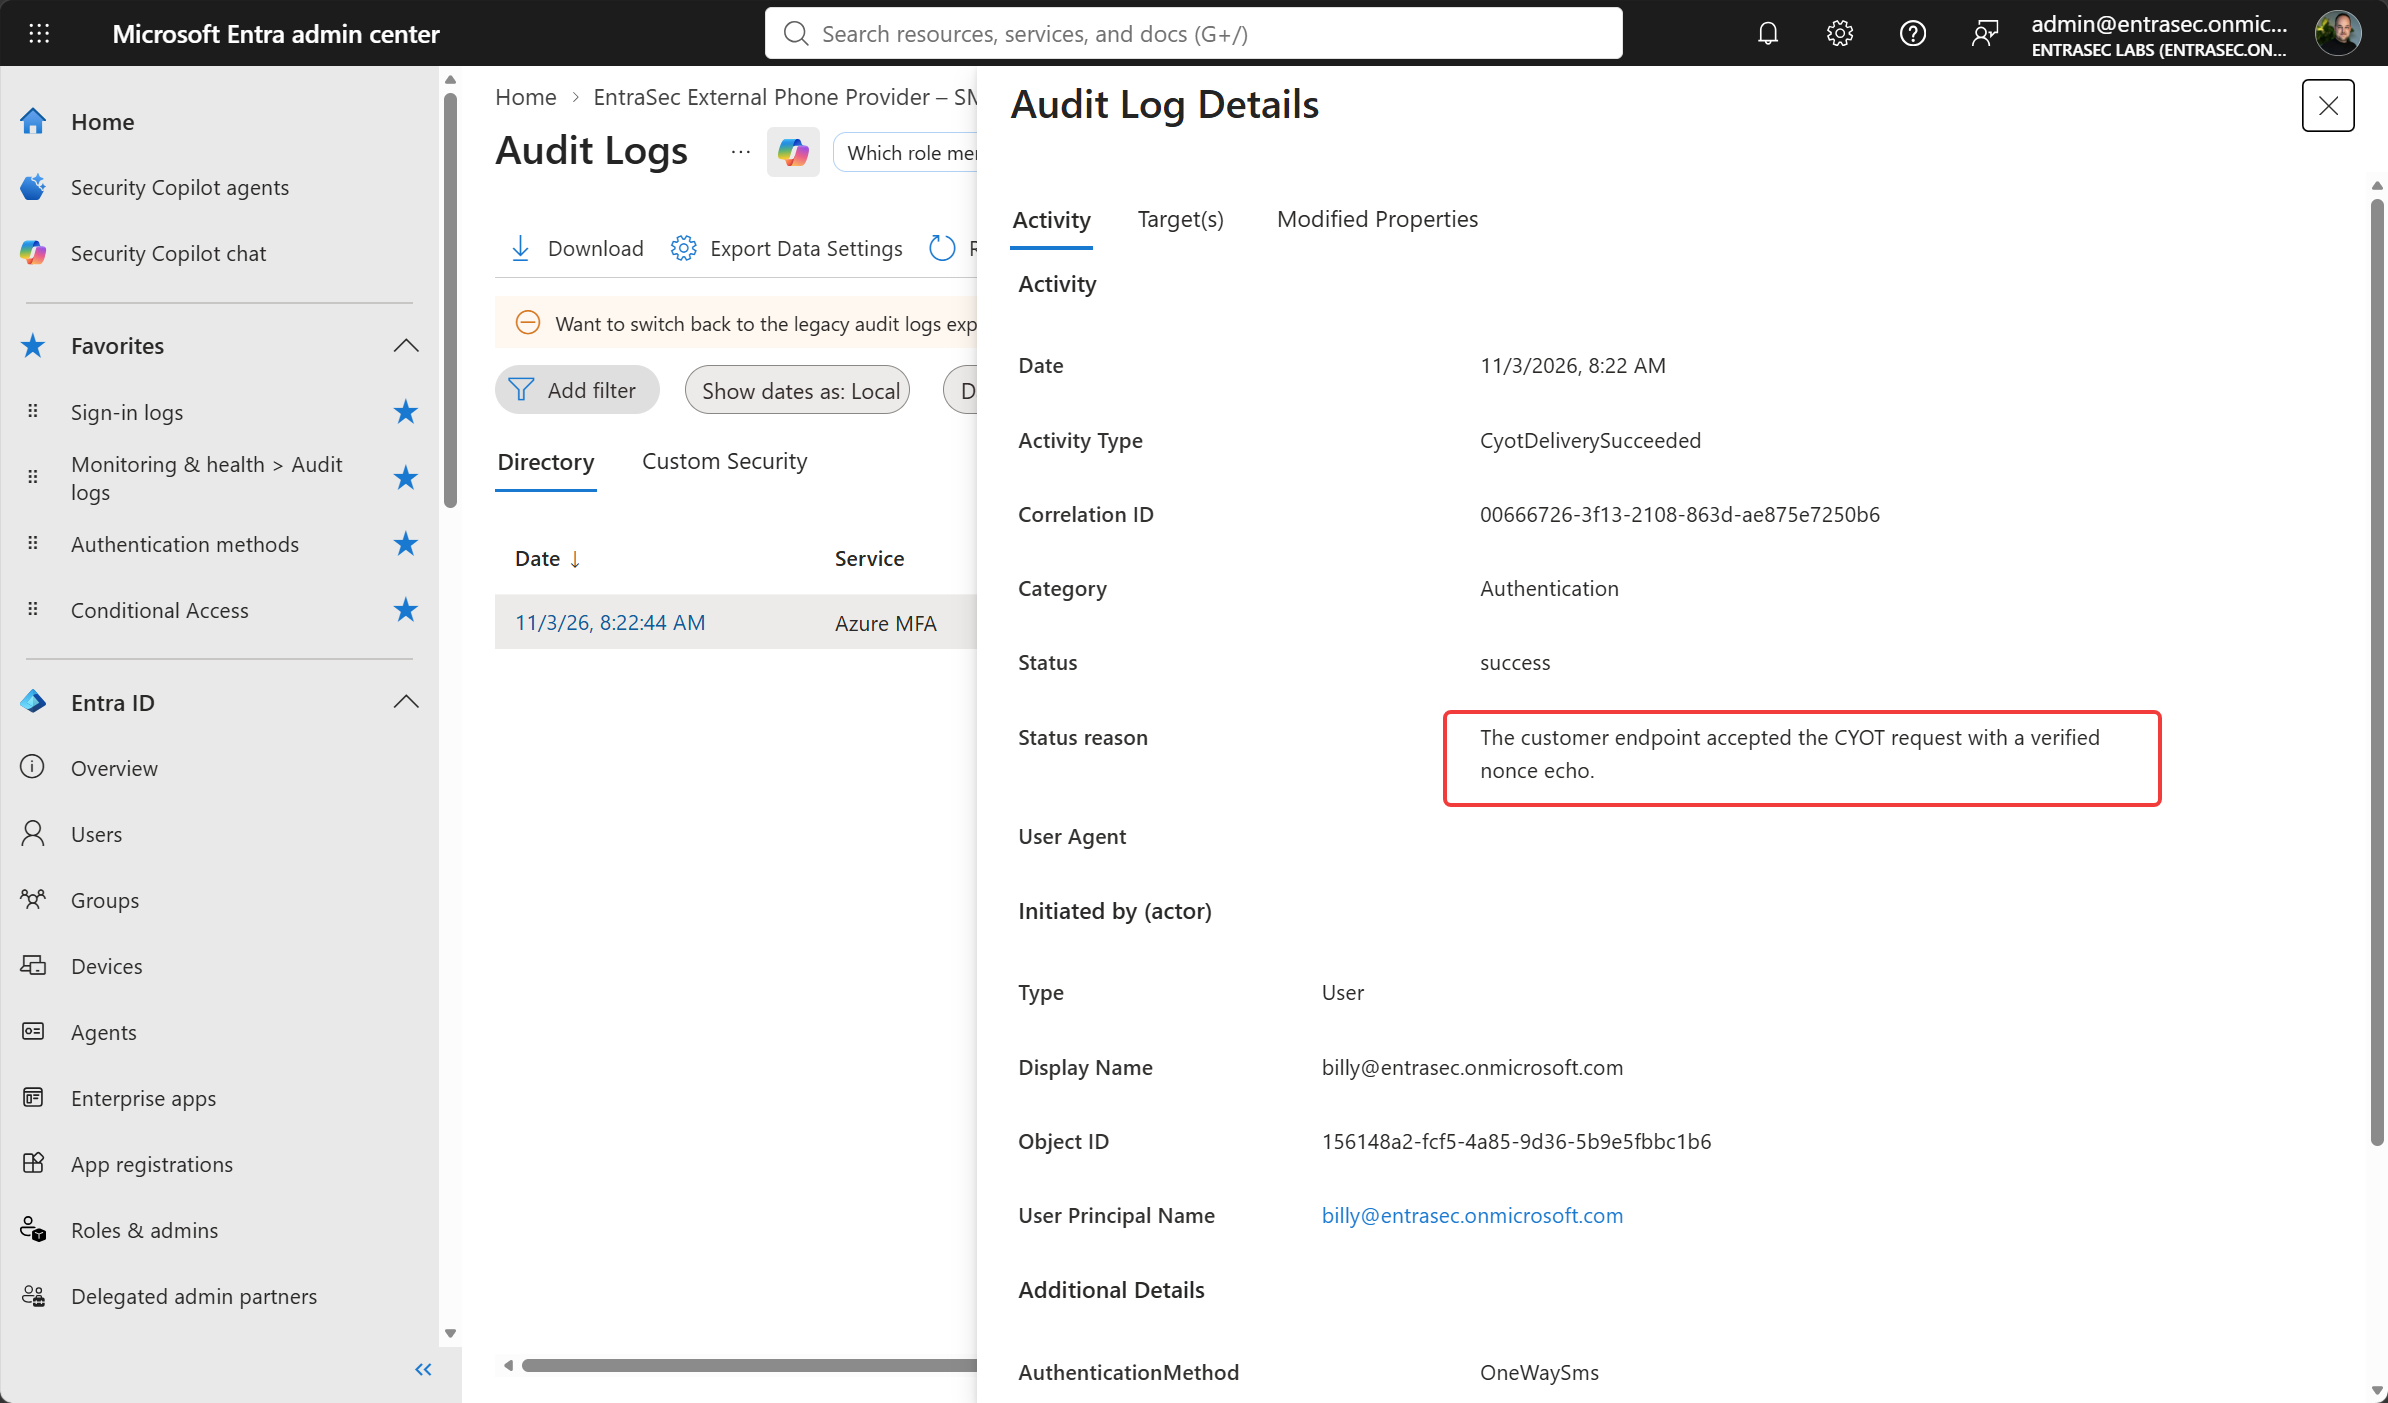
In Evaluation, Microsoft keeps delivering the real messages while your integration processes validation requests in parallel. Users are unaffected. Verify three things: sign in as a test user in an InPrivate session, check Function App > SendOtp > Invocations for Evaluation request completed with HTTP 200, and check Audit logs filtered to Service: Azure MFA for DeliveryMethod: CyotEvaluation.
Audit logs:
Let’s wrap up#
CYOT is more work than the SMS toggle it replaces. The responsibilities have changed. With CYOT, Microsoft keeps generating and validating the passcode and hands it to your endpoint. Everything past that handoff moves to you: the provider account and its contract, the security of the integration itself, and the fraud, destination, and spending controls that Microsoft previously applied on your behalf.
This article is a “quick” tutorial, but there are more parts to this, such as multi-region deployment using Azure Front Door, fraud protection, and LCM for the Azure and Entra parts. SMS and voice now become part of your operational IT.
Resources#
- Choose your own telephony provider
- Set up SMS and voice with your own telecom provider
- CYOT FAQ
- Plan for resiliency and high availability
- Protect against telephony fraud
- Monitor and troubleshoot
- Passkeys by default and retirement of Microsoft-provided SMS and voice
- ExternalPhoneProvider-AzureFunction-Sample and its cost calculator
- Soprano per-transaction offer
Comments
Comments load when you scroll here.